Introduction
Welcome to the gdnative book! This is a user guide for the Rust bindings to Godot 3.
Note that gdnative is not as actively maintained anymore as its successor, gdext. If you are interested in Godot 4, check out the gdext book.
If you're new to Rust, before getting started, it is highly recommended that you familiarize yourself with concepts outlined in the officially maintained Rust Book before you getting started with godot-rust.
Navigating this chapter
If you're new to godot-rust, try the Getting Started tutorial first!
For more information about architecture with godot-rust, the GDNative Overview gives a broad overview of how the library can be used with different use-cases, as well as in-depth information for the underlying API.
If you have specific code questions that are not covered in the Getting Started guide, please check out the Frequently Asked Questions or Recipes for some additional resources related to configuring godot-rust.
In case you are coming from earlier versions of godot-rust and would like to update, you can have a look at the Advanced Guides chapter for migration guides.
About godot-rust
This project specifically supports the Rust Programming Language bindings to both [GDNative] and [GDExtension] APIs, for the Godot engine versions 3 and 4, respectively.
Outside of personal preference, Rust may be a good choice for your game for the following reasons:
- Native levels of performance.
- Memory safety validated at compile time.*
- Fearless Concurrency.*
- The cargo build system and dependency management.
- The ability to leverage Rust's crate ecosystem from crates.io.
*: Compile time memory and thread safety guarantees only apply to the Rust code. As the user is allowed to call into the Godot engine (C++ code, via GDNative Foreign Function Interface) or into user-defined scripts (GDScript), some of the validity checks are outside godot-rust's control. However, godot-rust guides the user by making clear which operations are potentially unsafe.
Terminology
To avoid confusion, here is an explanation of names and technologies used within the book.
- GDNative: C API provided by Godot 3.
- GDExtension: C API provided by Godot 4.
- godot-rust: The entire project, encompassing Rust bindings for Godot 3 and 4, as well as related efforts (book, community, etc.).
- gdnative (lowercase): the Rust binding for GDNative (Godot 3).
- gdext (lowercase): the Rust binding for GDExtension (Godot 4).
- Extension: An extension is a C library developed using gdext. It can be loaded by Godot 4.
Showcase
If you would like to know about games and other projects in which godot-rust has been employed, check out the Projects chapter. At the moment, this is mostly referring to projects built with the Godot 3 bindings, due to their maturity.
Contributing
The source repository for this book is hosted on GitHub.
License
The GDNative bindings and this user guide are licensed under the MIT license. The GDExtension bindings are licensed under the Mozilla Public License 2.0.
Getting Started
The getting started tutorial will introduce you to basic godot-rust concepts. At the end of the tutorial, you'll have a working copy of the dodge-the-creeps example from the main repo.
This tutorial assumes some experience with Godot's GUI and GDScript. It assumes a basic understanding of Rust itself.
Work-in-progress
The Getting Started tutorial is a work-in-progress, and currently it only covers up to the hello-world example! To learn more about the API after the tutorial, you'll have to dive into the documentation on docs.rs, and the other examples in the main repo. If you have any questions using the bindings, ask away in the #gdnative_dev channel on the Godot Engine community Discord server!
Setup
Before we can start creating a hello-world project using godot-rust, we'll need to install the necessary software.
Godot Engine
The default API version is currently 3.2.3-stable. For the rest of the tutorial, we'll assume that you have Godot 3.2.3-stable installed, and available in your PATH as godot.
You may download binaries of Godot 3.2.3-stable from the official repository: https://godotengine.org/download/archive/3.2.3-stable/.
Using another build of the engine
For simplicity, we assume that you use the official build of 3.2.3-stable for the Getting Started tutorial. If you want to use another version of the engine, see the Using custom builds of Godot guide.
Rust
rustup is the recommended way to install the Rust toolchain, including the compiler, standard library, and Cargo, the package manager. Visit https://rustup.rs/ to see instructions for your platform.
After installation of rustup and the stable toolchain, check that they were installed properly:
# Check Rust toolchain installer version
rustup -V
# Check Rust version
rustc --version
# Check Cargo version
cargo -V
Windows
When working on Windows, it's also necessary to install the Visual Studio Build Tools, or the full Visual Studio (not Visual Studio Code). More details can be found on Working with Rust on Windows. Note that LLVM is also required on top of those dependencies to build your godot-rust project, see the next section for more information.
LLVM
The godot-rust bindings depend on bindgen, which in turn depends on LLVM. You may download LLVM binaries from https://releases.llvm.org/.
After installation, check that LLVM was installed properly:
# Check if Clang is installed and registered in PATH
clang -v
bindgen may complain about a missing llvm-config binary, but it is not actually required to build the gdnative crate. If you see a warning about llvm-config and a failed build, it's likely that you're having a different problem!
Using the template
One way to get started with godot-rust is a full-fledged (inofficial) template, which can be found here to get you started right away. All the boilerplate stuff is already done for you, however, using the template requires you to set up extra dependencies and toolchains. Check out the wiki for instructions on how to get started with the template.
The template is not maintained by us, and might not work in all setups where the base library would be compatible. If you encounter any issues with the template, please report them at its issue tracker.
Hello, world!
Follow this tutorial to learn how to create an empty project that simply prints "Hello, world!" to the Godot console on ready. The code might not compile or work as intended while it's in-progress, but at the end of this section, the code will be compiling and working fine.
The full, finished code is available in the main repo: https://github.com/godot-rust/godot-rust/tree/master/examples/hello-world.
Creating the project
First, create an empty project using the Godot GUI. Then, create an empty crate beside the project folder using cargo:
cargo init --lib my-gdnative-lib
Your file structure should look like this:
.
├─── my-gdnative-lib
│   ├─── src
│   │   ├   lib.rs
│   ├   Cargo.toml
├─── my-godot-project
│   ├─── .import
│   ├   icon.png
│   ├   icon.png.import
│   └   project.godot
Once the project is created, open Cargo.toml, change the crate type to cdylib, and add gdnative as a dependency:
[lib]
crate-type = ["cdylib"]

[dependencies]
gdnative = "0.10"
Organization of Rust code
While it's also possible to place the Rust crate within the Godot project, doing so might lead to problems with Godot's resource importer. It's best to place the Rust crate somewhere outside the Godot project directory.
Previously, some third-party resources have recommended separating Rust code into multiple crates. While this is fine to do, godot-rust works best when there is a single
cdylibcrate acting as the entry point for all crates in the workspace. Script downcasting, for example, only works for types registered in the same GDNative library. Code fromstdand other dependencies can also lead to code bloat when duplicated in multiple binaries.We suggest that users start projects as a single crate, and only split code into workspaces when necessary.
Boilerplate
You should now be able to compile your crate into a dynamic library, but a little bit of boilerplate is required before Godot can actually be able to load it as a GDNative library. Replace the contents of lib.rs with the following code:
#![allow(unused)]
fn main() {
use gdnative::prelude::*;

// Function that registers all exposed classes to Godot
fn init(handle: InitHandle) {
}

// Macro that creates the entry-points of the dynamic library.
godot_init!(init);
}
The code does several things:
#![allow(unused)]
fn main() {
use gdnative::prelude::*;
}
This imports a number of commonly used types and traits into the scope. Generally, you'll want this at the top of every file where you need to interact with GDNative.
#![allow(unused)]
fn main() {
// Function that registers all exposed classes to Godot
fn init(handle: InitHandle) {
}
}
This declares an empty callback function, which is called when the library is loaded by Godot. All script classes in the library should be "registered" here using handle.add_class::<MyNativeClass>(). You only need one of this in the entire library.
#![allow(unused)]
fn main() {
// Macro that creates the entry-points of the dynamic library.
godot_init!(init);
}
This macro defines the necessary C callbacks used by Godot. You only need one invocation of this macro in the entire library. Note how the init function defined earlier is given to the godot_init! macro as a callback.
GDNative internals
The purposes of this macro will be discussed in detail in An Overview of GDNative. For now, treat it as a magic incantation.
Your first script
With the boilerplate put into place, you can now create your first Rust script! We will go step by step and discover what's needed to create script "classes". Intermediate code versions might not compile, but at the end of this section it should be working!
A script is simply a Rust type that implements (derives) the NativeClass trait:
#![allow(unused)]
fn main() {
/// The HelloWorld "class"
#[derive(NativeClass)]
#[inherit(Node)]
pub struct HelloWorld;

// Function that registers all exposed classes to Godot
fn init(handle: InitHandle) {
    // Register the new `HelloWorld` type we just declared.
    handle.add_class::<HelloWorld>();
}
}
Similar to the GDScript extends directive, the inherit attribute tells godot-rust the most general base class your script can be attached to. Here, Node is the parent class of all nodes in the scene tree, so it would be possible to attach HelloWorld to any node or scene in Godot.
Unfortunately, this won't compile just yet: Rust will complain about the lack of a new method and a NativeClassMethods trait. This is because all scripts must also have a zero-argument constructor and a set of exported methods. To fix this, simply add two impl blocks:
#![allow(unused)]
fn main() {
// You may add any number of ordinary `impl` blocks as you want. However, ...
impl HelloWorld {
    /// The "constructor" of the class.
    fn new(_base: &Node) -> Self {
        HelloWorld
    }
}

// Only __one__ `impl` block can have the `#[methods]` attribute, which
// will generate code to automatically bind any exported methods to Godot.
#[methods]
impl HelloWorld {
}
}
The HelloWorld type is like any regular Rust type, and can have any number of ordinary impl blocks. However, it must have one and only one impl block with the #[methods] attribute, which tells godot-rust to generate code that automatically binds any exported methods to Godot.
Creating the NativeScript resource
You should now be able to build the dynamic library with a HelloWorld script class in it. However, we also need to tell Godot about it. To do this, build the library with cargo build.
After building the library with cargo build, the resulting library should be in the target/debug/ folder. Copy it (or create a symbolic link to it) somewhere inside the Godot project directory.
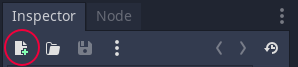
To tell Godot about the HelloWorld class, a GDNativeLibrary resource has to be created. This can be done in the "Inspector" panel in the Godot editor by clicking the "new resource" button in the top left.
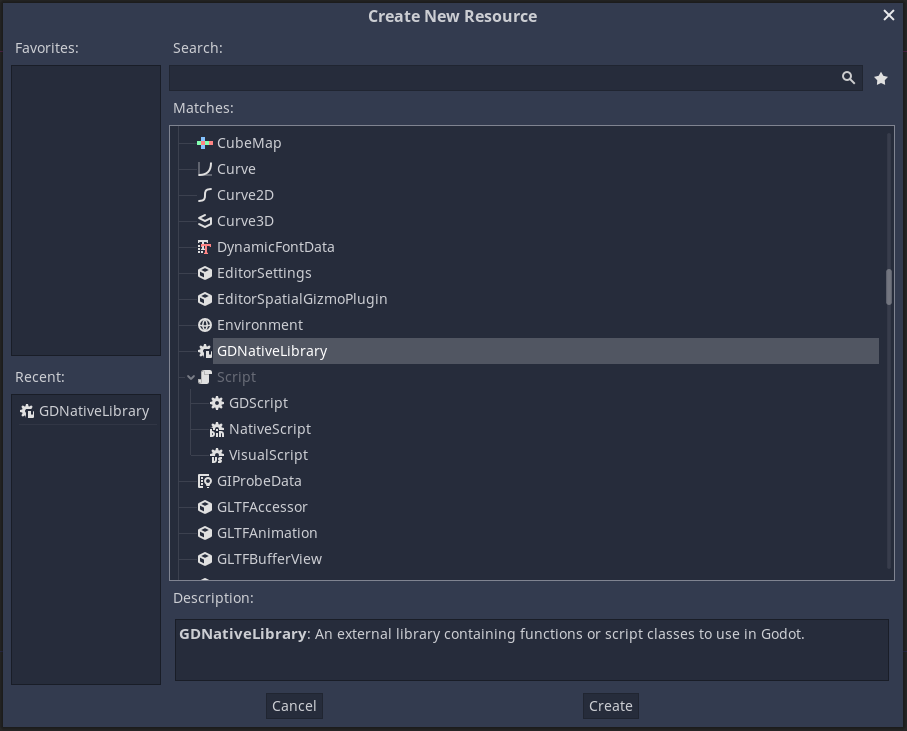
With the GDNativeLibrary resource created, the path to the generated binary can be set in the editor.

After specifying the path, save the GDNativeLibrary resource. Be sure to change the file type to GDNLIB.

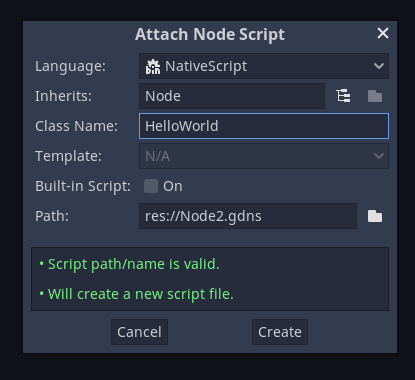
Now, the HelloWorld class can be added to any node by clicking the "attach script" button.

In the popup, select "NativeScript" as the language, and set the class name to HelloWorld.
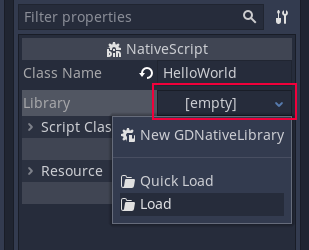
Then, select the NativeScript resource in the Inspector, click the library field and point to the GDNativeLibrary resource that you created earlier.
Overriding a Godot method
You can now run your project from the editor! If all goes correctly, it should launch but do nothing. That's because we haven't added any actual behaviors yet! To make our script actually do something, we can override the _ready method in the impl block with the #[methods] attribute:
#![allow(unused)]
fn main() {
// Only __one__ `impl` block can have the `#[methods]` attribute, which
// will generate code to automatically bind any exported methods to Godot.
#[methods]
impl HelloWorld {

    // To make a method known to Godot, use the #[method] attribute.
    // In Godot, script "classes" do not actually inherit the parent class.
    // Instead, they are "attached" to the parent object, called the "base".
    //
    // If access to the base instance is desired, the 2nd parameter can be
    // annotated with #[base]. It must have type `&T` or `TRef<T>`, where `T`
    // is the base type specified in #[inherit]. If you don't need this parameter,
    // feel free to omit it entirely.
    #[method]
    fn _ready(&self, #[base] base: &Node) {
        // The `godot_print!` macro works like `println!` but prints to the Godot-editor
        // output tab as well.
        godot_print!("Hello world from node {}!", base.to_string());
    }
}
}
Here, the #[method] attribute is used to tell godot-rust to expose your methods to Godot. In this case, we are overriding _ready and printing a line of text.
Now, re-compile the crate using cargo build and copy the resulting binary to the Godot project. Launch the project from the editor, and you should see Hello, world! in the Godot console!
Wrapping it up
Congratulations! You have just created your first Rust GDNative library. You have learned how to expose scripts and methods to Godot using the bindings, and how to use them in Godot. A lot of the details are still unexplained, but you're off to a good start!
You can find the full code for this example in the main repo: https://github.com/godot-rust/godot-rust/tree/master/examples/hello-world.
Work-in-progress
The Getting Started tutorial is a work-in-progress, and unfortunately it ends here for now! To learn more about the API, you'll have to dive into the documentation on docs.rs, and the other examples in the main repo. If you have any questions using the bindings, ask away in the #gdnative_dev channel on the Godot Engine community Discord server!
An Overview of GDNative
GDNative is the interface between the Godot engine version 3 and bindings in native languages, such as C, C++ or Rust.
This chapter gives a broad overview of basic GDNative concepts and godot-rust's approach to implement them in Rust. It is not a usage guide for exposing your Rust code to Godot; see chapter Binding to Rust code for concrete examples.
Subchapters:
Data representations
The godot-rust library uses many different approaches to store and transport data. This chapter explains high-level concepts of related terminology used throughout the library and its documentation. It is not a usage guide however -- to see the concepts in action, check out Binding to Rust code.
Object and class
Godot is built around classes, object-oriented types in a hierarchy, with the base class Object at the top. When talking about classes, we explicitly mean classes in the Object hierarchy and not built-in types like String, Vector2, Color, even though they are technically classes in C++. In Rust, classes are represented as structs.
Every user-defined class inherits Object directly or indirectly, and thus all methods defined in Object are accessible on any instance of a user-defined class. This type includes functionality for:
- object lifetime:
_init(newin Rust),free - identification and printing:
to_string,get_instance_id - reflection/introspection:
get_class,get,has_method, ... - custom function invocation:
call,callv,call_deferred - signal handling:
connect,emit_signal, ...
Object itself comes with manual memory management. All instances must be deallocated using the free() method. This is typically not what you want, instead you will most often work with the following classes inherited from Object:
ReferenceReference-counted objects. This is the default base class if you don't use theextendskeyword in GDScript. Allows to pass around instances of this type freely, managing memory automatically when the last reference goes out of scope. Do not confuse this type with the godot-rustRefsmart pointer.NodeAnything that's part of the scene tree, such asSpatial(3D),CanvasItemandNode2D(2D). Each node in the tree is responsible of its children and will deallocate them automatically when it is removed from the tree. At the latest, the entire tree will be destroyed when ending the application. Important: as long as a node is not attached to the scene tree, it behaves like anObjectinstance and must be freed manually. On the other hand, as long as it is part of the tree, it can be destroyed (e.g. when its parent is removed) and other references pointing to it become invalid.ResourceData set that is loaded from disk and cached in memory, for example 3D meshes, materials, textures, fonts or music (see also Godot tutorial).ResourceinheritsReference, so in the context of godot-rust, it can be treated like a normal, reference-counted class.
When talking about inheritance, we always mean the relationship in GDScript code. Rust does not have inheritance, instead godot-rust implements Deref traits to allow implicit upcasts. This enables to invoke all parent methods and makes the godot-rust API very close to GDScript.
Classes need to be added as NativeScript resources inside the Godot editor, see here for a description.
See Object in
godot-rust docs,
Godot docs
See GodotObject, the Rust trait implemented for all Godot classes, in godot-rust docs
Variant
Variant is a type that can hold an instance of any type in Godot. This includes all classes (of type Object) as well as all built-in types such as int, String, Vector2 etc.
Since GDScript is a dynamic language, you often deal with variants implicitly. Variables which are not type-annotated can have values of multiple types throughout their lifetime. In static languages like Rust, every value must have a defined type, thus untyped values in GDScript correspond to Variant in Rust. Godot APIs which accept any type as parameter are declared as Variant in the GDNative bindings (and thus godot-rust library). Sometimes, godot-rust also provides transparent mapping from/to concrete types behind the scenes.
Variants also have a second role as a serialization format between Godot and Rust. It is possible to extend this beyond the built-in Godot types. To make your own types convertible from and to variants, implement the traits FromVariant and ToVariant. Types that can only be safely converted to variants by giving up ownership can use OwnedToVariant, which is similar to the Rust Into trait.
See Variant in
godot-rust docs,
Godot docs
Script
Scripts are programmable building blocks that can be attached to nodes in the scene tree, in order to customize their behavior. Depending on the language in which the script is written, there are different classes which inherit the Script class; relevant here will be NativeScript for classes defined in Rust, and GDScript for classes defined in GDScript. Scripts are stored as Godot resources (like materials, textures, shaders etc), usually in their own separate file.
Scripts always inherit another class from Godot's Object hierarchy, either an existing one from Godot or a user-defined one. In Rust, scripts are limited to inherit an existing Godot class; other scripts cannot be inherited. This makes each script a class on their own: they provide the properties and methods from their base object, plus all the properties and methods that you define in the script.
See Script in
godot-rust docs,
Godot docs
Ref, TRef and Instance
Objects from Godot, such as scene nodes, materials, or other resources are owned and maintained by the Godot engine. This means that your Rust code will store references to existing objects, not values. godot-rust provides special wrapper types to deal with these references, which are explained in this page.
These classes stand in contrast to value types like bool, int, Vector2, Color etc., which are copied in GDScript, not referenced. In Rust, those types either map to built-in Rust types or structs implementing the Copy trait.
Ref: persistent reference
The generic smart pointer gdnative::Ref<T, Access> allows you to store Object instances in Rust. It comes with different access policies, depending on how the memory of the underlying object is managed (consult the docs for details). Most of the time, you will be working with Ref<T>, which is the same as Ref<T, Shared> and the only access policy that is explained here. Its memory management mirrors that of the underlying type:
- for all Godot objects inheriting the
Referenceclass,Ref<T>is reference-counted likeArc<T>and will clean up automatically. - for all other types (i.e. the type
Objectand inheritors ofNode),Ref<T>behaves like a raw pointer with manual memory management.
For example, storing a reference to a Godot Node2D instance in a struct would look as follows:
#![allow(unused)]
fn main() {
struct GodotNode {
	node_ref: Ref<Node2D>,
}
}
See Ref in
godot-rust docs
TRef: temporary reference
While Ref is a persistent pointer to retain references to Godot objects for an extended period of time, it doesn't grant access to the underlying Godot object. The reason for this is that Ref cannot generally guarantee that the underlying object, which is managed by the Godot engine, is valid at the time of the access. However, you as a user are in control of GDScript code and the scene tree, thus you can assert that an object is valid at a certain point in time by using assume_safe(). This is an unsafe function that returns a gdnative::TRef<T, Access> object, which allows you to call methods on the node. You are responsible for this assumption to be correct; violating it can lead to undefined behavior.
The following example demonstrates TRef. A node is stored inside a Rust struct, and its position is modified through set_position(). This approach could be used in an ECS (Entity-Component-System) architecture, where GodotNode is a component, updated by a system.
#![allow(unused)]
fn main() {
struct GodotNode {
    node_ref: Ref<Node2D>,
}

fn update_position(node: &GodotNode) {
    let pos = Vector2::new(20, 30);

    // fetch temporary reference to the node
    let node: TRef<Node2D> = unsafe { node.node_ref.assume_safe() };

    // call into the Godot engine
    // this implicitly invokes deref(), turning TRef<Node2D> into &Node2D
    node.set_position(pos);
}
}
Note that the parameter type is &GodotNode, not &mut GodotNode. Then why is it possible to mutate the Godot object?
All Godot classes in Rust (Object and its subtypes) have only methods that operate on &self, not &mut self. The reason for this choice is that &mut is -- strictly speaking -- not a mutable reference, but rather an exclusive reference. The one and only thing it guarantees is that while it exists, no other reference to the same object can exist (no aliasing). Since all the Godot classes can be shared with the Godot engine, which is written in C++ and allows free aliasing, using &mut references would potentially violate the exclusivity, leading to UB. This is why &T is used, and just like e.g. &RefCell it does allow mutation.
This being said, it can still make sense to bring back some type safety on a higher level in your own code. For example, you could make the update_position() take a &mut GodotNode parameter, to make sure that access to this GodotNode object is exclusive.
See TRef in
godot-rust docs
Instance: reference with attached Rust class
When working with classes that are provided by the engine or defined in GDScript, the Ref smart pointer is the ideal type for interfacing between Rust and Godot. However, when defining a custom class in Rust, that is registered with the Godot engine, there are two parts that need to be stored together:
- GDNative script: the Rust struct object that implements the entire custom logic. The Rust struct is written by you.
- Base object: the base class from which the script inherits, with its own state. This is always a Godot built-in class such as
Object,ReferenceorNode.
The Instance class simply wraps the two parts into a single type.
When passing around your own Rust types, you will thus be working with Instance. The traits ToVariant, FromVariant and OwnedToVariant are automatically implemented for Instance types, allowing you to pass them from and to the Godot engine.
Construction
Let's use a straightforward example: a player with name and score. Exported methods and properties are omitted for simplicity; the full interfacing will be explained later in Calling into GDScript from Rust.
#![allow(unused)]
fn main() {
#[derive(NativeClass)]
// no #[inherit], thus inherits Reference by default
pub struct Player {
    name: String,
    score: u32,
}

#[methods]
impl Player {
    fn new(_base: &Reference) -> Self {
        Self {
            name: "New player".to_string(),
            score: 0
        }
    }
}
}
To create a default instance, use Instance::new_instance().
You can later use map() and map_mut() to access the Instance immutably and mutably.
#![allow(unused)]
fn main() {
let instance: Instance<Reference, Unique> = Instance::new();
// or:
let instance = Player::new_instance();

// note: map_mut() takes &self, so above is not 'let mut'
instance.map_mut(|p: &mut Player, _base: TRef<Reference, Unique>| {
    p.name = "Joe".to_string();
    p.score = 120;
});
}
If you don't need a Godot-enabled default constructor, use the #[no_constructor] attribute and define your own Rust new() constructor.
#![allow(unused)]
fn main() {
#[derive(NativeClass)]
#[no_constructor]
pub struct Player {
    name: String,
    score: u32,
}

#[methods]
impl Player {
    pub fn new(name: &str, score: u32) -> Self {
       Self { name: name.to_string(), score }
    }
}
}
In this case, you can construct an Instance from an existing Rust object using Instance::emplace():
#![allow(unused)]
fn main() {
let player = Player::new("Joe", 120);

let instance = Instance::emplace(player);
// or:
let instance = player.emplace();
}
See Instance in
godot-rust docs
Game architecture
This chapter assumes that you are developing a game with Godot and Rust; however, many of the points apply to other projects like simulations or visualizations.
For users new to the godot-rust binding, there are a few questions that almost always come up:
- How do I organize my Rust code the best way?
- Should I still use GDScript or do everything in Rust?
- Where should I write my game logic?
- How can I use the Godot scene tree, if Rust has no inheritance?
Regarding architecture, godot-rust offers a lot of freedom and does not force you into certain patterns. How much you want to develop in GDScript and how much in Rust, is entirely up to you. The choice may depend on your experience, the amount of existing code you already have in either language, the scope of your game or simply personal preference.
Each language has their own strengths and weaknesses:
- GDScript is close to the engine, allows for very fast prototyping and integrates well with the editor. However, its type system is limited and refactoring is often manual. There is no dependency management.
- Rust focuses on type safety, performance and scalability, with mature tooling and ecosystem. The language is rather complex and enforces discipline, and Godot-related tasks tend to be more verbose.
As a starting point, this chapter highlights three common patterns that have been successfully used with godot-rust. This does not mean you must adhere to any of them; depending upon your needs, hybrid solutions or entirely different designs are also worth considering. The three patterns are listed in ascending order with respect to complexity and scalability.
1. Godot game + Rust module
In this architecture, you develop your game primarily in the Godot engine. Most of the game logic resides in GDScript, and the Godot editor is your tool of choice.
During development, you encounter a feature which you wish to develop in Rust while making it accessible to GDScript. Reasons may include:
- The code is performance-critical and GDScript is not fast enough.
- There is a Rust-based library that you wish to use, for example pathfinding, AI, or physics.
- You have a segment of your code with high complexity that is difficult to manage in GDScript.
In this case, you can write a GDNative class in Rust, with an API that exposes precisely the functionality you need -- no more and no less. godot-rust is only needed at the interface with GDScript. There are no calls into Godot from your Rust code, only exported methods.
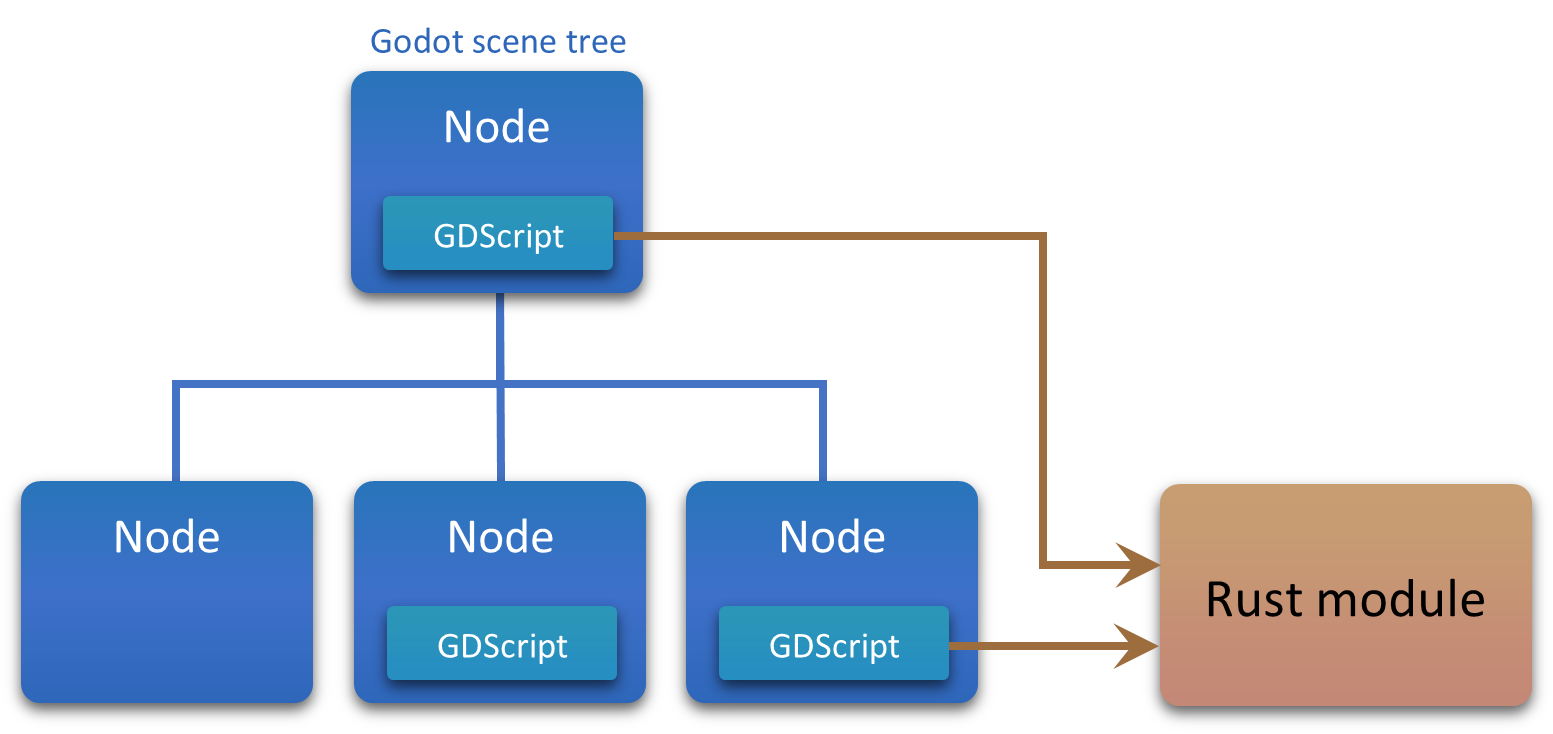
Pros:
- Very easy to get started, especially for existing Godot codebases.
- You can fully benefit from Godot's scene graph and the tooling around it.
- You can test the Rust functionality independently, without running Godot.
Cons:
- As most of the game logic is in GDScript, your project will not benefit from Rust's features, type safety and refactoring capabilities.
- Your game logic needs to fit Godot's scene graph model and you have little control about architecture.
2. Godot scene tree + native scripts
The Godot engine encourages a certain pattern: each game entity is represented by a scene node, and the logic for each node is implemented in a GDScript file. You can follow the same architecture with godot-rust, the only difference being that scripts are implemented in Rust.
Instead of .gd script files, you use .rs files to implement native scripts, and you register native classes in .gdns files. Each Rust script can call into Godot to interact with other nodes, set up or invoke signals, query engine state, etc. Godot types have an equivalent representation in Rust, and the Object hierarchy is emulated in Rust via Deref trait -- this means that e.g. Node2D references can be used to invoke methods on their parent class Node.
It often makes sense to be pragmatic and not try to do everything in Rust. For example, tweaking parameters for particle emitters or animation works much better in GDScript and/or the Godot editor.
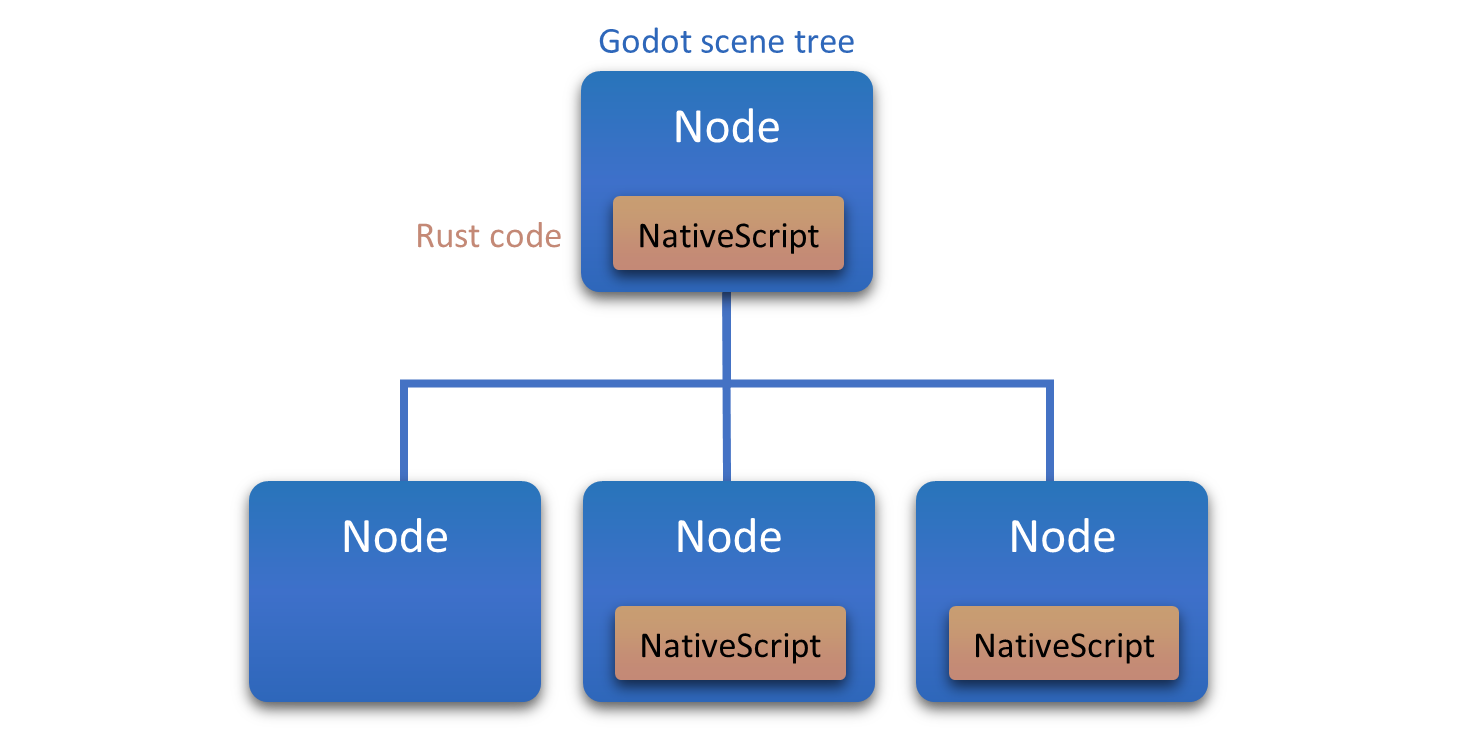
Pros:
- You can make full use of Godot's scene graph architecture while still writing the logic in Rust.
- Existing code and concepts from GDScript can be carried over quite easily.
Cons:
- You have little architectural freedom and are constrained by Godot's scene tree model.
- As godot-rust is used throughout your entire codebase, this will tightly couple your game logic to Godot. Testing and isolating functionality can be harder and you are more subject to version changes of Godot and godot-rust.
3. Rust game + Godot I/O layer
This architecture is the counterpart to section 1. Most of your game is written in Rust, and you use the engine primarily for input/output handling. You can have an entry point to your Rust library (the Controller) which coordinates the simulation.
A typical workflow is as follows:
- Input: You use the Godot engine to collect user input and events (key pressed, network packet arrived, timer elapsed, ...).
- Processing: The collected input is passed to Rust. The Controller runs a step in your game simulation and produces results.
- Output: These results are passed back to Godot and take effect in the scene (node positions, animations, sound effects, ...).
If you follow this pattern strictly, the Godot scene graph can be entirely derived from your Rust state, as such it is only a visualization. There will be some GDScript glue code to tweak graphics/audio output.
This can be the most scalable and "Rusty" workflow, but it also requires a lot of discipline. Several interactions, which the other workflows offer for free, need to be implemented manually.
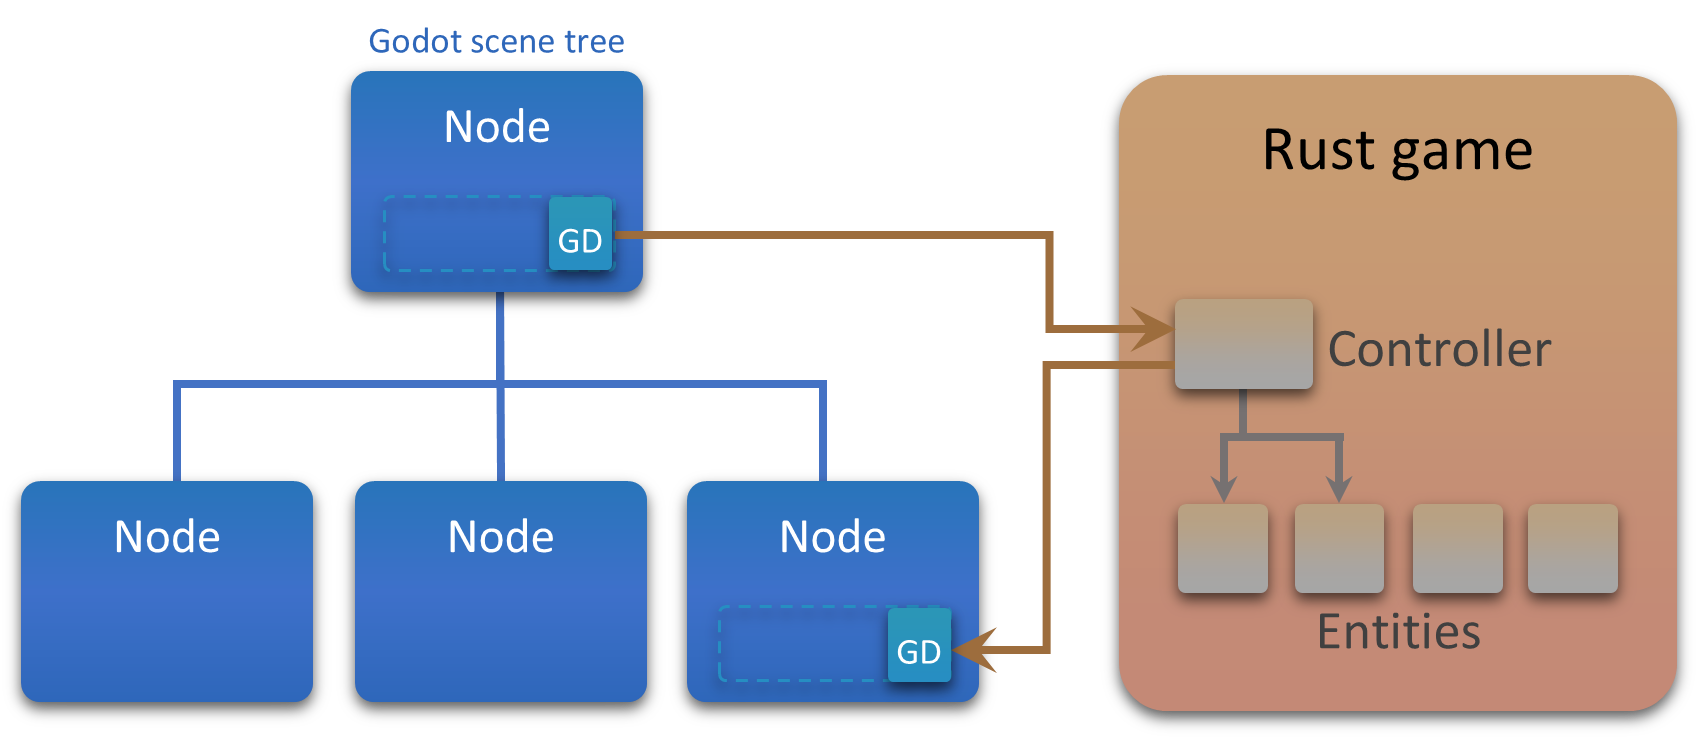
Pros:
- You are completely free how you organize your Rust game logic. You can have your own entity hierarchy, use an ECS, or simply a few linear collections.
- As your game logic runs purely in Rust, you don't need Godot to run the simulation. This allows for the following:
- Rust-only headless server
- Rust-only unit and integration tests
- Different/simplified visualization backends
Cons:
- A robust design for your Rust architecture is a must, with considerable up-front work.
- You need to manually synchronize your Rust entities with the Godot scene tree. In many cases, this means duplication of state in Rust (e.g. tile coordinate + health) and in Godot (world position + healthbar), as well as mapping between the two.
Binding to Rust code
This chapter provides an exhaustive list of mechanisms to pass data through the Rust GDNative binding, in both directions:
- GDScript -> Rust, e.g. to react to an input event with custom Rust logic
- Rust -> GDScript, e.g. to apply a game logic change to a graphics node in Godot
The goal is to serve as both an in-depth learning resource for newcomers and a reference to look up specific mechanisms at a later stage. Before delving into this chapter, make sure to read An Overview of GDNative, which explains several fundamental concepts used here.
The subchapters are intended to be read in order, but you can navigate to them directly:
Class registration
Classes are a fundamental data type of GDNative. They are used for Godot's own types (such as nodes) as well as custom ones defined by you. Here, we focus on defining custom classes and exposing them to Godot.
The Rust entry point
When working with godot-rust, your Rust code sits inside a dynamic library with C ABI (cdylib), which is loaded at runtime from the Godot engine. The engine works as the host application with the entry and exit point, and your Rust code will be loaded at some point after Godot starts and unloaded before it ends.
This workflow implies that when you want to execute Rust code, you need to first pass control from Godot to it. To achieve this, every godot-rust application integrated with the engine must expose a public interface, through which Godot can invoke Rust code.
Somewhere in your code, usually in lib.rs, you need to declare the functions that will be called by the engine when the native library is loaded and unloaded, as well as the registration function for native classes exposed to the engine. godot-rust provides the following macros (consult their documentation for further info and customization):
#![allow(unused)]
fn main() {
godot_gdnative_init!();
godot_nativescript_init!(init);
godot_gdnative_terminate!();
}
Or the equivalent short-hand:
#![allow(unused)]
fn main() {
godot_init!(init);
}
The argument init refers to the function registering native script classes, which is also defined by you. For this chapter, let's assume you want to write a class GodotApi, which exposes a public interface to be invoked from Godot. The registration is then as follows:
#![allow(unused)]
fn main() {
// see details later
struct GodotApi { ... }

fn init(handle: InitHandle) {
    handle.add_class::<GodotApi>();
}
}
Class definition
Similar to the Hello World example, we can define the GodotApi native class as follows:
#![allow(unused)]
fn main() {
// Tell godot-rust that this struct is exported as a native class
// (implements NativeClass trait)
#[derive(NativeClass)]

// Specify the base class (corresponds to 'extends' statement in GDScript).
// * Like 'extends' in GDScript, this can be omitted.
//   In that case, the 'Reference' class is used as a base.
// * Unlike 'extends' however, only existing Godot types are permitted,
//   no other user-defined scripts.
#[inherit(Node)]
pub struct GodotApi {}

// Exactly one impl block can have the #[methods] annotation,
// which registers methods in the background.
#[methods]
impl GodotApi {
    // Constructor, either:
    fn new(base: &Node) -> Self { ... }
    // or:
    fn new(base: TRef<Node>) -> Self { ... }
}
}
The #[derive(NativeClass)] macro enables a Rust type to be usable as a native class in Godot. It implements the NativeClass trait, which fills in the glue code required to make the class available in Godot. Among other information, this includes class name and registry of exported methods and properties. For the user, the utility methods new_instance() and emplace() are provided for constructing Instance objects.
The function new() corresponds to _init() in GDScript. The base is the base object of the script, and must correspond to the class specified in the #[inherit] attribute (or Reference if the attribute is absent). The parameter can be a shared reference &T or a TRef<T>.
With a new() method, you are able to write GodotApi.new() in GDScript. If you don't need this, you can add the #[no_constructor] attribute to the struct declaration.
At this point, arguments cannot be passed into the constructor. Consult this FAQ entry for available workarounds.
Exported methods
In order to receive data from Godot, you can export methods. With the #[method] attribute, godot-rust takes care of method registration and serialization. Note that the constructor is not annotated with #[method].
Recent API changes
#[export]has been renamed to#[method]and is now deprecated. It keeps working for the time being though (i.e. gdnative 0.11).For more information, see
gdnative::derive::NativeClass.
The exported method's first parameter is always &self or &mut self (operating on the Rust object), and the second parameter is &T or TRef<T> (operating on the Godot base object, with T being the inherited type).
#![allow(unused)]
fn main() {
#[derive(NativeClass)]
#[inherit(Node)]
pub struct GodotApi {
    enemy_count: i32,
}

#[methods]
impl GodotApi {
    fn new(_base: &Node) -> Self {
        // Print to both shell and Godot editor console
        godot_print!("_init()");
        Self { enemy_count: 0 }
    }

    #[method]
    fn create_enemy(
        &mut self,
        typ: String,
        pos: Vector2
    ) {
        godot_print!("create_enemy(): type '{}' at position {:?}", typ, pos);
        self.enemy_count += 1;
    }

    #[method]
    fn create_enemy2(
        &mut self,
        typ: GodotString,
        pos: Variant
    ) {
        godot_print!("create_enemy2(): type '{}' at position {:?}", typ, pos);
        self.enemy_count += 1;
    }

    #[method]
    fn count_enemies(&self) -> i32 {
        self.enemy_count
    }
}
}
The two creation methods are semantically equivalent, yet they demonstrate how godot-rust implicitly converts the values to the parameter types (unmarshalling). You could use Variant everywhere, however it is more type-safe and expressive to use specific types. The same applies to return types, you could use Variant instead of i32.
GodotString is the Godot engine string type, but it can be converted to standard String. To choose between the two, consult the docs.
In GDScript, you can then write this code:
var api = GodotApi.new()

api.create_enemy("Orc", Vector2(10, 20));
api.create_enemy2("Elf", Vector2(50, 70));

print("enemies: ", api.count_enemies())

# don't forget to add it to the scene tree, otherwise memory must be managed manually
self.add_child(api)
The output is:
_init()
create_enemy(): type 'Orc' at position (10.0, 20.0)
create_enemy2(): type 'Elf' at position Vector2((50, 70))
enemies: 2
Passing classes
The above examples have dealt with simple types such as strings and integers. What if we want to pass entire classes to Rust?
Let's say we want to pass in an enemy from GDScript, instead of creating one locally. It could be represented by the Node2D class and directly configured in the Godot editor. What you then would do is use the Ref wrapper:
#![allow(unused)]
fn main() {
#[derive(NativeClass)]
#[inherit(Node)]
pub struct GodotApi {
    // Store references to all enemy nodes
    enemies: Vec<Ref<Node2D>>,
}

#[methods]
impl GodotApi {
    // new() etc...

    #[method]
    fn add_enemy(
        &mut self,
        enemy: Ref<Node2D> // pass in enemy
    ) {
        self.enemies.push(enemy);
    }

    // You can even return the enemies directly with Vec.
    // In GDScript, you will get an array of nodes.
    // An alternative would be VariantArray, able to hold different types.
    #[method]
    fn get_enemies(
        &self,
    ) ->  Vec<Ref<Node2D>> {
        self.enemies.clone()
    }
}
}
Special methods
Godot offers some special methods. Most of them implement notifications, i.e. callbacks from the engine to notify the class about a change.
If you need to override a Godot special method, just declare it as a normal exported method, with the same name and signature as in GDScript. You can also omit the base parameter if you don't need it.
#![allow(unused)]
fn main() {
#[method]
fn _ready(&mut self, #[base] base: &Node) {...}

#[method]
fn _process(&mut self, #[base] base: &Node, delta: f32) {...}

#[method]
fn _physics_process(&mut self, #[base] base: &Node, delta: f32) {...}
}
If you want to change how GDScript's default formatter in functions like str() or print() works, you can overload the to_string GDScript method, which corresponds to the following Rust method:
#![allow(unused)]
fn main() {
#[method]
fn _to_string(&self, #[base] base: &Node) -> String {...}
}
Errors
If you pass arguments from GDScript that are incompatible with the Rust method's signature, the method invocation will fail. In this case, the code inside the method is not executed. An error message is printed on the Godot console, and the value null is returned for the GDScript function call.
If code inside your method panics (e.g. by calling unwrap() on an empty option/result), the same happens: error message and return value null.
Exported properties
Like methods, properties can be exported. The #[property] attribute above a field declaration makes the field available to Godot, with its name and type.
In the previous example, we could replace the count_enemies() method with a property enemy_count.
#![allow(unused)]
fn main() {
#[derive(NativeClass)]
#[inherit(Node)]
pub struct GodotApi {
    #[property]
    enemy_count: i32,
}
}
The GDScript code would be changed as follows.
print("enemies: ", api.enemy_count)
That's it.
Export options
The #[property] attribute can accept a several options to refine the export behavior.
You can specify default property value with the following argument:
#![allow(unused)]
fn main() {
#[property(default = 10)]
enemy_count: i32,
}
If you need to hide this property in Godot editor, use no_editor option:
#![allow(unused)]
fn main() {
#[property(no_editor)]
enemy_count: i32,
}
Property get/set
Properties can register set and get methods to be called from Godot.
Default get/set functions can be registered as per the following example:
#[derive(NativeClass, Default)]
#[inherit(Node)]
struct GodotApi {
    // property registration
    // Note: This is actually equivalent to #[property]
    #[property(get, set)]
    prop: i32,
}
If you need custom setters and getters, you can set them in the property attribute such as in the following example:
#![allow(unused)]
fn main() {
#[derive(NativeClass)]
#[inherit(Node)]
struct HelloWorld {
    // property registration
    #[property(get = "Self::get", set = "Self::set")]
    prop: i32,
}

impl HelloWorld {
    fn new(_base: &Node) -> Self {
        HelloWorld { prop: 0i32 }
    }
}

#[methods]
impl HelloWorld {
    fn get(&self, _base: TRef<Node>) -> i32 {
        godot_print!("get() -> {}", &self.prop);
        self.prop
    }

    fn set(&mut self, _base: TRef<Node>, value: i32) {
        godot_print!("set({})", &value);
        self.prop = value;
    }
}
}
Note: get vs get_ref
There are two ways to return the property.
getwill return a value ofTwhich must result in the value being cloned.get_refmust point to a function that returns&T, this is useful when working with large data that would be very expensive to copy unnecessarily.
Modifying the previous example accordingly results in the following:
#![allow(unused)]
fn main() {
#[derive(NativeClass)]
#[inherit(Node)]
struct GodotApi {
    // property registration
    #[property(get_ref = "Self::get", set = "Self::set")]
    prop: String,
}

impl GodotApi {
    fn new(_base: &Node) -> Self {
        GodotApi { prop: String::new() }
    }
}

#[methods]
impl GodotApi {
    fn get(&self, _base: TRef<Node>) -> &String {
        godot_print!("get() -> {}", &self.prop);
        &self.prop
    }

    fn set(&mut self, _base: TRef<Node>, value: String) {
        godot_print!("set({})", &value);
        self.prop = value;
    }
}
}
Manual property registration
For cases not covered by the #[property] attribute, it may be necessary to manually register the properties instead.
This is often the case where custom hint behavior is desired for primitive types, such as an Integer value including an IntEnum hint.
To do so, you can use the ClassBuilder -- such as in the following examples -- to manually register each property and customize how they interface in the editor.
#![allow(unused)]

fn main() {
#[derive(NativeClass)]
#[inherit(Node)]
#[register_with(Self::register_properties)]
#[no_constructor]
pub struct MyNode {
    number: i32,
    number_enum: i32,
    float_range: f64,
    my_filepath: String,
}

#[methods]
impl MyNode {
    fn register_properties(builder: &ClassBuilder<MyNode>) {
        use gdnative::export::hint::*;
        // Add a number with a getter and setter.
        // (This is the equivalent of adding the `#[property]` attribute for `number`)
        builder
            .property::<i32>("number")
            .with_getter(Self::number_getter)
            .with_setter(Self::number_setter)
            .done();

        // Register the number as an Enum
        builder
            .property::<i32>("number_enum")
            .with_getter(move |my_node: &MyNode, _base: TRef<Node>| my_node.number_enum)
            .with_setter(move |my_node: &mut MyNode, _base: TRef<Node>, new_value| my_node.number_enum = new_value)
            .with_default(1)
            .with_hint(IntHint::Enum(EnumHint::new(vec!["a".to_owned(), "b".to_owned(), "c".to_owned(), "d".to_owned()])))
            .done();

        // Register a floating point value with a range from 0.0 to 100.0 with a step of 0.1
        builder
            .property::<f64>("float_range")
            .with_getter(move |my_node: &MyNode, _base: TRef<Node>| my_node.float_range)
            .with_setter(move |my_node: &mut MyNode, _base: TRef<Node>, new_value| my_node.float_range = new_value)
            .with_default(1.0)
            .with_hint(FloatHint::Range(RangeHint::new(0.0, 100.0).with_step(0.1)))
            .done();

        // Manually register a string as a file path for .txt and .dat files.
        builder
            .property::<String>("my_filepath")
            .with_ref_getter(move |my_node: &MyNode, _base: TRef<Node>| &my_node.my_filepath)
            .with_setter(move |my_node: &mut MyNode, _base: TRef<Node>, new_value: String| my_node.my_filepath = new_value)
            .with_default("".to_owned())
            .with_hint(StringHint::File(EnumHint::new(vec!["*.txt".to_owned(), "*.dat".to_owned()])))
            .done();
    }
    fn number_getter(&self, _base: TRef<Node>) -> i32 {
        self.number
    }

    fn number_setter(&mut self, _base: TRef<Node>, new_value: i32) {
        self.number = new_value
    }
}
}
Property<T> and when to use it
Sometimes it can be useful to expose a value as a property instead of as a function. Properties of this type serve as a marker that can be registered with Godot and viewed in the editor without containing any data in Rust.
This can be useful for data (similar to the first sample) where the count serves more as a property of enemies rather than as its own distinct data, such as the following:
struct Enemy {
    // Enemy Data
}
#[derive(NativeClass)]
struct GodotApi {
    enemies: Vec<Enemy>,
    // Note: As the property is a "marker" property, this will never be used in code.
    #[allow(dead_code)]
    #[property(get = "Self::get_size")]
    enemy_count: Property<u32>,
}

#[methods]
impl GodotApi {
    //...

    fn get_size(&self, _base: TRef<Reference>) -> u32 {
        self.enemies.len() as u32
    }
}
ToVariant, FromVariant and Export
As seen in the previous section, the #[property] attribute of the NativeClass procedural macro is a powerful tool to automatically configure properties with Godot.
One constraint of the #[property] attribute is that it requires that all attributed property types implement ToVariant, FromVariant and Export in order to interface with Godot.
ToVariant/FromVariant traits
In Godot all types inherit from Variant.
As per the official Godot docs, Variant is "The most important data type in Godot." This is a wrapper type that can store any Godot Engine type
The ToVariant and FromVariant are conversion traits that allow Rust types to be converted between these types. All properties must implement both ToVariant and FromVariant while exported methods require FromVariant to be implemented for optional parameters and ToVariant to be implemented for return types.
For many datatypes, it is possible to use the derive macros such as in the following example:
#![allow(unused)]
fn main() {
// Note: This struct does not implement `Export` and cannot be used as a property, see the following section for more information.
#[derive(ToVariant, FromVariant)]
struct Foo {
    number: i32,
    float: f32,
    string: String
}
}
For more information about how you can customize the behavior of the dervive macros, please refer to the official documentation for the latest information.
Export Trait
The Godot editor retrieves property information from Object::get_property_list. To populate this data, godot-rust requires that the Export trait be implemented for each type Rust struct.
There are no derive macros that can be used for Export but many of the primitive types have it implemented by default.
To implement Export for the previous Rust data type, you can do so as in the following example:
#![allow(unused)]
fn main() {
// Note: By default `struct` will be converted to and from a Dictionary where property corresponds to a key-value pair.
#[derive(ToVariant, FromVariant)]
struct Foo {
    number: i32,
    float: f32,
    string: String
}

impl Export for Foo {
    // This type should normally be one of the types defined in [gdnative::export::hint](https://docs.rs/gdnative/latest/gdnative/export/hint/index.html).
    // Or it can be any custom type for differentiating the hint types.
    // In this case it is unused, so it is left as ()
    type Hint = ();
    fn export_info(hint: Option<Self::Hint>) -> ExportInfo {
        // As `Foo` is a struct that will be converted to a Dictionary when converted to a variant, we can just add this as the VariantType.
        ExportInfo::new(VariantType::Dictionary)
    }
}
}
Case study: exporting Rust enums to Godot and back
A common challenge that many developers may encounter when using godot-rust is that while Rust enums are Algebraic Data Types, Godot enums are constants that correspond to integer types.
By default, Rust enums are converted to a Dictionary representation. Its keys correspond to the name of the enum variants, while the values correspond to a Dictionary with fields as key-value pairs.
For example:
#![allow(unused)]
fn main() {
#[derive(ToVariant, FromVariant)]
enum MyEnum {
    A,
    B { inner: i32 },
    C { inner: String }
}
}
Will convert to the following dictionary:
# MyEnum::A
"{ "A": {} }
# MyEnum::B { inner: 0 }
{ "B": { "inner": 0 } }
# MyEnum::C { inner: "value" }
{ "C": {"inner": "value" } }
As of writing (gdnative 0.9.3), this default case is not configurable. If you want different behavior, it is necessary to implement FromVariant and Export manually for this data-type.
Case 1: Rust Enum -> Godot Enum
Consider the following code:
#![allow(unused)]
fn main() {
enum MyIntEnum {
    A=0, B=1, C=2,
}

#[derive(NativeClass)]
#[inherit(Node)]
#[no_constructor]
struct MyNode {
    #[property]
    int_enum: MyIntEnum
}
}
This code defines the enum MyIntEnum, where each enum value refers to an integer value.
Without implementing the FromVariant and Export traits, attempting to export MyIntEnum as a property of MyNode will result in the following error:
the trait bound `MyIntEnum: gdnative::prelude::FromVariant` is not satisfied
   required because of the requirements on the impl of `property::accessor::RawSetter<MyNode, MyIntEnum>` for `property::accessor::invalid::InvalidSetter<'_>`2

the trait bound `MyIntEnum: Export` is not satisfied
    the trait `Export` is not implemented for `MyIntEnum`
This indicates that MyIntEnum does not have the necessary traits implemented for FromVariant and Export. Since the default derived behavior may not be quite what we want, we can implement this with the following:
#![allow(unused)]
fn main() {
impl FromVariant for MyIntEnum {
    fn from_variant(variant: &Variant) -> Result<Self, FromVariantError> {
        let result = i64::from_variant(variant)?;
        match result {
            0 => Ok(MyIntEnum::A),
            1 => Ok(MyIntEnum::B),
            2 => Ok(MyIntEnum::C),
            _ => Err(FromVariantError::UnknownEnumVariant {
                variant: "i64".to_owned(),
                expected: &["0", "1", "2"],
            }),
        }
    }
}

impl Export for MyIntEnum {
    type Hint = IntHint<u32>;

    fn export_info(_hint: Option<Self::Hint>) -> ExportInfo {
        Self::Hint::Enum(EnumHint::new(vec![
            "A".to_owned(),
            "B".to_owned(),
            "C".to_owned(),
        ]))
        .export_info()
    }
}

}
After implementing FromVariant and Export, running cargo check would result in the following additional error:
the trait bound `MyIntEnum: gdnative::prelude::ToVariant` is not satisfied
the trait `gdnative::prelude::ToVariant` is not implemented for `MyIntEnum`
If the default implementation were sufficient, we could use #[derive(ToVariant)] for MyIntEnum or implement it manually with the following code:
#![allow(unused)]
fn main() {
use gdnative::core_types::ToVariant;
impl ToVariant for MyIntEnum {
    fn to_variant(&self) -> Variant {
        match self {
            MyIntEnum::A => { 0.to_variant() },
            MyIntEnum::B => { 1.to_variant() },
            MyIntEnum::C => { 2.to_variant() },
        }
    }
}
}
At this point, there should be no problem in using MyIntEnum as a property in your native class that is exported to the editor.
Calling GDScript from Rust
To transport information from Rust back to GDScript, you have three options (of which the last can be achieved in different ways):
- Use return values in exported methods
- Use exported properties
- Call a Godot class method from Rust
- invoke built-in method as part of the API (e.g.
set_position()above) - invoke custom GDScript method, through
call()and overloads - emit a signal, through
emit_signal()
- invoke built-in method as part of the API (e.g.
Which one you need depends on your goals and your architecture. If you see Rust as a deterministic, functional machine in the sense of input -> processing -> output, you could stick to only returning data from Rust methods, and never directly calling a Godot method. This can be limiting however, and depending on your use case you end up manually dispatching back to different nodes on the GDScript side.
Passing custom classes to GDScript
On the previous pages, we explained how to export a class, so it can be instantiated and called from GDScript. This section explains how to construct a class locally in Rust.
Let's define a class Enemy which acts as a simple data bundle, i.e. no functionality. We inherit it from Reference, such that memory is managed automatically. In addition, we define _to_string() and delegate it to the derived Debug trait implementation, to make it printable from GDScript.
#![allow(unused)]
fn main() {
#[derive(NativeClass, Debug)]
// no #[inherit], thus inherits Reference by default
#[no_constructor]
pub struct Enemy {
    #[property]
    pos: Vector2,

    #[property]
    health: f32,

    #[property]
    name: String,
}

#[methods]
impl Enemy {
    #[method]
    fn _to_string(&self) -> String {
        format!("{:?}", self) // calls Debug::fmt()
    }
}
}
Godot can only use classes that are registered, so let's do that:
#![allow(unused)]
fn main() {
fn init(handle: InitHandle) {
    // ...
    handle.add_class::<Enemy>();
}
}
Now, it's not possible to directly return Enemy instances in exported methods, so this won't work:
#![allow(unused)]
fn main() {
#[method]
fn create_enemy(&mut self) -> Enemy {...}
}
Instead, you can wrap the object in a Instance<Enemy, Unique>, using emplace(). For an in-depth explanation of the Instance class, read this section.
#![allow(unused)]
fn main() {
#[method]
fn create_enemy(&self) -> Instance<Enemy, Unique> {
    let enemy = Enemy {
        pos: Vector2::new(7.0, 2.0),
        health: 100.0,
        name: "MyEnemy".to_string(),
    };

    enemy.emplace()
}
}
When calling this method in GDScript:
var api = GodotApi.new()
var enemy = api.create_enemy()
print("Enemy created: ", enemy)
the output will be:
Enemy created: Enemy { pos: (7.0, 2.0), health: 100.0, name: "MyEnemy" }
If you want types to be default-constructible, e.g. to allow construction from GDScript, omit the #[no_constructor] attribute. You can default-construct from Rust using Instance::new_instance().
Function calls
While you can export Rust methods to be called from GDScript, the opposite is also possible. Typical use cases for this include:
- Read or modify the scene tree directly from Rust (e.g. moving a node)
- Synchronizing logic state (Rust) with visual representation (Godot)
- Notify code in GDScript about changes in Rust
Methods provided by Godot classes are mapped to regular Rust functions. Examples for these are Node2D::rotate(), Button::set_text(), StaticBody::bounce(). They can usually be invoked safely on a &T or TRef<T> reference to the respective object.
Custom GDScript methods (defined in .gd files) on the other hand need to be invoked dynamically. This means that there is no type-safe Rust signature, so you will use the Variant type. All Godot-compatible types can be converted to variants. For the actual call, Object provides multiple methods. Since every Godot class eventually dereferences to Object, you can invoke them on any Godot class object.
The following GDScript method:
# in UserInterface.gd
extends CanvasItem

func update_stats(mission_name: String, health: float, score: int) -> bool:
    # ...
can be invoked from Rust as follows:
#![allow(unused)]
fn main() {
use gdnative::core_types::ToVariant;

fn update_mission_ui(ui_node: Ref<CanvasItem>) {
    let mission_name = "Thunderstorm".to_variant();
    let health = 37.2.to_variant();
    let score = 140.to_variant();

    // both assume_safe() and call() are unsafe
    let node: TRef<CanvasItem> = unsafe { ui_node.assume_safe() };
    let result: Variant = unsafe {
        node.call("update_stats", &[mission_name, health, score])
    };

    let success: bool = result.try_to_bool().expect("returns bool");
}
}
Besides Object::call(), alternative methods callv() (accepting a VariantArray) and call_deferred() (calling at the end of the frame) exist, but the principle stays the same.
For long parameter lists, it often makes sense to bundle related functionality into a new class, let's say Stats in the above example. When working with classes, you can convert both Ref (for Godot/GDScript classes) and Instance (for native classes) to Variant by means of the OwnedToVariant trait:
#![allow(unused)]
fn main() {
use gdnative::core_types::OwnedToVariant; // owned_to_variant()
use gdnative::nativescript::NativeClass; // emplace()

// Native class bundling the update information
#[derive(NativeClass)]
#[no_constructor]
struct Stats {
    #[property]
    mission_name: String,

    #[property]
    health: f32,

    #[property]
    score: i32,
}

fn update_mission_ui(ui_node: Ref<CanvasItem>) {
    let stats = Stats {
        mission_name: "Thunderstorm".to_variant(),
        health: 37.2.to_variant(),
        score: 140.to_variant(),
    };

    let instance: Instance<Stats, Unique> = stats.emplace();
    let variant: Variant = instance.owned_to_variant();

    let node: TRef<CanvasItem> = unsafe { ui_node.assume_safe() };

    // let's say the method now returns a Stats object with previous stats
    let result: Variant = unsafe { node.call("update_stats", &[variant]) };

    // convert Variant -> Ref -> Instance
    let base_obj: Ref<Reference> = result.try_to_object().expect("is Reference");
    let instance: Instance<Stats, Shared> = Instance::from_base(base_obj).unwrap();

    instance.map(|prev_stats: &Stats, _base| {
        // read prev_stats here
    });
}
}
Warning
When calling GDScript functions from Rust, a few things need to be kept in mind.
Safety: Since the calls are dynamic, it is possible to invoke any other functions through them, including unsafe ones like free(). As a result, call() and its alternatives are unsafe.
Re-entrancy: When calling from Rust to GDScript, your Rust code is usually already running in an exported #[method] method, meaning that it has bound its receiver object via &T or &mut T reference. In the GDScript code, you must not invoke any method on the same Rust receiver, which would violate safety rules (aliasing of &mut).
Signal emissions
Like methods, signals defined in GDScript can be emitted dynamically from Rust.
The mechanism works analogously to function invocation, except that you use Object::emit_signal() instead of Object::call().
FAQ
This is a list of frequently asked questions that have been pulled from various sources. This will be periodically updated with new information.
Please select one of the categories in the side bar for more information.
FAQ: Common code questions
Table of contents
- How do I store a reference of
Node? - Borrow failed; a &mut reference was requested
- Why do mutating Godot methods take
&selfand not&mut self? - Why is there so much
unsafein godot-rust? - Can the
newconstructor have additional parameters? - Can I implement static methods in GDNative?
- How do I convert from a
Variantto the underlying Rust type? - Is it possible to set subproperties of a Godot type, such as a
Material? - What is the Rust equivalent of
preload? - How can function parameters accept Godot subclasses (polymorphism)?
- What is the Rust equivalent of
onready var? - What types are supported for passing through the GDNative API?
- How can I profile my code to measure performance?
How do I store a reference of Node?
The idiomatic way to maintain a reference to a node in the SceneTree from Rust is to use Option<Ref<T>>.
For example, the following GDScript code:
extends Node
class_name MyClass
var node
var node_2

func _ready():
  node = Node.new()
  node.set_process(true)
  self.add_child(node, false)

  node_2 = Node.new()
  self.add_child(node_2, false)
  node_2.set_process(true)
could be translated to this Rust snippet:
#![allow(unused)]
fn main() {
#[derive(NativeClass)]
#[inherit(Node)]
#[no_constructor]
struct MyNode {
    node_ref: Option<Ref<Node>>
    node_2_ref: Option<Ref<Node>>
}

#[methods]
impl MyNode {
    #[method]
    fn _ready(&self, #[base] base: TRef<Node>) {
        let node = Node::new();
        node.set_process(true);
        let node = node.into_shared();
        base.add_child(node);
        self.node_ref = Some(node);

        let node_2 = Node::new();
        let node_2 = unsafe { node_2.into_shared().assume_safe() };
        base.add_child(node_2);
        node_2.set_process(true);
        self.node_2_ref = Some(node_2.claim());
    }
}
}
Note the into_shared() call before we use node as an argument and store it in the struct, and how a change in the operation order also affects whether an unsafe operation is required. In gdnative, the ownership status of Godot objects are tracked with type-states. Node::new() itself creates a unique reference, which can be safely accessed, but not copied. into_shared() casts the ownership type-state of this node, making it safe to duplicate, but unsafe to access further. For more information, see Ref, TRef and Instance.
Borrow failed; a &mut reference was requested
In Rust, there can only be one &mut reference to the same memory location at the same time. To enforce this while making simple use cases easier, the bindings make use of interior mutability. This works like a lock: whenever a method with &mut self is called, it will try to obtain a lock on the self value, and hold it until it returns. As a result, if another method that takes &mut self is called in the meantime for whatever reason (e.g. signals), the lock will fail and an error (BorrowFailed) will be produced.
It's relatively easy to work around this problem, though: Because of how the user-data container works, it can only see the outermost layer of your script type - the entire structure. This is why it's stricter than what is actually required. If you run into this problem, you can introduce finer-grained interior mutability in your own type, and modify the problematic exported methods to take &self instead of &mut self.
This issue also can often occur when using signals to indicate an update such as in the following code.
#![allow(unused)]
fn main() {
#[derive(NativeClass)]
#[inherit(Node)]
// register_with attribute can be used to specify custom register function for node signals and properties
#[register_with(Self::register_signals)]
struct SignalEmitter {
    data: LargeData,
}

#[methods]
impl SignalEmitter {
    fn register_signals(builder: &ClassBuilder<Self>) {
        builder.signal("updated").done();
    }

    fn new(_base: &Node) -> Self {
        SignalEmitter {
            data: "initial",
        }
    }

    #[method]
    fn update_data(&mut self, #[base] base: TRef<Node>, data: LargeData) {
        self.data = data;
      base.emit_signal("updated", &[]);
    }

    #[method]
    fn get_data(&self) -> &LargeData {
        &self.data
    }
}
}
The assumption with the above code is that SignalEmitter is holding data that is too large to be feasible to clone into the signal. So the purpose of the signal is to notify other Nodes or Objects that this the data has been updated.
The problem is that, unless the nodes all connect with the Object::CONNECT_DEFERRED flag, they will be notified immediately and will attempt to borrow the data. This is the root cause of the BorrowFailed error.
There are two ways to solve it.
- Ensure that all nodes use
Object::CONNECT_DEFERRED. This will delay the callbacks until the end of the current physics or idle frame, long after the current borrow on the data ends. - Store
datain aRefCell<LargeData>if it should only be accessed from the same thread (such as with signals) orMutex<LargeData>if you need thread-safety. Then you can modifyupdate_data()to the following snippet:
#![allow(unused)]
fn main() {
#[method]
fn update_data(&self, #[base] base: TRef<Node>, data: LargeData) {
    // If using RefCell
    self.data.replace(data);
    // If using Mutex
    // *self.data.lock().expect("this should work") = data;
    base.emit_signal("updated", &[]);
}
}
In both instances you will not encounter the reentrant errors.
Why do mutating Godot methods take &self and not &mut self?
&mutmeans that only one reference can exist simultaneously (no aliasing), not that the object is mutable. Mutability is often a consequence of the exclusiveness. Since Godot objects are managed by the engine, Rust cannot guarantee that references are exclusive, as such using&mutwould cause undefined behavior. Instead, an interior mutability pattern based on&Tis used. For godot-rust, it is probably more useful to consider&and&mutas "shared" and "unique" respectively. For more information, please refer to this explanation for more information.- Why godot-rust does not use
RefCell(or some other form of interior mutability) is because the types already have interior mutability as they exist in Godot (and can't be tracked by Rust). For example, doescall()modify its own object? This depends on the arguments. There are many such cases which are much more subtle.
Why is there so much unsafe in godot-rust?
Short Answer: Godot is written in C++, which cannot be statically analyzed by the Rust compiler to guarantee safety.
Longer Answer: unsafe is required for different reasons:
- Object lifetimes: Godot manages memory of objects independently of Rust. This means that Rust references can be invalidated when Godot destroys referred-to objects. This usually happens due to bugs in GDScript code, like calling
free()of something actively in use. - Thread safety: while Rust has a type system to ensure thread safety statically (
Send,Sync), such mechanisms do not exist in either GDScript or C++. Even user-defined GDScript code has direct access to theThreadAPI. - C FFI: any interactions that cross the C Foreign Function Interface will be unsafe by default as Rust cannot inspect the other side. While many functions may be safely reasoned about, there are still some functions which will be inherently unsafe due to their potential effects on object lifetimes.
One of the ways that godot-rust avoids large unsafe blocks is by using the TypeState pattern with temporary references such as TRef and TInstance. For more information see Ref, TRef and Instance.
Here is an example of some common unsafe usage that you will often see and use in your own games.
#![allow(unused)]
fn main() {
fn get_a_node(&self, #[base] base: TRef<Node>) {
    // This is safe because it returns an option that Rust knows how to check.
    let child = base.get_child("foo");
    // This is safe because Rust panics if the returned `Option` is None.
    let child = child.expect("I know this should exist");
    // This is also safe because Rust panics if the returned `Option` is None.
    let child = child.cast_instance::<Foo>().expect("I know that it must be this type");
    // This is unsafe because the compiler cannot reason about the lifetime of `child`.
    // It is the programmer's responsibility to ensure that `child` is not freed before
    // it gets used.
    let child: Instance<Foo> = unsafe { child.assume_safe() };
    // This is safe because we have already asserted above that we are assuming that
    // there should be no problem and Rust can statically analyze the safety of the
    // functions.
    child.map_mut(|c, o| {
        c.bar(o);
    }).expect("this should not fail");
    // This is unsafe because it relies on Godot for function dispatch and it is
    // possible for it to call `Object.free()` or `Reference.unreference()` as
    // well as other native code that may cause undefined behavior.
    unsafe {
        child.call("bar", &[])
    };
}
}
By the way, safety rules are subject to an ongoing discussion and likely to be relaxed in future godot-rust versions.
Can the new constructor have additional parameters?
Unfortunately this is currently not possible, due to a general limitation of GDNative (see related issue).
As a result, a common pattern to work around this limitation is to use explicit initialization methods. For instance:
#![allow(unused)]
fn main() {
struct EnemyData {
    name: String,
    health: f32,
}

#[derive(NativeClass)]
#[inherit(Object)]
struct Enemy {
    data: Option<EnemyData>,
}

#[methods]
impl Enemy {
    fn new(_base: &Object) -> Self {
        Enemy {
            data: None,
        }
    }

    #[method]
    fn set_data(&mut self, name: String, health: f32) {
        self.data = Some(EnemyData { name, health });
    }
}
}
This however has two disadvantages:
- You need to use an
Optionwith the sole purpose of late initialization, and subsequentunwrap()calls or checks -- weaker invariants in short. - An additional type
EnemyDatafor each native class likeEnemyis required (unless you have very few properties, or decide to addOptionfor each of them, which has its own disadvantages).
An alternative is to register a separate factory class, which returns fully-constructed instances:
#![allow(unused)]
fn main() {
#[derive(NativeClass)]
#[no_constructor] // disallow default constructor
#[inherit(Object)]
struct Enemy {
    name: String,
    health: f32,
}

#[methods]
impl Enemy {
    // nothing here
}

#[derive(NativeClass)]
#[inherit(Reference)]
struct EntityFactory {}

#[methods]
impl EntityFactory {
    #[method]
    fn enemy(&self, name: String, health: f32)
    -> Instance<Enemy, Unique> {
        Enemy { name, health }.emplace()
    }
}
}
So instead of Enemy.new() you can write EntityFactory.enemy(args) in GDScript.
This still needs an extra type EntityFactory, however you could reuse that for multiple classes.
Can I implement static methods in GDNative?
In GDScript, classes can have static methods. However, GDNative currently doesn't allow to register static methods from bindings.
As a work-around, it is possible to use a ZST (zero-sized type):
#![allow(unused)]
fn main() {
#[derive(NativeClass, Copy, Clone, Default)]
#[user_data(Aether<StaticUtil>)]
#[inherit(Object)]
pub struct StaticUtil;

#[methods]
impl StaticUtil {
    #[method]
    fn compute_something(&self, input: i32) -> i32 {
        godot_print!("pseudo-static computation");
        2 * input
    }
}
}
Aether is a special user-data wrapper intended for zero-sized types, that does not perform any allocation or synchronization at runtime.
The type needs to be instantiated somewhere on GDScript level. Good places for instantiation are for instance:
- a member of a long-living util object,
- a singleton auto-load object.
How do I convert from a Variant to the underlying Rust type?
Assuming that a method takes an argument my_node as a Variant
You can convert my_node to a Ref, and then to an Instance or TInstance, and mapping over it to access the Rust data type:
#![allow(unused)]
fn main() {
/// My class that has data
#[derive(NativeClass)]
#[inherit(Node2D)] // something specific, so it's clear when this type re-occurs in code
struct MyNode2D { ... }

/// Utility script that uses MyNode2D
#[derive(NativeClass, Copy, Clone, Default)]
#[user_data(Aether<AnotherNativeScript>)] // ZST, see above
#[inherit(Reference)]
pub struct AnotherNativeScript;

#[methods]
impl AnotherNativeScript {
    #[method]
    pub fn method_accepting_my_node(&self, my_node: Variant) {
        // 1. Cast Variant to Ref of associated Godot type, and convert to TRef.
        let my_node = unsafe {
            my_node
                .try_to_object::<Node2D>()
                .expect("Failed to convert my_node variant to object")
                .assume_safe()
        };

        // 2. Obtain a TInstance which gives access to the Rust object's data.
        let my_node = my_node
            .cast_instance::<MyNode2D>()
            .expect("Failed to cast my_node object to instance");

        // 3. Map over the RefInstance to process the underlying user data.
        my_node
            .map(|my_node, _base| {
                // Now my_node is of type MyNode2D.
            })
            .expect("Failed to map over my_node instance");
    }

}

}
Is it possible to set subproperties of a Godot type, such as a Material?
Yes, it is possible, but it will depend on the type.
For example, when you need to set an albedo_texture on the SpatialMaterial, it will be necessary to use the generic set_texture() function with the parameter index.
While a similar case applies for ShaderMaterial in the case of shader material, to set the shader parameters, you will need to use the set_param() method with the relevant parameter name and value.
Direct access to such properties is planned in godot-rust/godot-rust#689.
What is the Rust equivalent of preload?
Unfortunately, there is no equivalent to preload in languages other than GDScript, because preload is GDScript-specific magic that works at compile time. If you read the official documentation on preload, it says:
"Returns a resource from the filesystem that is loaded during script parsing." (emphasis mine)
This is only possible in GDScript because the parser is deeply integrated into the engine.
You can use ResourcePreloader as a separate node in your scene, which will work regardless of whether you use Rust or GDScript. However, note that if you create a ResourcePreloader in your code, you will still be loading these resources at the time of execution, because there is no way for the engine to know what resources are being added before actually running the code.
The ResourceLoader should be used in most cases.
Also, you can go with a static Mutex<HashMap<..>> variable and load everything you need there during a loading screen.
How can function parameters accept Godot subclasses (polymorphism)?
Static (compile-time) polymorphism can be achieved by a combination of the SubClass trait and upcast().
For example, let's assume we want to implement a helper function that should accept any kind of Container. The helper function can make use of SubClass and upcast() as follows:
#![allow(unused)]
fn main() {
fn do_something_with_container<T>(container: TRef<'_, T>)
    where T: GodotObject + SubClass<Container>
// this means: accept any TRef<T> where T inherits `Container`
{
    // First upcast to a true container:
    let container = container.upcast::<Container>();
    // Now you can call `Container` specific methods like:
    container.set_size(...);
}
}
This function can now be used with arbitrary subclasses, for instance:
#![allow(unused)]
fn main() {
fn some_usage() {
    let panel: Ref<PanelContainer> = PanelContainer::new().into_shared();
    let panel: TRef<PanelContainer> = unsafe { panel.assume_safe() };
    do_something_with_container(panel);
}
}
Note that SubClass is only a marker trait that models the inheritance relationship of Godot classes, and doesn't perform any conversion by itself. For instance, x: Ref<T> or x: TRef<'_, T> satisfying T: GodotObject + SubClass<Container> doesn't mean that x can be used as a Container directly. Rather, it ensures that e.g. x.upcast::<Container>() is guaranteed to work, because T is a subclass of Container. Therefore, it is a common pattern to use SubClass constraints in combination with .upcast() to convert to the base class, and actually use x as such.
Of course, you could also delegate the work to upcast to the call site:
#![allow(unused)]
fn main() {
fn do_something_with_container(container: TRef<Container>) { ... }

fn some_usage() {
    let panel: TRef<PanelContainer> = ...;
    do_something_with_container(panel.upcast());
}
}
This would also support dynamic (runtime) polymorphism -- Ref<T> can also store subclasses of T.
What is the Rust equivalent of onready var?
Rust does not have a direct equivalent to onready var. The most idiomatic workaround with Rust is to use Option<Ref<T>> of you need the Godot node type or Option<Instance<T>> if you are using a Rust based NativeClass.
extends Node
class_name MyClass
onready var node = $Node2d
You would need to use the following code.
#![allow(unused)]
fn main() {
#[derive(NativeClass, Default)]
#[inherit(Node)]
#[no_constructor]
struct MyNode {
    // late-initialization is modeled with Option
    // the Default derive will initialize both to None
    node2d: Option<Ref<Node>>,
    instance: Option<Instance<MyClass>>,
}

#[methods]
impl MyNode {
    #[method]
    fn _ready(&self, #[base] base: TRef<Node>) {
        // Get an existing child node that is a Godot class.
        let node2d = base
            .get_node("Node2D")
            .expect("this node must have a child with the path `Node2D`");
        let node2d = unsafe { node2d.assume_safe() };
        let node2d = node2d.cast::<Node2D>()
                        .expect("child must be of type 'Node2D'");
        self.node2d = Some(node2d.claim());

        // Get an existing child node that is a Rust class.
        let instance = base
            .get_node("MyClass")
            .expect("this node must have a child with the path `MyClass`");
        let instance = unsafe { instance.assume_safe() };
        let instance = instance.cast_instance::<MyClass>()
                        .expect("child must be type `MyClass`");
        self.instance = Some(instance.claim());
    }
}
}
What types are supported for passing through the GDNative API?
The GDNative API supports any type that implements the ToVariant and/or FromVariant traits.
To use a type as a property, in addition to the above, the type will also need to implement the Export trait.
Some concrete examples of types that can be used with the GDNative API are the following:
Variant, this is Godot's "any" type. It must be converted before it can be used.- A subset of scalar types such as
i64,f64,bool, etc. StringandGodotString.- Godot core types such as
Color,Aabb,Transform2D,Vector2, etc. - Godot classes such as
Node,Reference, etc. which must be accessed viaRef<T>(you can't pass them by value, because Godot owns them). - Any Rust struct that derives
NativeClass, throughInstance<T>.
How can I profile my code to measure performance?
There are a lot of ways to profile your code and they vary in complexity.
The simplest way is to use the #[gdnative::profiled] procedural macro that enables Godot to profile the attributed function. This option is useful for comparing performance gains when porting GDScript code to Rust or as a way to understand the relative "frame time" of your code. Don't forget to compile Rust code with --release!
For more information about the Godot profiler, please refer to the official documentation.
In order for Godot to profile your function, all the following must be true:
- The function belongs to a struct that derives
NativeClass. - The function is included in an
implblock that is attributed with the#[methods]attribute. - The function is attributed with
#[method]attribute.
As such, this method is only useful for exported code and is subject to the Godot profiler's limitations, such as millisecond accuracy in profiler metrics.
The following example illustrates how your code should look when being profiled:
#![allow(unused)]
fn main() {
#[derive(NativeClass)]
#[inherit(Node)]
struct MyClass {}

#[methods]
impl MyClass {
    fn new(_base: &Node) -> Self {
        Self {}
    }

    #[method]
    #[gdnative::profiled]
    fn my_profiled_function(&self, #[base] _base: &Node) {
        // Any code in this function will be profiled.
    }
}
}
If you require insight into Rust code that is not exported to Godot, or would like more in-depth information regarding execution of your program, it will be necessary to use a Rust compatible profiler such as puffin or perf. These tools can be used to more accurately determine bottlenecks and the general performance of your Rust code.
Note: There are many more profilers than the ones listed and you should do your own research before selecting which one you wish to use.
For more information about profiling and other rust performance tips, please check out the Rust performance book.
FAQ: Multithreading
Table of contents
- How do I use multithreading?
- Why does my game freeze while using multiple threads?
- Why is accessing the servers using multiple threads slow?
- Why do I get the
DifferentThreaderror?
How do I use multithreading?
Make sure you read Godot's thread safety guidelines.
This is EXTREMELY IMPORTANT.
Read the guidelines again. Make sure you fully understand them.
Anything not explicitly allowed there is a potential minefield.
This cannot be stressed enough, because threading can easily turn a fun gamedev experience into a debugging nightmare. In fact, most occurrences of undefined behavior (UB) with godot-rust occur not because of FFI, dangling objects or broken C++ code, but because threads are used incorrectly. By understanding the implications of multithreading, you can save a lot of effort.
A few points are worth highlighting in particular:
- Do not mix GDScript's
Thread/Mutexclasses with Rust'sstd::threadandstd::syncmodules; they are not compatible. If you absolutely must access GDScript threads from Rust, use the correctThreadandMutexAPIs for it. - Prefer Rust threads whenever possible. Safe Rust statically guarantees that no race conditions can occur (deadlocks are still possible).
In practice, this often means that:
- your game logic (e.g. loading a map) can run in a separate thread, entirely without touching any Godot APIs
- your main thread is exclusively accessing Godot APIs
- the two threads can communicate via channels.
- As elaborated in Godot's guidelines, most Godot classes are simply not thread-safe. This means you can absolutely not access them concurrently without synchronization. Even if things seem to work, you may invoke UB which can manifest in hard-to-find places.
- It is tempting to think that synchronizing concurrent access to an object through
Mutexsolves threading issues. However, this may not be the case: sometimes there are hidden dependencies between unrelated types -- for example, aResourcemight access a global registry, which is currently written by a different object in another thread. Some types internally use shared caches. A lot of these things are undocumented, which means you must know Godot's implementation to be sure. And the implementation can always change and introduce a bug in the future.
TLDR: Be conservative regarding assumptions about the thread-safety of Godot APIs.
Rust threads (without Godot APIs) are a very powerful tool -- use them!
Why does my game freeze while using multiple threads?
Make sure you have multi-threading enabled under Project Settings > Rendering > Threading.
In addition, you will need to ensure that you are not ending up with a deadlock scenario within your Rust code.
Last, you may have violated one of the multithreading guidelines and tips in the first section.
Why is accessing the servers using multiple threads slow?
Aside from deadlock issues, there are a few potential points to investigate when using Godot's servers.
Potential cause #1 - command queue is too small
For multi-threaded access the servers use a thread-safe command queue. This allows you to send multiple commands from any thread. These queues have a fixed size that can be set in the threading section of the Memory -> Limits section of the Project settings.
Potential cause #2 - rayon parallel iterators
The reference created by a server method such as VisualServer::godot_singleton() is not thread-safe. As such, you have to individually get a reference to the singleton.
This can cause severe slowdown, that would not occur if the same job were run from a single thread.
Multi-threading with servers requires that you manually create a thread pool that can hold the reference to the server. Additional testing is required to ensure that this is an actual optimization.
Why do I get the DifferentThread error?
For example, what does the following error indicate?
#![allow(unused)]
fn main() {
ERROR: <native>: gdnative-core: method call failed with error:
       DifferentThread { original: ThreadId(1), current: ThreadId(2) }
   At: src/path/to/class.rs:29
ERROR: <native>: gdnative-core: check module level documentation
                 on gdnative::user_data for more information
   At: src/path/to/class.rs:29
}
If you call certain code from Godot and receive the above error, it is likely that you need to change the user_data that comes with
your NativeClass derive. If no type is specified, it defaults to LocalCellData, which can only be used from the thread it was created in.
See the official docs for more information on when you should use each type of data.
FAQ: Configuration
Table of contents
- How do I create the library file for my GDNative binary?
- Once I create the
.gdnlibfile, how do I create the native script, so that I can attach it to the nodes in the scene tree? - C headers not found by bindgen
- Why aren't my scripts showing up in the Add Node portion of the editor, even though they inherit from
Node,Node2D,SpatialorControl? - Can I use Rust for a tool script?
- Is it possible to use multiple libraries with GDNative?
- Can I expose {insert Rust crate name} for use with Godot and GDScript?
- How do I get auto-completion with IntelliJ-Rust plugin?
- How can I make my debug builds more performant?
How do I create the library file for my GDNative binary?
You can create .gdnlib files with either of the following methods.
Editor
- In the editor, right click in the File System and Select New Resource.
- Select GDNativeLibrary from the menu.
- Save as new GDNativeLibrary. The typical file extension is
.gdnlib. - Select the GDNativeLibrary.
- For each desired target, select a path to the location of the library created by Cargo.
Manual
Create a text file with the .gdnlib extension with the following content.
Please note: you only need to include paths for the targets you plan on building for.
[entry]
X11.64="res://path/to/lib{binary-name}.so"
OSX.64="res://path/to/lib{binary-name}.dylib"
Windows.64="res://path/to/{binary-name}.dll"

[dependencies]
X11.64=[  ]
OSX.64=[  ]
Windows.64 = [ ]

[general]
singleton=false
load_once=true
symbol_prefix="godot_"
reloadable=true
Once I create the .gdnlib file, how do I create the native script, so that I can attach it to the nodes in the scene tree?
Script files can be created in two ways.
- From the editor.
- Manually by creating a
.gdnsfile with the following code snippet.
[gd_resource type="NativeScript" load_steps=2 format=2]

[ext_resource path="res://path/to/{filename}.gdnlib" type="GDNativeLibrary" id=1]

[resource]
resource_name = "{class-name}"
class_name = "{class-name}"
library = ExtResource( 1 )
C headers not found by bindgen
When building the library, bindgen may produce errors that look like this:
godot-rust/gdnative-sys/godot_headers/gdnative/string.h:39:10: fatal error: 'wchar.h' file not found
This means that bindgen was unable to find the C system headers for your platform. If you can locate the headers manually, you may try setting the C_INCLUDE_PATH environment variable so libclang could find them. If on Windows, you may try building from the Visual Studio "developer console", which should setup the appropriate variables for you.
Why aren't my scripts showing up in the Add Node portion of the editor, even though they inherit from Node, Node2D, Spatial or Control?
Due to limitations with Godot 3.x's version of GDNative, NativeScript types do not get registered in the class database. As such, these classes are not included in the Create New Node dialog.
A workaround to this issue has been included in the recipe Custom Nodes Plugin.
Can I use Rust for a tool script?
Yes, any Rust struct that inherits from NativeClass can be also used as a tool class by using the InitHandle::add_tool_class during native script initialization instead of InitHandle::add_class.
#![allow(unused)]
fn main() {
#[derive(NativeClass)]
#[inherit(Node)]
stuct MyTool {}
#[methods]
impl MyTool {
    fn new (_base: &Node) -> Self {
        Self {}
    }
}

fn init(handle: InitHandle) {
    handle.add_tool_class::<InitHandle>();
}
}
Please also see the native-plugin that is the Rust version of the editor plugin tutorial.
Important
- Editor plugins do not support the hot reload feature. If making use of tool classes, your
GDNativeLibrarymust havereloadable=falseor the plugins will crash when the editor loses focus. - It is advised that
GDNativeLibraryfiles for editor plugins be compiled as a separate "cdylib" from theGDNativeLibrarythat may need to be recompiled during development, such as game logic.
Is it possible to use multiple libraries with GDNative?
Yes. This is possible, but it should be avoided unless necessary. Generally you should create one GDNativeLibrary (.gdnlib) and associate many NativeScript (.gdns) files with the single library.
The most common use-case for using multiple GDNativeLibrary files is when creating editor plugins in Rust that are either intended for distribution or cannot be hot reloaded.
If you do have a scenario that requires multiple GDNativeLibrary, you can create as many libraries as you need for your project. Be mindful that it is possible for name collision to occur when loading from multiple dynamic libraries. This can occur in the event that multiple libraries attempt to register the same class in their init function.
To avoid these collisions, rather than the godot_init! initialization macro, prefer the use of the individual macros.
For example, if we want to define the symbol_prefix for our library "my_symbol_prefix", we can use the macros below.
#![allow(unused)]
fn main() {
// _ indicates that we do not have any specific callbacks needed from the engine for initialization. So it will automatically create
// We add the prefix onto the `gdnative_init` which is the name of the callback that Godot will use when attempting to run the library
godot_gdnative_init!(_ as my_symbol_prefix_gdnative_init);
// native script init requires that the registration function be defined. This is commonly named `fn init(init: InitHandle)` in most of the examples
// We add the prefix onto the `native_script_init` which is the name of the callback that Godot will use when attempting to intialize the script classes
godot_nativescript_init!(registration_function as my_symbol_prefix_nativescript_init);
// _ indicates that we do not have any specific callbacks needed from the engine for initialization. So it will automatically create
// We add the prefix onto the `gdnative_terminate` which is the name of the callback that Godot will use when shutting down the library
godot_gdnative_terminate!(_ as my_symbol_prefix_gdnative_terminate);
}
Can I expose {insert Rust crate name} for use with Godot and GDScript?
Yes, with NativeScript so long as you can create a NativeScript wrapper you can create GDScript bindings for a Rust crate. See the logging recipe for an example of wrapping a Rust logging crate for use with GDScript.
How do I get auto-completion with IntelliJ-Rust plugin?
IntelliJ-Family IDEs struggle to autocomplete gdnative types generated at compile-time.
There are two problems preventing autocompletion of gdnative types in IntelliJ-Rust.
First, the features necessary are (as of writing) considered experimental and must be enabled. Press shift twice to open the find all dialog and type Experimental features... and click the checkbox for org.rust.cargo.evaluate.build.scripts. Note that org.rust.cargo.fetch.out.dir will also work, but is known to be less performant and may be phased out.
Second, the bindings files generated (~8mb) are above the 2mb limit for files to be processed. As reported you can increase the limit with the steps below.
- open custom VM options dialog (
Help|Find Actionand typeEdit Custom VM Options) - add
-Didea.max.intellisense.filesize=limitValueline wherelimitValueis desired limit in KB, for example, 10240. Note, it cannot be more than 20 MB. - restart IDE
How can I make my debug builds more performant?
Note: These changes may slow down certain aspects of the build times for your game.
Some simple ways to make your debug builds faster is to update the following profiles in your workspace cargo file.
[profile.dev.package."*"]
opt-level = 3

[profile.dev]
opt-level=1
FAQ: Versioning and supported platforms
Table of contents
- What does godot-rust's version mean?
- Is godot-rust stable?
- Does godot-rust support Godot 4?
- What is the scope of the godot-rust project?
- Will godot-rust speed up my game in Godot?
- Which platforms are supported?
- Does godot-rust support consoles?
What does godot-rust's version mean?
godot-rust follows Cargo's semantic versioning for the API breaking changes.
Is godot-rust stable?
godot-rust will not be considered stable until MAJOR version 1.x.x. As such, MINOR version upgrades are subject to potential API breaking changes, but PATCH versions will not break the API.
Does godot-rust support Godot 4?
See dedicated FAQ Page.
What is the scope of the godot-rust project?
Similar Questions
Why is X feature not available in the API? Why does X function take Y parameters and return Z?
Answer
The short answer is "that is how the Godot API works". As godot-rust is focused on the bindings to Godot, we follow the API.
The longer answer is that the goal of the bindings is to ease the friction between using Rust and interacting with the Godot API. This is accomplished by use of Procedural Macros as well as clever use of traits and trait conversions to keep friction and unsafe blocks to a minimum.
Types, which are not part of Godot's Object class hierarchy, have an implementation in Rust. This avoids FFI overhead and allows code to be more idiomatic. Examples are Vector2, Vector3, Color, GodotString, Dictionary, etc.
Will godot-rust speed up my game in Godot?
Short Answer: It depends on what you are building and the bottlenecks, but it's pretty fast(tm).
Longer Answer: Generally speaking, compared to GDScript, Rust will (in most cases) be a large performance increase.
Compared to an C or C++ GDNative, the performance should be similar.
Compared to a C++ Engine module, the performance will probably be somewhat slower as GDNative modules cannot take advantage of certain optimizations and need to use the C Foreign Function Interface at runtime.
Caveat: The above apply only to release builds with appropriate release settings. When comparing to debug builds in Rust can be very slow.
Caveat 2: It is still possible to write Rust code that has poor performance. You will still need to be mindful of the specific algorithms that you are choosing.
Caveat 3: A lot of code in a game is not performance-critical and as such, Rust will help only in limited ways. When deciding between GDScript and Rust, you should also consider other factors such as static type safety, scalability, ecosystem and prototyping speed. Try to use the best of both worlds, it's very well possible to have part of your code in GDScript and part in Rust.
Which platforms are supported?
Short Answer: Wherever you can get your code (and Godot) to run. :)
Long Answer: Rust and Godot are natively available for Windows, Linux, Android and iOS export targets.
As of writing, WASM targets are a tentatively doable, but it requires additional configuration and is currently not supported out of the box. The godot-rust bindings do not officially support this target. The progress in this regard can be tracked in godot-rust/godot-rust#647.
Does godot-rust support consoles?
The official position of the godot-rust project is that, we do not have the ability to offer console support due to a lacking access to the SDK.
As for whether or not it is possible to compile Rust to run on a console, due to the Non-disclosure Agreements that are a part of the console SDKs, it is unlikely that anyone can give you a definitive answer.
The official Godot documentation goes into more details with how this works from a Godot perspective. Please keep in mind that this does not necessarily extend to GDNative.
Regarding whether Rust can run on a console or not, as most modern consoles are using x86 processor architectures, it should be possible to compile for them. The primary issue will be whether the console manufacturer has a version of the Rust standard library that is building for their console. If not, it would be necessary to port it or leverage a port from another licensed developer.
FAQ: Community
Table of contents
I need help, where can I ask?
The godot-rust project uses several sources for different kinds of information.
1 - API documentation
The documentation of released crates is hosted at docs.rs.
If you prefer to look up API details of the latest master in-development version, they are hosted on GitHub pages.
The crate-level documentation of gdnative should guide you to more concrete places to look at.
If you don't know where to start, look at the prelude module -- it contains the most commonly used symbols.
2 - Godot Docs
As godot-rust is the layer that wraps the Godot API, the behavior and use cases for many of the classes and methods are available in the official Godot documentation. Whenever you have questions for anything Godot-specific that is outside godot-rust's scope, this is the place to go as well.
3 - Discord Server
For more complex questions, the fastest way to get an answer is to reach out to us and fellow developers on the godot-rust Discord.
4 - Bug reports: GitHub issue
If you find a bug or an issue with the godot-rust bindings or have an idea for future development, please feel free to open up a GitHub issue and we'd be happy to take a look.
Please consider the Contribution Guidelines if you plan to contribute.
GitHub issues are not intended for general questions, as only project maintainers and contributors generally read and track new issues. As such, if you have a question about how to use the library, we highly recommend seeking out one of the above options before opening an issue.
FAQ: Godot 4 Status
Table of contents
- What is the status of Godot 4 Support?
- What is GDExtension? Why don't we just upgrade GDNative?
- Where can I read more about it?
What is the status of Godot 4 Support?
Godot 4 is supported in the gdext GitHub repo.
For an up-to-date overview of implementation status, consult its ReadMe as well as issue #24.
What is GDExtension? Why don't we just upgrade GDNative?
The Godot team has officially announced GDExtension as the replacement for GDNative. GDNative is no longer supported in Godot 4.
Where can I read more about it?
Check out the gdext book, which is still under construction.
Recipes
This is a small collection of recipes and patterns that various contributors have found to be useful with godot-rust.
These recipes cover general use cases and are not intended to be the only way to implement these patterns. Each recipe should be evaluated and customized to your specific use case.
The pages are listed alphabetically, so instead of reading them one-by-one, you can directly jump to those that appeal to you.
Recipe: Async with Tokio runtime
This recipe is based off of the test written for gdnative-async, which uses the futures crate in the executor. For cases where you may need a tokio runtime, it is possible to execute spawned tokio tasks in much the same way, with some alterations.
Requirements
This recipe requires the following entries in your Cargo.toml file
tokio = { version = "1.10", features = ["rt"] }
gdnative = { git = "https://github.com/godot-rust/godot-rust.git", features = ["async"]}
Defining the Executor
The executor itself can be defined the same way.
#![allow(unused)]
fn main() {
thread_local! {
	static EXECUTOR: &'static SharedLocalPool = {
		Box::leak(Box::new(SharedLocalPool::default()))
	};
}
}
However, our SharedLocalPool will store a LocalSet instead, and the futures::task::LocalSpawn implementation for the type will simply spawn a local task from that.
#![allow(unused)]
fn main() {
use tokio::task::LocalSet;

#[derive(Default)]
struct SharedLocalPool {
	local_set: LocalSet,
}

impl futures::task::LocalSpawn for SharedLocalPool {
	fn spawn_local_obj(
		&self,
		future: futures::task::LocalFutureObj<'static, ()>,
	) -> Result<(), futures::task::SpawnError> {
		self.local_set.spawn_local(future);

		Ok(())
	}
}
}
The Executor Driver
Finally, we need to create a NativeClass which will act as the driver for our executor. This will store the tokio Runtime.
#![allow(unused)]
fn main() {
use tokio::runtime::{Builder, Runtime};

#[derive(NativeClass)]
#[inherit(Node)]
struct AsyncExecutorDriver {
	runtime: Runtime,
}

impl AsyncExecutorDriver {
	fn new(_base: &Node) -> Self {
		AsyncExecutorDriver {
			runtime: Builder::new_current_thread()
				.enable_io() 	// optional, depending on your needs
				.enable_time() 	// optional, depending on your needs
				.build()
				.unwrap(),
		}
	}
}
}
In the _process call of our AsyncExecutorDriver, we can block on run_until on the LocalSet. run_until will automatically resume all tasks on the local set until the provided future is completed. Since we don't want to block the frame, and we'd be checking every frame anyway, we just provide an empty task and await it.
#![allow(unused)]
fn main() {
#[methods]
impl AsyncExecutorDriver {
	#[method]
	fn _process(&self, #[base] _base: &Node, _delta: f64) {
		EXECUTOR.with(|e| {
			self.runtime
				.block_on(async {
					e.local_set
						.run_until(async {
							tokio::task::spawn_local(async {}).await
						})
						.await
				})
				.unwrap()
		})
	}
}
}
From there, initializing is just the same as it is in the tests.
#![allow(unused)]
fn main() {
fn init(handle: InitHandle) {
	gdnative::tasks::register_runtime(&handle);
	gdnative::tasks::set_executor(EXECUTOR.with(|e| *e));

	...
	handle.add_class::<AsyncExecutorDriver>();
}
}
Recipe: Custom node plugin
While GDNative in Godot 3.x has some limitations, creating an EditorPlugin that registers custom nodes can be used to help integrate your types more tightly in the engine. Using a Custom Nodes plugin, you may register as many NativeClass scripts as you need in a single plugin.
- Create the directory "res://addons/my_custom_nodes/".
- In the directory "res://addons/my_custom_nodes/", create
plugin.cfgandadd_my_custom_nodes.gdand include the following code for each.
plugin.cfg
[plugin]
name="My Custom Nodes"
description="Adds my custom nodes for my native classes."
author="your-name"
version="0.1.0"
script="add_my_custom_nodes.gd"
add_my_custom_nodes.gd
tool
extends EditorPlugin

func _enter_tree():
    # Get the base icon from the current editor interface/theme
    var gui = get_editor_interface().get_base_control()
    var node_icon = gui.get_icon("Node", "EditorIcons")

    # Alternatively, preload to a custom icon at the following
    # var node_icon preload("res://icon_ferris.png")

    add_custom_type(
        "MyNode",
        "Control",
        preload("res://gdnative/MyNode.gdns"),
        node_icon
    )

    # Add any additional custom nodes here here.

func _exit_tree():
    remove_custom_type("MyNode")
    # Add a remove for each registered custom type to clean up
From the editor's main menu, find "Project > Project Settings > Plugins". Find "My Custom Nodes" in the list of plugins and activate this. From here, you can create these directly from the "Create New Node" dialog. In addition, any nodes created this way will disallow the script from being changed or removed.
For more information about this kind of plugin, please refer to the Godot Documentation.
Note: This method only works for types that inherit from Script. In addition, changing the path to the ".gdns" file will cause the custom Node to no longer register correctly.
Note 2: This does not register your custom classes in the class database. In order to instantiate the script from GDScript, it will still be necessary to use var ScriptType = preload("res://path/to/my_node.gdns") before attempting to instantiate it.
Recipe: Loading external resource files
If you need to use any files that aren't explicitly supported by Godot's Resource Loader, it will be necessary to process and load the file yourself.
This recipe covers two methods of loading these files.
Option 1 - Embed the File into the Binary
The simplest way is to embed the resource directly into your binary by using the std::include_bytes macro.
To embed the file directly into the binary you can use the following macro:
#![allow(unused)]
fn main() {
// To have global immutable access to the file.
const RESOURCE: &'static [u8] = include_bytes!("path/to/resource/file");

fn process_the_resource() {
    // Include the file locally
    let bytes = include_bytes!("path/to/resource/file");
}
}
This can be useful for embedding any information that should be included at build time.
For example: such as if you wish to hard-code certain features like cheat codes, developer consoles, or default user configuration as a file rather than a build flag.
This approach is much more limited as it requires recompiling for all targets whenever changes to the resources are made.
Option 2 - Embed the File in the PCK
For most other use-cases you can use Godot's PCK file to export your resources into the game.
This can be accomplished by using the gdnative::api::File module as follows.
#![allow(unused)]

fn main() {
fn load_resource_as_string(filepath: &str) -> String {
    use gdnative::api::File;
    let file = File::new();
    file.open(filepath, File::READ).expect(&format!("{} must exist", filepath));

    let data: GodotString = file.get_as_text();
    // Depending upon your use-case you can also use the following methods depending upon your use-case.
    // let line: StringArray = file.get_csv_line(0);
    // let file_len = file.get_len();
    // let bytes: ByteArray = file.get_bytes(file_len);
    data.to_string()
}
}
See the File Class Documentation for every function that you use for loading the resources.
After you retrieve the data in the desired format, you can process it like you would normal Rust code.
Option #3 Save and Load filedata as user_data
Godot allows access to device side user directory for the project under "user://". This works very similar to loading above and it uses the gdnative::api::File API
Note: Saving only works on resource paths (paths starting with "res://") when Godot is being run in the editor. After exporting "res://" becomes read-only.
Example on writing and reading string data.
#![allow(unused)]
fn main() {
fn save_data_from_string(filepath: &str, data: &str) {
    use gdnative::api::File;
    let file = File::new();
    file.open(filepath, File::WRITE).expect(&format!("{} must exist", &filepath));

    file.store_string(data);
}


fn load_data_as_string(filepath: &str) -> String {
    use gdnative::api::File;
    let file = File::new();
    file.open(filepath, File::READ).expect(&format!("{} must exist", &filepath));

    let data: GodotString = file.get_as_text();
    data.to_string()
}
}
For more information on the paths, please refer to the File System Tutorial.
Testing
This section is for unit testing from Rust without loading Godot. As gdnative::api::File requires that Godot be running, any Rust-only unit tests will require a separate method to be implemented in order to load the resources. This can be accomplished by creating separate code paths or functions #[cfg(test)] and #[cfg(not(test))] attributes to differentiate between test configuration and Godot library configurations.
In test configurations, you will need to ensure that your loading code uses std::fs::File or some equivalent to read your load.
Exporting
When exporting your game, under the Resources Tab you will need to add a filter so that godot will pack those resources into the .pck file.
For example: If you are using .json, .csv and .ron files, you will need to use include *.json, *.csv, *.ron in the "Filters to Export non-resource files/folders" field.
Recipe: Logging
Logging in Godot can be accessed by using the godot_print!, godot_warn!, and godot_error! macros.
These macros only work when the library is loaded by Godot. They will panic instead when invoked outside that context, for example, when the crate is being tested with cargo test
Simple wrapper macros for test configurations
The first option that you have is wrap the godot_print! macros in the following macro that will use godot_print! when running with Godot, and stdout when run during tests.
#![allow(unused)]
fn main() {
/// prints to Godot's console, except in tests, there it prints to stdout
macro_rules! console_print {
    ($($args:tt)*) => ({
        if cfg!(test) {
            println!($($args)*);
        } else {
            gdnative::godot_print!($($args)*);
        }
    });
}
}
Using a logging Crate
A more robust solution is to integrate an existing logging library.
This recipe demonstrates using the log crate with flexi-logger. While most of this guide will work with other backends, the initialization and LogWriter implementation may differ.
First add the following crates to your Cargo.toml file. You may want to check the crates.io pages of the crates for any updates.
log = "0.4.14"
flexi_logger = "0.17.1"
Then, write some code that glues the logging crates with Godot's logging interface. flexi-logger, for example, requires a LogWriter implementation:
#![allow(unused)]
fn main() {
use gdnative::prelude::*;
use flexi_logger::writers::LogWriter;
use flexi_logger::{DeferredNow, Record};
use log::{Level, LevelFilter};

pub struct GodotLogWriter {}

impl LogWriter for GodotLogWriter {
    fn write(&self, _now: &mut DeferredNow, record: &Record) -> std::io::Result<()> {
        match record.level() {
            // Optionally push the Warnings to the godot_error! macro to display as an error in the Godot editor.
            flexi_logger::Level::Error => godot_error!("{}:{} -- {}", record.level(), record.target(), record.args()),
            // Optionally push the Warnings to the godot_warn!  macro to display as a warning in the Godot editor.
            flexi_logger::Level::Warn => godot_warn!("{}:{} -- {}",record.level(), record.target(), record.args()),
            _ => godot_print!("{}:{} -- {}", record.level(), record.target(), record.args())
        }        ;
        Ok(())
    }

    fn flush(&self) -> std::io::Result<()> {
        Ok(())
    }

    fn max_log_level(&self) -> LevelFilter {
        LevelFilter::Trace
    }
}
}
For the logger setup, place the code logger configuration code in your fn init(handle: InitHandle) as follows.
To add the logging configuration, you need to add the initial configuration and start the logger inside the init function.
#![allow(unused)]
fn main() {
fn init(handle: InitHandle) {
    flexi_logger::Logger::with_str("trace")
        .log_target(flexi_logger::LogTarget::Writer(Box::new(crate::util::GodotLogWriter {})))
        .start()
        .expect("the logger should start");
    /* other initialization work goes here */
}
godot_init!(init);
}
Setting up a log target for tests
When running in a test configuration, if you would like logging functionality, you will need to initialize a log target.
As tests are run in parallel, it will be necessary to use something like the following code to initialize the logger only once. The #[cfg(test)] attributes are used to ensure that this code is not accessible outside of test builds.
Place this in your crate root (usually lib.rs)
#![allow(unused)]
fn main() {
#[cfg(test)]
use std::sync::Once;
#[cfg(test)]
static TEST_LOGGER_INIT: Once = Once::new();
#[cfg(test)]
fn test_setup_logger() {
    TEST_LOGGER_INIT.call_once(||{
        flexi_logger::Logger::with_str("debug")
        .log_target(flexi_logger::LogTarget::StdOut)
        .start()
        .expect("the logger should start");
    });
}
}
You can call the above code in your units tests with crate::test_setup_logger(). Please note: currently there does not appear to be a tes case that will be called before tests are configured, so the test_setup_logger will need to be called in every test where you require log output.
Now that the logging is configured, you can use use it in your code such as in the following sample
#![allow(unused)]
fn main() {
log::trace!("trace message: {}", "message string");
log::debug!("debug message: {}", "message string");
log::info!("info message: {}", "message string");
log::warn!("warning message: {}", "message string");
log::error!("error message: {}", "message string");
}
At this point, we have a logging solution implemented for our Rust based code that will pipe the log messages to Godot.
But what about GDScript? It would be nice to have consistent log messages in both GDScript and GDNative. One way to ensure that is to expose the logging functionality to Godot with a NativeClass.
Exposing to GDScript
Note
As the Rust macros cannot get the GDScript name or resource_path, it is necessary to pass the log target from GDScript.
#![allow(unused)]
fn main() {
#[derive(NativeClass, Copy, Clone, Default)]
#[user_data(Aether<DebugLogger>)]
#[inherit(Node)]
pub struct DebugLogger;

#[methods]
impl DebugLogger {
    fn new(_: &Node) -> Self {
        Self {}
    }
    #[method]
    fn error(&self, target: String, message: String) {
        log::error!(target: &target, "{}", message);
    }
    #[method]
    fn warn(&self, target: String, message: String) {
        log::warn!(target: &target, "{}", message);
    }
    #[method]
    fn info(&self, target: String, message: String) {
        log::info!(target: &target, "{}", message);
    }
    #[method]
    fn debug(&self, target: String, message: String) {
        log::debug!(target: &target, "{}", message);
    }
    #[method]
    fn trace(&self, target: String, message: String) {
        log::trace!(target: &target, "{}", message);
    }
}
}
After adding the class above with handle.add_class::<DebugLogger>() in the init function, you may add it as an Autoload Singleton in your project for easy access. In the example below, the name "game_logger" is chosen for the Autoload singleton:
game_logger.trace("name_of_script.gd", "this is a trace message")
game_logger.debug("name_of_script.gd", "this is a debug message")
game_logger.info("name_of_script.gd", "this is an info message")
game_logger.warn("name_of_script.gd", "this is a warning message")
game_logger.error("name_of_script.gd", "this is an error message")
As this is not very ergonomic, it is possible to make a more convenient access point that you can use in your scripts. To make the interface closer to the Rust one, we can create a Logger class in GDScript that will call the global methods with the name of our script class.
extends Reference

class_name Logger

var _script_name

func _init(script_name: String) -> void:
	self._script_name = script_name

func trace(msg: String) -> void:
	D.trace(self._script_name, msg)

func debug(msg: String) -> void:
	D.debug(self._script_name, msg)

func info(msg: String) -> void:
	D.info(self._script_name, msg)

func warn(msg: String) -> void:
	D.warn(self._script_name, msg)

func error(msg: String) -> void:
	D.error(self._script_name, msg)
To use the above class, create an instance of Logger in a local variable with the desired script_name and use it as in the script example below:
extends Node

var logger = Logger.new("script_name.gd")

func _ready() -> void:
    logger.info("_ready")
And now you have a logging solution fully implemented in Rust and usable in GDScript.
Recipe: Nix as development environment
Disclaimer: Currently the following steps are tested and confirmed to work on Linux only.
Nix is a package manager that employs a pure functional approach to dependency management. Nix packages are built and ran in isolated environments. It makes them more portable, but also harder to author. This tutorial will walk you through the process of setting up a package for Godot, GDNative and Rust with Nix.
This tutorial assumes that Nix is installed in your system.
To begin with, we are going to create a new project using the Hello, world! guide in Getting Started. Note that the full source code for the project is available at https://github.com/godot-rust/godot-rust/tree/master/examples/hello-world. Because we aren't using the default build system explained in setup, you should only be worried about the content of the project rather than the dependencies.
Specifying dependencies
Now to the Nix part of the tutorial. In the root directory of the project (where project.godot is located), create a new file called shell.nix. Later on, this file will be evaluated by Nix to define the dependencies of your project. Below are the default content of shell.nix to run the sample project. We will also explain it in brief about the meaning each line of code.
let
    # Get an up-to-date package for enabling OpenGL support in Nix
    nixgl = import (fetchTarball "https://github.com/guibou/nixGL/archive/master.tar.gz") {};

    # Pin the version of the nix package repository that has Godot 3.2.3 and compatible with godot-rust 0.9.3
    # You might want to update the commit hash into the one that have your desired version of Godot
    # You could search for the commit hash of a particular package by using this website https://lazamar.co.uk/nix-versions
    pkgs = import (fetchTarball "https://github.com/nixos/nixpkgs/archive/5658fadedb748cb0bdbcb569a53bd6065a5704a9.tar.gz") {};
in
    # Configure the dependency of your shell
    # Add support for clang for bindgen in godot-rust
    pkgs.mkShell.override { stdenv = pkgs.clangStdenv; } {
        buildInputs = [
            # Rust related dependencies
            pkgs.rustc
            pkgs.cargo
            pkgs.rustfmt
            pkgs.libclang

            # Godot Engine Editor
            pkgs.godot

            # The support for OpenGL in Nix
            nixgl.auto.nixGLDefault
        ];

        # Point bindgen to where the clang library would be
        LIBCLANG_PATH = "${pkgs.libclang.lib}/lib";
        # Make clang aware of a few headers (stdbool.h, wchar.h)
        BINDGEN_EXTRA_CLANG_ARGS = with pkgs; ''
          -isystem ${llvmPackages.libclang.lib}/lib/clang/${lib.getVersion clang}/include
          -isystem ${llvmPackages.libclang.out}/lib/clang/${lib.getVersion clang}/include
          -isystem ${glibc.dev}/include
        '';

        # For Rust language server and rust-analyzer
        RUST_SRC_PATH = "${pkgs.rust.packages.stable.rustPlatform.rustLibSrc}";

        # Alias the godot engine to use nixGL
        shellHook = ''
            alias godot="nixGL godot -e"
        '';
    }
If you get any errors about missing headers, you can use nix-locate to search for them, e.g. nix-locate 'include/wchar.h' | grep -v '^(' (the grep -v hides indirect packages), and then add the matching Nix package via the BINDGEN_EXTRA_CLANG_ARGS env var like above (context).
Activating the Nix environment
One of the simplest way to activate the nix environment is to use the nix-shell command. This program is installed automatically as you install Nix Package Manager.
First, you need to open the root directory of your project. And then to activate your environment, run nix-shell -v into your terminal. The optional -v flag in the command will configure the command to be more verbose and display what kinds of things is getting installed. Because this is your first time using nix-shell on this particular project, it will take some time to download and install all the required dependencies. Subsequent run will be a lot faster after the installation.
To run the project, first you need to compile the hello-world Rust library using cargo build. After that, you can open the Godot Engine in your terminal using the command godot. As seen in shell.nix, this command is actually aliased to nixGL godot -e in which Godot will be opened using nixGL instead of opening it directly. After running the default scene, you should be able to see a single hello, world. printed in the Godot terminal.
Recipe: Rust panic handler
When using GDNative, Rust panics are ignored by Godot by default. This recipe can be used to catch those panics in the Godot editor at runtime.
This recipe was written and tested with godot-rust 0.9.3 with Rust version 1.52.1
GDScript hook
First create a GDScript with the following code named "rust_panic_hook.gd"
extends Node

func rust_panic_hook(error_msg: String) -> void:
	assert(false, error_msg)
In the Project Settings -> Autoload menu, create an autoload singleton referencing the script (in this case rust_panic_hook.gd).
Pick a unique name that identifies the autoload singleton. You will need to use this name to find the autoload singleton in Rust.
For this example, we are using the autoload name "rust_panic_hook".
At this point we have our GDScript based panic hook we can use in Rust.
GDNative hook initialization
In the GDNative library code's entry point (lib.rs by default).
#![allow(unused)]
fn main() {
pub fn init_panic_hook() {
    // To enable backtrace, you will need the `backtrace` crate to be included in your cargo.toml, or
    // a version of Rust where backtrace is included in the standard library (e.g. Rust nightly as of the date of publishing)
    // use backtrace::Backtrace;
    // use std::backtrace::Backtrace;
    let old_hook = std::panic::take_hook();
    std::panic::set_hook(Box::new(move |panic_info| {
        let loc_string;
        if let Some(location) = panic_info.location() {
            loc_string = format!("file '{}' at line {}", location.file(), location.line());
        } else {
            loc_string = "unknown location".to_owned()
        }

        let error_message;
        if let Some(s) = panic_info.payload().downcast_ref::<&str>() {
            error_message = format!("[RUST] {}: panic occurred: {:?}", loc_string, s);
        } else if let Some(s) = panic_info.payload().downcast_ref::<String>() {
            error_message = format!("[RUST] {}: panic occurred: {:?}", loc_string, s);
        } else {
            error_message = format!("[RUST] {}: unknown panic occurred", loc_string);
        }
        godot_error!("{}", error_message);
        // Uncomment the following line if backtrace crate is included as a dependency
        // godot_error!("Backtrace:\n{:?}", Backtrace::new());
        (*(old_hook.as_ref()))(panic_info);

        unsafe {
            if let Some(gd_panic_hook) = gdnative::api::utils::autoload::<gdnative::api::Node>("rust_panic_hook") {
                gd_panic_hook.call("rust_panic_hook", &[GodotString::from_str(error_message).to_variant()]);
            }
        }
    }));
}
}
The details the process in the above code is as follows:
- Get the default panic hook from Rust
- Create a new panic hook closure to output to the Godot console
- Get the location string and error message from the
panic_infoclosure parameter and print the message to the console - Optionally, retreive and print the backtrace
- Execute the old panic hook so that the normal panic behavior still occurs
- Call the function defined on your GDScript panic hook script
The final step is to call init_panic_hook() at the end of the init function that you pass in the godot_init(init) macro such as in the following code.
#![allow(unused)]
fn main() {
// GDNative entry point
fn init(handle: InitHandle) {
    // -- class registration above
    init_panic_hook();
}
}
Now you can run your game and once it is fully initialized, any panics will pause the game execution and print the panic message in Godot's editor in the Debugger's Error tab.
Exporting
Exporting Godot projects using godot-rust is a 2 steps process:
- build your Rust code with cargo, which triggers a build of gdnative crate for the target platform;
- do a standard Godot export.
If the target you are exporting to is the same as the one you are developping on, the export is straightforward, however when cross-compiling (eg: exporting for a mobile platform, or building from a Docker image on a CI) you need to correctly set up a cross-compiler for the target platform. Rust does this very well, so provided you only write Rust code, cross-compiling is easy. However to build gdnative-sys you need a working C/C++ cross compiler with, among other things, the correct headers and linker.
How to set up such a cross-compiler depends on the source and the target platform.
Android
Disclaimer: Currently, the following steps are tested and confirmed to work on Linux only.
In order to export to Android, we need to compile our Rust source for the appropriate targets. Unlike compiling for our native targets, there are a few extra steps involved with cross-compiling for another target.
Installing prerequisites
First, we need to install the Android SDK with NDK enabled. This contains the necessary tools for each architecture. Once the Android SDK is installed, open Editor Settings in the Godot GUI (Editor > Editor Settings > Export > Android) and set the absolute paths to adb, jarsigner, and the debug keystore (debug.keystore), all of which can be found in the Android SDK installation.
About NDK versions
libgccwas removed in Android NDK versionr23-beta3. Although Rust was updated accordingly (see this issue), it's not available in stable Rust yet (as of 2023-03-04). Therefore, you need to use the nightly toolchain if you have Android NDK version 23 or higher.# Install nightly toolchain rustup toolchain install nightlyAfter that, run all
rustuporcargocommands in this tutorial using the nightly toolchain by adding+nightlyargument. For example:rustup +nightly target add aarch64-linux-androidAlternatively, you can change the toolchain for your project using
rust-toolchain.tomlfile, or you can change the global default toolchain. See rustup book for more information.
Then, we'll install the Rust toolchains for the targets we want to support:
rustup target add aarch64-linux-android    # for arm64 (64-bit)
rustup target add x86_64-linux-android     # for x86_64 (64-bit)
32-bit targets
The aarch64-linux-android and x86_64-linux-android toolchains are our top priorities, because Google has been requiring 64-bit binaries for all new apps on Play Store since August 2019, and will stop serving 32-bit apps in 2021. If you, nevertheless, want to support 32-bit targets, there are a few more dependencies to install.
A bit of context
There are two major CPU providers in the Android ecosystem: ARM and Intel.
They were primarily supporting 32-bit OS, with notably ARMv7 and x86 architectures, until they started supporting 64-bit OS, by introducing ARMv8-A (often called ARM64) and x86-64 (often called Intel 64 or AMD64, in reference to a long-time conflict between Intel and AMD).
Aarch64 is the 64-bit execution state that is introduced in ARM64 chips. i686 (also called P6) is actually the sixth-generation Intel x86 microarchitecture.
Generally speaking, 32-bit programs can run on 64-bit systems, but 64-bit programs won't run on 32-bit systems.
Rust toolchains for 32-bit targets
rustup target add armv7-linux-androideabi  # for armv7 (32-bit)
rustup target add i686-linux-android       # for x86 (32-bit)
gcc libraries for cross-compilation
On Windows, we will need to setup a 32-bit/64-bit compatible MinGW instance.
On UNIX-like systems, the required packages are usually available under different names in the package managers for each distribution. On Debian-based Linuxes (including Ubuntu), for example, the required libraries can be installed using apt:
apt-get update
apt-get install g++-multilib gcc-multilib libc6-dev-i386 -y
Custom Godot build
Note that if you are using GDNative with custom-godot setting, you need to compile Godot for Android yourself. Follow the instructions in official Godot documentation and make sure that GDNative support is enabled (which will be enabled by default unless you add module_gdnative_enabled=no).
Setting up Cargo
To make Cargo aware of the proper platform-specific linkers that it needs to use for Android targets, we need to put the paths to the binaries in the Cargo configuration file, which can be found (or created) at $HOME/.cargo/config.toml on UNIX-like systems, or %USERPROFILE%\.cargo\config.toml on Windows), using [target] tables:
[target.armv7-linux-androideabi]
linker = "/usr/local/lib/android/sdk/ndk/21.4.7075529/toolchains/llvm/prebuilt/linux-x86_64/bin/armv7a-linux-androideabi29-clang"
... where the value of linker is an absolute path to the Android SDK linker for the target triple. Assuming $ANDROID_SDK_ROOT is the Android SDK path and $ANDROID_NDK_VERSION is the installed NDK instance version, these binaries can be found at:
- Windows:
$ANDROID_SDK_ROOT\ndk\$ANDROID_NDK_VERSION\toolchains\llvm\prebuilt\windows-x86_64\bin\ - UNIX-like systems:
$ANDROID_SDK_ROOT/ndk/$ANDROID_NDK_VERSION/toolchains/llvm/prebuilt/linux-x86_64/bin/
Alternatively, the NDK can be located under
$ANDROID_SDK_ROOT/ndk-bundleinstead of$ANDROID_SDK_ROOT/ndk/$ANDROID_NDK_VERSION, but this folder is deprecated because it doesn't allow for parallel versions installation.
Repeat for all targets installed in the previous step, until we get something that looks like:
# Example configuration on an UNIX-like system. `29` is the Android API version.

[target.armv7-linux-androideabi]
linker = "/usr/local/lib/android/sdk/ndk/21.4.7075529/toolchains/llvm/prebuilt/linux-x86_64/bin/armv7a-linux-androideabi29-clang"

[target.aarch64-linux-android]
linker = "/usr/local/lib/android/sdk/ndk/21.4.7075529/toolchains/llvm/prebuilt/linux-x86_64/bin/aarch64-linux-android29-clang"

[target.i686-linux-android]
linker = "/usr/local/lib/android/sdk/ndk/21.4.7075529/toolchains/llvm/prebuilt/linux-x86_64/bin/i686-linux-android29-clang"

[target.x86_64-linux-android]
linker = "/usr/local/lib/android/sdk/ndk/21.4.7075529/toolchains/llvm/prebuilt/linux-x86_64/bin/x86_64-linux-android29-clang"
Alternatively, you can use cargo config environment variables:
export CARGO_TARGET_ARMV7_LINUX_ANDROIDEABI_LINKER="/usr/local/lib/android/sdk/ndk/21.4.7075529/toolchains/llvm/prebuilt/linux-x86_64/bin/armv7a-linux-androideabi29-clang"
export CARGO_TARGET_AARCH64_LINUX_ANDROID_LINKER="/usr/local/lib/android/sdk/ndk/21.4.7075529/toolchains/llvm/prebuilt/linux-x86_64/bin/aarch64-linux-android29-clang"
export CARGO_TARGET_I686_LINUX_ANDROID_LINKER="/usr/local/lib/android/sdk/ndk/21.4.7075529/toolchains/llvm/prebuilt/linux-x86_64/bin/i686-linux-android29-clang"
export CARGO_TARGET_X86_64_LINUX_ANDROID_LINKER="/usr/local/lib/android/sdk/ndk/21.4.7075529/toolchains/llvm/prebuilt/linux-x86_64/bin/x86_64-linux-android29-clang"
Setting up environment variables for gdnative-sys
The gdnative-sys crate can infer include paths for Android targets, but it requires the following environment variables:
$ANDROID_SDK_ROOT, which should point to the Android SDK root (which contains thendkorndk-bundledirectory).$ANDROID_NDK_VERSION, which should contain the selected ndk version (if omitted, the latest version available is used and a warning is issued).
Depending on your installation, these environment variables might have already been set. Otherwise, the variables may be set in bash:
export ANDROID_SDK_ROOT=/path/to/android/sdk
export ANDROID_NDK_VERSION=21.4.7075529
... or in PowerShell on Windows:
$env:ANDROID_SDK_ROOT = "C:\path\to\android\sdk"
$env:ANDROID_NDK_VERSION = "21.4.7075529"
Building the GDNative library
Finally, we can now build the GDNative library with Cargo for one or multiple targets:
cargo build --release --target x86_64-linux-android
Important note: ARM and x86 are, by design, different architectures. It is normal to get errors while running cargo test with a Rust library targeting ARMv7 on a x86-64 CPU, for example, since the CPU is unable to handle it.
Exporting in Godot
Linking to Android binaries in .gdns
After building the GDNative libraries, we need to link them to Godot, by adding new entries in the GDNative library declaration file (*.gdnlib) for Android.armeabi-v7a (ARMv7), arm64-v8a (ARM64), Android.x86 (x86) and/or Android.x86_64 (x86-64), depending of the toolchains we actually used in previous steps:
[entry]

Android.armeabi-v7a="res://target/armv7-linux-androideabi/release/lib.so"
Android.arm64-v8a="res://target/aarch64-linux-android/release/lib.so"
Android.x86="res://target/i686-linux-android/release/lib.so"
Android.x86_64="res://target/x86_64-linux-android/release/lib.so"

[dependencies]

Android.armeabi-v7a=[  ]
Android.arm64-v8a=[  ]
Android.x86=[  ]
Android.x86_64=[  ]
APK signing for publication
Usually, we can choose between releasing an app in Debug or Release mode. However, the Release mode is required when officially releasing to Play Store.
In order to configure Godot to sign Release APKs, we'll first need to generate a project-specific Release keystore using keytool, and set up an alias and a single password (as explained in the Godot docs, -storepass and -keypass option values must be the same):
keytool -genkeypair -v -keystore path/to/my.keystore -alias some-alias -keyalg RSA -keysize 2048 -validity 10000 -storepass my-password -keypass my-password
Then, we will register its path in Export Settings (Project > Export) or export_presets.cfg. Please note that passwords entered in the GUI will be stored in export_presets.cfg. Be sure to not commit it into any VCS!
# Remember to not commit the password as is in VCS!
keystore/release="path/to/my.keystore"
keystore/release_user="some-alias"
keystore/release_password="my-password"
Exporting
Finally, we can now export the project using the GUI (Project > Export... > Android (Runnable)) and uncheck "Export with Debug" in GUI when being asked to enter APK file name. We may also use one of the following commands from the CLI to do the same:
# Debug mode
godot --export-debug "Android" path/to/my.apk

# Release mode
godot --export "Android" path/to/my.apk
When trying to install the app directly from the APK on an Android device, Play Protect may display a warning explaining that the app developers are not recognized, so the app may be unsafe. This is the expected behavior for an APK in Release mode that isn't actually released on Play Store.
If not planning to release on Play Store, one may file an appeal from Play Protect using a form provided by Google.
Troubleshooting
Compile time:
unable to find library -lgcc: You need the nightly version of Rust toolchain. See "About NDK versions" section.
Runtime:
ERROR: No loader found for resource: res://*.gdns: Your Godot APK was compiled without GDNative support. Make sure that you compile withoutmodule_gdnative_enabled=nosetting in your build command.
iOS
TODO
Mac OS X
Disclaimer: Currently, the following steps are tested and confirmed to work on Linux only.
Use case
Exporting for Mac OS X is interesting if:
- you do not have access to Apple hardware
- you want to build from a CI, typically on a Docker image
If you have access to a real Mac, building natively is easier.
Why is this complex ?
Cross-compiling Rust programs for Mac OS X is as simple as:
rustup target add x86_64-apple-darwin
cargo build --target x86_64-apple-darwin
However to build gdnative-sys you need a Mac OS X C/C++ compiler, the Rust compiler is not enough. More precisely you need an SDK which usually comes with Xcode. For Mac users, this SDK is "just there" but when cross-compiling, it is typically missing, even if your compiler is able to produce Mac OS X compatible binaries.
The most common error is:
fatal error: 'TargetConditionals.h' file not found
Installing just this file is not enough, this error is usually a consequence of the whole SDK missing, so there is no chance you can get a build.
What you need to do is:
- download the SDK
- fix all paths and other details so that it ressembles a Mac OS X environment
- then build with
cargo build --target x86_64-apple-darwin
Hopefully, the first two steps, downloading the SDK and fixing details, are handled by a tool called osxcross which is just about setting up a working C/C++ compiler on Linux.
Howto
# make sure you have a proper C/C++ native compiler first, as a suggestion:
sudo apt-get install llvm-dev libclang-dev clang libxml2-dev libz-dev

# change the following path to match your setup
export MACOSX_CROSS_COMPILER=$HOME/macosx-cross-compiler

install -d $MACOSX_CROSS_COMPILER/osxcross
install -d $MACOSX_CROSS_COMPILER/cross-compiler
cd $MACOSX_CROSS_COMPILER
git clone https://github.com/tpoechtrager/osxcross && cd osxcross

# picked this version as they work well with godot-rust, feel free to change
git checkout 7c090bd8cd4ad28cf332f1d02267630d8f333c19
At this stage you need to download and package the SDK which can not be distributed with osxcross for legal reasons. Please ensure you have read and understood the Xcode license terms before continuing.
You should now have an SDK file, for example MacOSX10.10.sdk.tar.xz.
# move the file where osxcross expects it to be
mv MacOSX10.10.sdk.tar.xz $MACOSX_CROSS_COMPILER/osxcross/tarballs/
# build and install osxcross
UNATTENDED=yes OSX_VERSION_MIN=10.7 TARGET_DIR=$MACOSX_CROSS_COMPILER/cross-compiler ./build.sh
At this stage, you should have, in $MACOSX_CROSS_COMPILER/cross-compiler,
a working cross-compiler.
Now you need to tell Rust to use it when linking Mac OS X programs:
echo "[target.x86_64-apple-darwin]" >> $HOME/.cargo/config
find $MACOSX_CROSS_COMPILER -name x86_64-apple-darwin14-cc -printf 'linker = "%p"\n' >> $HOME/.cargo/config
echo >> $HOME/.cargo/config
After this, your $HOME/.cargo/config (not the cargo.toml file in your project, this is a different file)
should contain:
[target.x86_64-apple-darwin]
linker = "/home/my-user-name/macosx-cross-compiler/cross-compiler/bin/x86_64-apple-darwin14-cc"
Then, we need to also tell the compiler to use the right compiler and headers. In our example, with SDK 10.10, the env vars we need to export are:
C_INCLUDE_PATH=$MACOSX_CROSS_COMPILER/cross-compiler/SDK/MacOSX10.10.sdk/usr/include
CC=$MACOSX_CROSS_COMPILER/cross-compiler/bin/x86_64-apple-darwin14-cc
You probably do not want to export those permanently as they are very
specific to building for Mac OS X so they are typically passed at each
call to cargo, eg:
C_INCLUDE_PATH=$MACOSX_CROSS_COMPILER/cross-compiler/SDK/MacOSX10.10.sdk/usr/include CC=$MACOSX_CROSS_COMPILER/cross-compiler/bin/x86_64-apple-darwin14-cc cargo build --release --target x86_64-apple-darwin
As a consequence, you do not need to put $MACOSX_CROSS_COMPILER/cross-compiler/bin in your $PATH if
you only plan to export godot-rust based programs, as the
binary needs to be explicitly overloaded.
Exporting
Once your .dylib file is built, a standard Godot export should work:
godot --export "Mac OSX" path/to/my.zip
Note that when exporting from a non Mac OS X platform, it is not possible to build a .dmg.
Instead, a .zip is produced. Again, the tool required to build Mac OS X disk images is
only available on Mac OS X. The .zip works fine though, it just contains my.app
folder, ready to use.
Double-check your .dylib file is there.
Useful links
- https://github.com/tpoechtrager/osxcross: tool used to install the Mac OS X SDK on Linux
- https://wapl.es/rust/2019/02/17/rust-cross-compile-linux-to-macos.html: a complete tutorial on how to use osxcross
HTML5
Exporting to HTML5 works just like exporting to other platforms, however there are some things that can make the process a bit tricky and require extra attention.
What you need (to know)
The Godot HTML5 export templates are built with Emscripten, so you need to build your Rust code for the wasm32-unknown-emscripten target (wasm32-unknown-unknown will not work). Since Emscripten does not offer a stable ABI between versions, your code and the Godot export template have to be built with the same Emscripten version, which also needs to be compatible with the Rust compiler version you are using.
In practice, this means you probably have to do some or all of these things:
- install a specific version of Emscripten
- build the HTML5 export template yourself
- use a specific version of Rust
You can check which versions of Emscripten/Rust you are using like this:
emcc -v
rustc --version --verbose
A list of compatible Rust and Emscripten versions are given in the next section.
Emscripten uses a cache to store build artifacts and header files. This means that the order in which steps are completed matters. In particular, Godot export template should be built before the GDNative library.
Also note that wasm32-unknown-emscripten is a 32-bit target, which can cause problems with crates incorrectly assuming that usize is 64 bits wide.
Limitations
- Multi-threading is not supported. See this issue for more details and instructions for failing experimental build.
- Debug builds may not work due to their large size. See the corresponding issue.
- As a workaround, you can set
opt-level = 1in debug builds, which reduces the build size. Add the following to your workspace's/project'sCargo.toml:
- As a workaround, you can set
[profile.dev]
opt-level = 1
Godot 3.5
Disclaimer: Currently, the following steps are only tested and confirmed to work on Linux.
Godot 3.5's prebuilt HTML5 export template is built with Emscripten 3.1.10. It might be possible to use it if build your Rust code with that exact version, but extra compiler flags may be needed. This guide focuses on building the export template yourself with a recent version of Emscripten.
As of 2023-01-28 you also need to use a Rust nightly build.
Confirmed working versions are:
- Rust toolchain
nightly-2023-01-27andEmscripten 3.1.21 (f9e81472f1ce541eddece1d27c3632e148e9031a)- This combination will be used in the following sections of this tutorial.
rustc 1.65.0-nightly (8c6ce6b91 2022-09-02)andEmscripten 3.1.21-git (3ce1f726b449fd1b90803a6150a881fc8dc711da)
The compatibility problems between Rust and Emscripten versions are assumed to stem from differing LLVM versions. You can use the following commands to check the LLVM versions of the currently installed nightly toolchain and the currently active emcc:
rustc +nightly --version --verbose
emcc -v
emcc -v reports the version number of clang, which is equal to the version number of the overall LLVM release.
Install Rust toolchain
Following bash commands install nightly-2023-01-27 toolchain with wasm32-unknown-emscripten target:
# Install the specific version of Rust toolchain.
rustup toolchain install nightly-2023-01-27

# Add wasm32-unknown-emscripten target to this toolchain.
rustup +nightly-2023-01-27 target add wasm32-unknown-emscripten
Installing and configuring Emscripten
Use the following bash commands to install Emscripten 3.1.21, which is known to be compatible with Rust nightly-2023-01-27:
# Get the emsdk repo.
git clone https://github.com/emscripten-core/emsdk.git

# Enter the cloned directory.
cd emsdk

# Download and install a compatible SDK version.
./emsdk install 3.1.21

# Make this SDK version "active" for the current user. (writes .emscripten file)
./emsdk activate 3.1.21

# Activate PATH and other environment variables in the current terminal
source ./emsdk_env.sh
Building Godot
Build the Godot Export template according to the instructions:
source "/path/to/emsdk-portable/emsdk_env.sh"
scons platform=javascript tools=no gdnative_enabled=yes target=release
mv bin/godot.javascript.opt.gdnative.zip bin/webassembly_gdnative_release.zip
Since this is a web build, you might want to disable unused modules and optimize your build for size as shown in Godot documentation.
Set the newly built export template as a custom template in Godot and be sure to set the export type as GDNative. When exporting, uncheck "Export With Debug".
Building your Rust code
In your project's .cargo/config.toml (see Cargo Docs), add the following:
[target.wasm32-unknown-emscripten]
rustflags = [
	"-Clink-arg=-sSIDE_MODULE=2", # build a side module that Godot can load
	"-Zlink-native-libraries=no", # workaround for a wasm-ld error during linking
	"-Cpanic=abort", # workaround for a runtime error related to dyncalls
]
Build like this:
source "/path/to/emsdk-portable/emsdk_env.sh"
export C_INCLUDE_PATH=$EMSDK/upstream/emscripten/cache/sysroot/include

cargo +nightly-2023-01-27 build --target=wasm32-unknown-emscripten --release
This will produce a .wasm file in target/wasm32-unknown-emscripten/release/ directory. Add this file to GDNativeLibrary properties under entry/HTML5.wasm32, just like you would add a .so or a .dll for Linux or Windows.
Errors you might encounter
Compile time:
failed to run custom build command for gdnative-sys v0.10.1,fatal error: 'wchar.h' file not found: Emscripten cache not populated, build Godot export template firstundefined symbol: __cxa_is_pointer_type: You need to build with-Clink-arg=-sSIDE_MODULE=2error: undefined symbol: main/__main_argc_argv (referenced by top-level compiled C/C++ code): Your.cargo/config.tomlwas not loaded. See Cargo Docs and verify its location.
Runtime:
indirect call signature mismatch: Possibly due to Emscripten version mismatch between Godot and Rustneed the dylink section to be first: Same as aboveWebAssembly.Module(): Compiling function #1 failed: invalid local index: You need to build with-Cpanic=abortERROR: Can't resolve symbol godot_gdnative_init. Error: Tried to lookup unknown symbol "godot_gdnative_init" in dynamic lib: Possibly because Emscripten version is not compatible with Rust toolchain version. See the compatible version list above.wasm validation error: at offset 838450: too many locals: Binary size is too big. See limitations section for a workaround.WebAssembly.instantiate(): Compiling function #2262:"gdnative_sys::GodotApi::from_raw::..." failed: local count too large: Binary size is too big. See limitations section for a workaround.
Further reading
In the future, some of this will probably not be needed, for more info see:
- Tracking issue for godot-rust wasm support
- Rust and Emscripten issues that explain the need for
-Zlink-native-libraries=no - Emscripten PR that should have obsoleted
-Cpanic=abort - Rust PR that would obsolete
-Clink-arg=-sSIDE_MODULE=2
Advanced Guides
Using custom builds of Godot
As you probably know, godot-rust interacts with Godot via the GDNative interface. This interface is formally specified in a file called api.json, which lists all the classes, functions, constants and other symbols. In its build step, godot-rust reads this file and generates Rust code reflecting the GDNative interface.
By default, godot-rust ships an api.json compatible with the latest Godot 3.x release. This makes it easy to use the latest version. But there are cases where you might want to use an older Godot version, or one that you built yourself (with custom compiler flags or modules). In the past, this needed quite a few manual steps; in the meantime, this process has been simplified.
For using custom Godot builds, the first thing you need to do is to add the feature flag custom-godot when adding godot-rust as a dependency.
For example, if you depend on the latest GitHub version of godot-rust, Cargo.toml would look like this:
gdnative = { git = "https://github.com/godot-rust/godot-rust.git", features = ["custom-godot"] }
Next, godot-rust must be able to locate the Godot engine executable on your system.
There are two options:
- Your executable is called
godotand available in the system PATH.
On Windows systems, this would also find agodot.bat, for example. - You define an environment variable
GODOT_BINwith the absolute path to your executable.
It is important that you include the filename -- this is not a directory path.
That's it. During build, godot-rust will invoke Godot to generate a matching api.json -- you might see a short Godot window popping up.
Keep in mind that we only support Godot versions >= 3.2 and < 4.0 for now. Also, the GDNative API varies between versions, so you may need to adjust your client code.
Previous approach
Note: this guide is now obsolete.
You can still use it when working with godot-rust 0.9 ormasterversions before December 2021.
Sometimes, users might need to use a different version of the engine that is different from the default one, or is a custom build. In order to use godot-rust with them, one would need to create a custom version of the gdnative-bindings crate, generated from an api.json from the custom build. This guide walks through the necessary steps to do so.
First, obtain the source code for gdnative-bindings from crates.io. For this guide, we'll use cargo-download to accomplish this:
# Install the `cargo-download` sub-command if it isn't installed yet
cargo install cargo-download

# Download and unpack the crate
cargo download gdnative-bindings==0.9.0 >gdnative-bindings.tar.gz
tar -xf gdnative-bindings.tar.gz
You should be able to find the source code for the crate in a gdnative-bindings-{version} directory. Rename it to a distinctive name like gdnative-bindings-custom and update the Cargo.toml:
[package]
name = "gdnative-bindings-custom"
When downloading the crate, please specify the exact version of the crate that is specified in the Cargo.toml of gdnative. This is necessary because the generated bindings depend on internal interfaces that may change between non-breaking versions of gdnative.
After source is obtained, replace the API description file with one generated by your specific Godot build:
cd /path/to/gdnative-bindings-custom
/path/to/godot --gdnative-generate-json-api api.json

# Try to build and see if it works
cargo build
If everything goes well, you can now update the dependencies of your GDNative library to use this custom bindings crate:
[dependencies]

# Use the exact version corresponding to `gdnative-bindings`
# and disable the default re-export.
gdnative = { version = "=0.9.0", default-features = false, features = [] }

# Use your custom bindings crate as a path dependency
gdnative-bindings-custom = { path = "/path/to/gdnative-bindings-custom" }
Here, gdnative is specified using an exact version because the bindings generator is an internal dependency. When using custom binding crates, care must be taken to ensure that the version of the bindings crate used as the base matches the one specified in the Cargo.toml of the gdnative crate exactly, even for updates that are considered non-breaking in the gdnative crate. Using an exact version bound here helps prevent unintentional updates that may break the build.
Finally, replace references to gdnative::api with gdnative-bindings-custom. You should now be able to use the APIs in your custom build in Rust!
Generating documentation
However, if you try to generate documentation with rustdoc at this point, you might notice that documentation might be missing or wrong for some of the types or methods. This is due to documentation being stored separately from the API description itself, and can be easily fixed if you have access to the source code from which your custom Godot binary is built.
To get updated documentation, you only need to copy all the documentation XMLs from doc/classes in the Godot source tree, to the docs directory in the gdnative-bindings source. After the files are copied, you should be able to get correct documentation for the API.
Migrating from godot-rust 0.8 to 0.9.x
In version 0.9, we are attempting to resolve many long-standing problems in the older API. As a result, there are many breaking changes in the public interface. This is a quick guide to the new API for users that have used older versions.
Module organization and naming
Generated API types
Generated types now live under the gdnative::api module. This makes the top-level namespace easier to navigate in docs. If you have used glob imports like:
#![allow(unused)]
fn main() {
use gdnative::*;
}
..., you should change this to:
#![allow(unused)]
fn main() {
use gdnative::prelude::*;
use gdnative::api::*;
}
Generated property accessors
Generated getters of properties are no longer prefixed with get_. This does not affect other methods that start with get_ that are not getters, like File::get_8.
Separation of core types and NativeScript code
Core types, like VariantArray, Color, and Dictionary are moved to the gdnative::core_types module, while NativeScript supporting code like NativeClass, Instance and init code are moved to the gdnative::nativescript module. Most of the commonly-used types are re-exported in the prelude, but if you prefer individual imports, the paths need to be changed accordingly.
API enums
C enums in the API are now generated in submodules of gdnative_bindings named after their associated objects. Common prefixes are also stripped from the constant names. The constants are accessed as associated constants:
Example
In 0.8, you would write this:
#![allow(unused)]
fn main() {
use gdnative::*;

object.connect(
    "foo".into(),
    owner.to_object(),
    "_handle_foo".into(),
    VariantArray::new(),
    Object::CONNECT_DEFERRED,
);
}
In 0.9, this should now be written as:
#![allow(unused)]
fn main() {
use gdnative::prelude::*;
use gdnative::api::object::ConnectFlags;

object.connect("foo", owner, "_handle_foo", VariantArray, ConnectFlags::DEFERRED.into());
}
Fixed typos
Typos in variant names of VariantOperator and GodotError are fixed. Change to the correct names if this breaks your code.
Changes to derive macros
The NativeScript derive macro now looks for new instead of _init as the constructor.
Example
In 0.8, you would write this:
#![allow(unused)]
fn main() {
#[derive(NativeClass)]
#[inherit(Object)]
pub struct Thing;

impl Thing {
    fn _init(_owner: Object) -> Self {
        Thing
    }
}
}
In 0.9, this should now be written as:
#![allow(unused)]
fn main() {
#[derive(NativeClass)]
#[inherit(Object)]
pub struct Thing;

impl Thing {
    // `owner` may also be `TRef<Object>`, like in exported methods.
    fn new(_owner: &Object) -> Self {
        Thing
    }
}
}
Argument casts
Generated methods taking objects, Variant, and GodotString are now made generic using impl Trait in argument position. This make calls much less verbose, but may break inference for some existing code. If you have code that looks like:
#![allow(unused)]
fn main() {
let mut binds = VariantArray::new();
binds.push(&42.to_variant());
binds.push(&"foo".to_variant());
thing.connect(
    "foo".into(),
    Some(owner.to_object()),
    "bar".into(),
    binds,
    0,
)
}
..., you should change this to:
#![allow(unused)]
fn main() {
let mut binds = VariantArray::new();
binds.push(42);
binds.push("foo");
thing.connect("foo", owner, "bar", binds, 0);
}
Explicit nulls
A side effect of accepting generic arguments is that inference became tricky for Option. As a solution for this, an explicit Null type is introduced for use as method arguments. To obtain a Null value, you may use either GodotObject::null() or Null::null(). You may also call null on specific types since it is a trait method for all API types, e.g. Node::null() or Object::null().
For example, to clear the script on an object, instead of:
#![allow(unused)]
fn main() {
thing.set_script(None);
}
..., you should now write:
#![allow(unused)]
fn main() {
thing.set_script(Null::null());
}
This is arguably less convenient, but passing explicit nulls should be rare enough a use case that the benefits of having polymorphic arguments are much more significant.
Object semantics
In 0.9, the way Godot objects are represented in the API is largely remodeled to closely match the behavior of Godot. For the sake of illustration, we'll use the type Node in the following examples.
In 0.8.x, bare objects like Node are either unsafe or reference-counted pointers. Some of the methods require &mut receivers, but there is no real guarantee of uniqueness since the pointers may be cloned or aliased freely. This restriction is not really useful for safety, and requires a lot of operations to be unsafe.
This is changed in 0.9 with the typestate pattern, which will be explained later. Now, there are three representations of Godot objects, with different semantics:
| Type | Terminology | Meaning |
|---|---|---|
&'a Node | bare reference | reference assumed or guaranteed to be valid and uncontended during 'a |
Ref<Node, Access> | persistent reference | stored reference whose validity is not always known, depending on the typestate Access |
TRef<'a, Node, Access> | temporary reference | reference assumed or guaranteed to be valid and uncontended during 'a, with added typestate tracking |
Note that owned bared objects, like Node, no longer exist in the new API. They should be replaced with Ref or TRef depending on the situation:
- In persistent data structures, like
NativeScriptstructs, useRef<Node, Access>. - When taking the
ownerargument, use&NodeorTRef<'a, Node, Shared>. The latter form allows for more safe operations, like using as method arguments, thanks to the typestate. - When taking objects from the engine, like as arguments other than
owner, useRef<Node, Shared>. - When passing objects to the engine as arguments or return values, use
&Ref<Node, Shared>,Ref<Node, Unique>, orTRef<'a, Node, Shared>. - When passing temporary references around in internal code, use
TRef<'a, Node, Access>.
All objects are also seen as having interior mutability in Rust parlance, which means that all API methods now take &self instead of &mut self. For more information about shared (immutable) and unique (mutable) references, see Accurate mental model for Rust's reference types by dtolnay.
Unlike the previous versions requiring ubiquitous unsafes, the new API allows for clearer separation of safe and unsafe code in Rust. In general, unsafe is only necessary around the border between Godot and Rust, while most of the internal code can now be safe.
To convert a Ref to a TRef, use Ref::assume_safe or Ref::as_ref depending on the object type and typestate. To convert non-unique TRefs to Refs, use TRef::claim. Bare references are usually obtained through Deref, and it's not recommended to use them directly.
For detailed information about the API, see the type-level documentation on Ref and TRef.
Example
If you prefer to learn by examples, here is the simplified code for instancing child scenes in the dodge-the-creeps example in 0.8. Note how everything is unsafe due to Nodes being manually-managed:
#![allow(unused)]
fn main() {
#[derive(NativeClass)]
#[inherit(Node)]
pub struct Main {
    #[property]
    mob: PackedScene,
}

#[methods]
impl Main {
    #[export]
    unsafe fn on_mob_timer_timeout(&self, owner: Node) {
        let mob_scene: RigidBody2D = instance_scene(&self.mob).unwrap();
        let direction = rng.gen_range(-PI / 4.0, PI / 4.0);
        mob_scene.set_rotation(direction);
        owner.add_child(Some(mob_scene.to_node()), false);
    }
}

unsafe fn instance_scene<Root>(scene: &PackedScene) -> Result<Root, ManageErrs>
where
    Root: gdnative::GodotObject,
{
    let inst_option = scene.instance(PackedScene::GEN_EDIT_STATE_DISABLED);

    if let Some(instance) = inst_option {
        if let Some(instance_root) = instance.cast::<Root>() {
            Ok(instance_root)
        } else {
            Err(ManageErrs::RootClassNotRigidBody2D(
                instance.name().to_string(),
            ))
        }
    } else {
        Err(ManageErrs::CouldNotMakeInstance)
    }
}
}
In 0.9, this can now be written as (with added type annotations and explanations for clarity):
#![allow(unused)]
fn main() {
#[derive(NativeClass)]
#[inherit(Node)]
pub struct Main {
    #[property]
    mob: Ref<PackedScene, Shared>,
}

#[methods]
impl Main {
    #[export]
    fn on_mob_timer_timeout(&self, owner: &Node) {
        // This assumes that the `PackedScene` cannot be mutated from
        // other threads during this method call. This is fine since we
        // know that no other scripts mutate the scene at runtime.
        let mob: TRef<PackedScene, Shared> = unsafe { self.mob.assume_safe() };

        // Call the internal function `instance_scene` using the `TRef`
        // produced by `assume_safe`. This is safe because we already
        // assumed the safety of the object.
        let mob_scene: Ref<RigidBody2D, Unique> = instance_scene(mob);

        // `mob_scene` can be used directly because it is a `Unique`
        // reference -- we just created it and there can be no other
        // references to it in the engine.
        let direction = rng.gen_range(-PI / 4.0, PI / 4.0);
        mob_scene.set_rotation(direction);

        // `mob_scene` can be passed safely to the `add_child` method
        // by value since it is a `Unique` reference.
        // Note that there is no need to cast the object or wrap it in an
        // `Option`.
        owner.add_child(mob_scene, false);

        // Note that access to `mob_scene` is lost after it's passed
        // to the engine. If you need to use it after doing that,
        // convert it into a `Shared` one with `into_shared().assume_safe()`
        // first.
    }
}

// The `instance_scene` function now expects `TRef` arguments, which expresses
// at the type level that this function expects a valid and uncontended
// reference during the call.
//
// Note that this makes the interface safe.
fn instance_scene<Root>(scene: TRef<PackedScene, Shared>) -> Ref<Root, Unique>
where
    // More static guarantees are now available for `cast` using the `SubClass`
    // trait. This ensures that you can only downcast to possible targets.
    Root: gdnative::GodotObject<RefKind = ManuallyManaged> + SubClass<Node>,
{
    // Instancing the scene is safe since `scene` is assumed to be safe.
    let instance = scene
        .instance(PackedScene::GEN_EDIT_STATE_DISABLED)
        .expect("should be able to instance scene");

    // `PackedScene::instance` is a generated API, so it returns
    // `Ref<_, Shared>` by default. However, we know that it actually creates
    // a new `Node` for us, so we can convert it to a `Unique` reference using
    // the `unsafe` `assume_unique` method.
    let instance = unsafe { instance.assume_unique() };

    // Casting to the `Root` type is also safe now.
    instance
        .try_cast::<Root>()
        .expect("root node type should be correct")
}
}
Casting
The casting API is made more convenient with 0.9, using the SubClass trait. Casting is now covered by two generic methods implemented on all object reference types: cast and upcast. Both methods enforce cast validity statically, which means that the compiler will complain about casts that will always fail at runtime. The generated to_* methods are removed in favor of upcast.
Examples
Casting a Node to Object
In 0.8, you would write either of:
node.to_object()node.cast::<Object>().unwrap()
In 0.9, this should now be written as node.upcast::<Object>(). This is a no-op at runtime because Node is a subclass of Object.
Casting an Object to Node
The API for downcasting to concrete types is unchanged. You should still write object.cast::<Node>().unwrap().
Casting to a type parameter
In 0.8, you would write this:
#![allow(unused)]
fn main() {
fn polymorphic_cast<T: GodotObject>(obj: Object) -> Option<T> {
    obj.cast()
}
}
In 0.9, casting to a type parameter is a bit more complicated due to the addition of static checks. You should now write:
#![allow(unused)]
fn main() {
fn polymorphic_cast<T, Access>(
    obj: TRef<Object, Access>,
) -> Option<TRef<T, Access>>
where
    T: GodotObject + SubClass<Object>,
    Access: ThreadAccess,
{
    obj.cast()
}
}
Note that this function is also polymorphic over the Access typestate, which is explained the the following section.
Typestates
The typestate pattern is introduced in 0.9 to statically provide fine-grained reference safety guarantees depending on thread access state. There are three typestates in the API:
Shared, for references that may be shared between multiple threads.Sharedreferences areSendandSync.ThreadLocal, for references that may only be shared on the current thread.ThreadLocalreferences are!Sendand!Sync. This is because sending aThreadLocalreference to another thread violates the invariant.Unique, for references that are globally unique (with the exception of specific engine internals likeObjectDB).Uniquereferences areSendbut!Sync. These references are always safe to use.
Users may convert between typestates using the into_* and assume_* methods found on various types that deal with objects or Variant collections with interior mutability (Dictionary and VariantArray). Doing so has no runtime cost. The documentation should be referred to when calling the unsafe assume_* methods to avoid undefined behavior.
Typestates are encoded in types as the Access type parameter, like the ones in Ref<T, Access> and Dictionary<Access>. These type parameters default to Shared.
The general guidelines for using typestates are as follows:
- References obtained from the engine are
Sharedby default. This includes unique objects returned by generated API methods, because there isn't enough information to tell them from others. - Constructors return
Uniquereferences. ThreadLocalreferences are never returned directly. They can be created manually from other references, and can be used Godot objects and collections internally kept in Rust objects.
Examples
Creating a Dictionary and returning it
In 0.8, you would write this:
#![allow(unused)]
fn main() {
#[export]
fn dict(&self, _owner: Reference) -> Dictionary {
    let mut dict = Dictionary::new();
    dict.insert(&"foo".into(), &42.into());
    dict.insert(&"bar".into(), &1337.into());
    dict
}
}
In 0.9, this should now be written as (with added type annotations and explanations for clarity):
#![allow(unused)]
fn main() {
#[export]
fn dict(&self, _owner: &Reference) -> Dictionary<Unique> {
    // `mut` is no longer needed since Dictionary has interior mutability in
    // Rust parlance
    let dict: Dictionary<Unique> = Dictionary::new();

    // It is safe to insert into the `dict` because it is unique. Also note how
    // the conversion boilerplate is no longer needed for `insert`.
    dict.insert("foo", 42);
    dict.insert("bar", 1337);

    // Owned `Unique` references can be returned directly
    dict
}
}
Using an object argument other than owner
In 0.8, you would write this:
#![allow(unused)]
fn main() {
#[export]
unsafe fn connect_to(&self, owner: Node, target: Object) {
    target.connect(
        "foo".into(),
        owner.to_object(),
        "_handle_foo".into(),
        VariantArray::new(),
        0,
    );
}
}
In 0.9, this should now be written as (with added type annotations and explanations for clarity):
#![allow(unused)]
fn main() {
#[export]
// The `Access` parameter defaults to `Shared` for `Ref`, so it can be omitted
// in method signatures.
// Here, we also need to use `TRef` as the owner type, because we need the
// typestate information to pass it into `connect`.
fn connect_to(&self, owner: TRef<Node>, target: Ref<Object>) {
    // Assume that `target` is safe to use for the body of this method.
    let target = unsafe { target.assume_safe() };
    // `TRef` references can be passed directly into methods without the need
    // for casts.
    target.connect("foo", owner, "_handle_foo", VariantArray::new(), 0);
}
}
Migrating from godot-rust 0.9.x to 0.10.x
Version 0.10 implements many improvements to ergonomics, naming consistency and bugfixes. Tooling and CI has been majorly overhauled, providing fast feedback cycles, higher confidence and easier-to-read documentation.
This guide outlines what actions users of godot-rust need to take to update their code.
Minimum supported Rust version
The MSRV has been increased to 1.56. When migrating, you will need to ensure that you are using at least Rust 1.56 or later or your projects may fail to build.
We use the Rust 2021 edition; in your own code you may use any edition.
Breaking API changes
This is a brief overview of the smaller breaking changes in the library API. Please refer to the changelog for a comprehensive list.
More sophisticated breaking changes are explained further down in section Migrations.
Changes to modules
The module structure has been simplified to ensure there is only one module per symbol:
- Module
nativescripthas been renamed toexport. - Types
nativescript::{Instance, RefInstance}have been moved toobject. - Less often used macros
godot_gdnative_init,godot_gdnative_terminate,godot_nativescript_init,godot_sitehave been removed from the prelude. - Unnecessarily nested modules have also been removed. If you were depending upon the exact path, you will need to use the new path.
Changes to core types
-
The euclid vector library has been removed and replaced with glam.
-
Varianthas a redesigned conversion API. -
Matrix types --
Transform2D,TransformandBasis-- have had their basis vectors renamed fromx/y/ztoa/b/c, to avoid confusion with thex/y/zvector components. -
The following deprecated symbols have been removed:
Reference::init_ref(unsound)ClassBuilder::add_method,add_method_advanced,add_method_with_rpc_modeScriptMethodScriptMethodFnScriptMethodAttributes
-
The following methods were removed due to being redundant:
- unsafe access methods for
VariantArray<Shared>(available inVariantArray<Unique>) Basis::invertBasis::orthonormalizeBasis::rotateBasis::tdotxBasis::tdotyBasis::tdotzRid::operator_lessStringName::operator_less
- unsafe access methods for
Various type names have been changed to improve clarity and consistency:
| Old Type Name | New Type Name |
|---|---|
RefInstance | TInstance |
RefKind | Memory |
ThreadAccess | Ownership |
TypedArray | PoolArray |
Element | PoolElement |
SignalArgument | SignalParam |
Point2 | Vector2 |
Size2 | Vector2 |
The following methods have been renamed:
| Old Method | New Method |
|---|---|
{String,Variant}::forget | leak |
Color::{rgb,rgba} | {from_rgb,from_rgba} |
Rid::is_valid | is_occupied |
Basis::to_scale | scale |
Basis::from_elements | from_rows |
Transform2D::from_axis_origin | from_basis_origin |
StringName::get_name | to_godot_string |
Changes to procedural macros
#[inherit]is now optional and defaults toReferenceinstead ofNode.#[property(before_set)]and its siblings are replaced with#[property(set)]etc.; see below.
Ownership Changes
InstanceandTInstancenow useOwn=Sharedby default. Some adjustments to your assumptions should be re-evaluated as needed.
New features
In addition to new functionality outlined here, it can be interesting to check the Added section in the changelog.
Cargo features
While these are not breaking changes, the following may be useful to consider when migrating, particularly if you were previously using a custom solution for either of the following:
- serde is now supported for
VariantDispatchand types in thecore_typesmodule. - Async Foundations have been completed, so you can now make use of Rust
asyncruntimes with Godot more easily. We have a recipe for using async with the tokio runtime. - Custom Godot builds are now supported. The advanced guide for Custom Godot has been updated accordingly.
Custom property exports
In godot-rust 0.9, it was necessary to manually register properties using the class builder such as the following:
#![allow(unused)]
fn main() {
#[derive(NativeClass)]
#[inherit(Reference)]
struct Foo {
    #[property]
    bar: i64,
}

#[methods]
impl Foo {
  fn register_properties(builder: &ClassBuilder<Foo>) {
    builder
        .add_property::<String>("bar")
        .with_getter(get_bar)
        .with_setter(set_bar)
        .with_default(0)
        .done();
  }
  #[export]
  fn set_bar(&mut self, _owner: &Reference, value: i64) {
      self.bar = value;
  }

  #[export]
  fn get_bar(&mut self, _owner: &Reference) -> i64 {
      self.bar
  }
}
}
In 0.10, this can be automated with the #[property] procedural macro, such as the following:
#![allow(unused)]
fn main() {
#[derive(NativeClass)]
#[inherit(Reference)]
struct Foo {
    #[property(name = "bar", set = "set_bar", get = "get_bar", default = 0)]
    bar: i64,
}

#[methods]
impl Foo {
    #[export]
    fn set_bar(&mut self, _owner: &Reference, value: i64) {
        self.bar = value;
    }

    #[export]
    fn get_bar(&mut self, _owner: &Reference) -> i64 {
        self.bar
    }
}
}
VariantDispatch
VariantDispatch is an newly introduced type in godot-rust 0.10. This enum lets you treat Variant in a more rust-idiomatic way, e.g. by pattern-matching its contents:
#![allow(unused)]
fn main() {
let variant = 42.to_variant();

let number_as_float = match variant.dispatch() {
    VariantDispatch::I64(i) => i as f64,
    VariantDispatch::F64(f) => f,
    _ => panic!("not a number"),
};

approx::assert_relative_eq!(42.0, number_as_float);
}
Migrations
This section elaborates on APIs with non-trivial changes and guides you through the process of updating your code.
Variant
If you were using the Variant::from_* methods, those no longer exist.
In 0.9.x you would need to use the specific constructor, such as the following:
#![allow(unused)]
fn main() {
let variant = Variant::from_i64(42);
let variant = Variant::from_f64(42.0);
let variant2 = Variant::from_object(object);
}
In 0.10.x, new() is sufficient for any type that implements ToVariant, such as the following:
#![allow(unused)]
fn main() {
let variant = Variant::new(42);
let variant = Variant::new(42.0);
let variant2 = Variant::new(object);
}
When converting from a variant to a Rust type, it previously was necessary to do the following:
#![allow(unused)]
fn main() {
let integer64 = i64::from_variant(&variant_i64).unwrap();
let float64 = f64::from_variant(&variant_f64).unwrap();
let object = ObjectType::from_variant(&variant_object).unwrap();
}
In 0.10.x, you can now cast your variants by using the to() function on FromVariant-enabled types, such as the following:
#![allow(unused)]
fn main() {
// Note: If the compiler can infer your type, the turbofish `::<T>` is optional
let integer64 = variant.to::<i64>().unwrap();
let float64 = variant.to::<f64>().unwrap();
let object = variant.to_object::<ObjectType>().unwrap(); // returns Ref<ObjectType>
}
Transforms
Previously, transforms were defined by the matrix identities such as m11, m12; now, they are referred by the vector name for consistency.
For example: When creating an identity Transform2D in 0.9.x, you would create it using the following code:
#![allow(unused)]
fn main() {
let tform = Transform2D::new(1.0, 0.0, 0.0, 1.0, 1.0, 1.0);
}
In 0.10.x you now need to create it using from_basis_origin and use a, b, and origin vectors, such as the following:
#![allow(unused)]
fn main() {
let tform = Transform2D::from_basis_origin(
    Vector2::new(1.0, 0.0),
    Vector2::new(0.0, 1.0),
    Vector2::new(1.0, 1.0),
);
}
Vector types
The underlying vector library as well as the implementation have been fundamentally replaced. In 0.9.x, many of the goemetric types were thinly wrapping a separate library. This led to several wrapping classes such as Point2, Size2 being removed now. In addition, other geometric types -- for example Rect2, Quat, Transform, Plane -- have all been changed, and certain convenience functions may not be available anymore, depending upon the struct.
For example: Rect2 no longer has width() or height(), but lets you directly access its size.x or size.y fields.
ClassBuilder
The ClassBuilder type has been extended to use the builder pattern when registering signals and properties.
In 0.9, registering a signal would look like the following:
#![allow(unused)]
fn main() {
fn register_signals(builder: &ClassBuilder<Self>) {
  builder.add_signal(
    Signal {
      name: "signal1",
      args: &[],
    }
  );
  builder.add_signal(
    Signal {
      name: "signal2",
      args: &[SignalArgument {
          name: "myArg",
          default: 42.0.to_variant(),
          export_info: ExportInfo::new(VariantType::F64),
          usage: PropertyUsage::DEFAULT,
      }],
  });
}
}
In 0.10, this changes to:
#![allow(unused)]
fn main() {
fn register_signals(builder: &ClassBuilder<Self>) {
  builder.signal("signal1").done();

  builder.signal("signal2")
    .with_param_custom(
      SignalParam {
          name: "myArg",
          default: 42.0.to_variant(),
          export_info: ExportInfo::new(VariantType::F64),
          usage: PropertyUsage::DEFAULT,
      },
    ).done();

  // If you only need a default value, you can also register a signal like this:
  builder.signal("signal3")
    .with_param_default("myArg", 42.0.to_variant())
    .done()
}
}
Server singletons
Godot's server singletons have received a safety overhaul. As a result, all functions that take one or more parameters of type Rid are now marked unsafe and thus require being used inside an unsafe block or unsafe function.
In 0.9.x, creating a canvas_item and attaching it to a parent would be done as follows:
#![allow(unused)]
fn main() {
let vs = unsafe { VisualServer::godot_singleton() };
let canvas = vs.canvas_create();
let ci = vs.canvas_item_create();
vs.canvas_item_set_parent(ci, canvas);
}
In 0.10.x, you now must wrap the canvas_item_set_parent function in an unsafe block, such as follows:
#![allow(unused)]
fn main() {
let vs = unsafe { VisualServer::godot_singleton() };
let canvas = vs.canvas_create();
let ci = vs.canvas_item_create();
unsafe {
  vs.canvas_item_set_parent(ci, canvas);
}
}
Additional UB notes
The reason for this change was due to issue #836 being raised. Developers were able to demonstrate that you could easily cause undefined behavior when using any function that accepted Rid as a parameter, such as the following:
#![allow(unused)]
fn main() {
let vs = unsafe { VisualServer::godot_singleton() };
let canvas = vs.canvas_create();
let vp = vs.viewport_create();
vs.canvas_item_set_parent(vp, canvas); // crashes immediately
vs.canvas_item_set_parent(canvas, canvas); // crashes at shutdown
}
Migrating from godot-rust 0.10.x to 0.11
Version 0.11 is a relatively small release, primarily adding support for the latest stable Godot version, 3.5.1 at the time.
Due to some breaking changes in the GDNative API, this is a SemVer-breaking release, but in practice you can reuse your 0.10.x based code with near-zero changes. This migration guide is correspondingly brief.
For a detailed list of changes, refer to the changelog.
Supported Godot version
The underlying Godot version changes from 3.4 (for gdnative 0.10) to 3.5.1.
Note that we explicitly recommend Godot 3.5.1 and not just 3.5; the reason being that GDNative had minor (but breaking) changes for this patch release.
If you want to keep using Godot 3.4 with latest godot-rust (or any Godot version for that matter), take a look at the
Cargo feature custom-godot.
Minimum supported Rust version
The MSRV has been increased to 1.63.
If you have an older toolchain, run rustup update.
API Changes
Method export syntax
Up until gdnative 0.10.0, methods need to be exported using the #[export] syntax.
If you did not need that parameter, the convention was to prefix it with _:
#![allow(unused)]
fn main() {
#[export]
fn _ready(&mut self, owner: &Node, delta: f32) {...}

#[export]
fn _process(&mut self, _owner: &Node, delta: f32) {...}
}
This changes starting from 0.10.1: #[method] is the new attribute for the method, and #[base] annotates
the parameter base (previously called owner). If the base parameter is not needed, simply omit it.
base still needs to be in 2nd position, immediately after the receiver (&self/&mut self).
#![allow(unused)]
fn main() {
#[method]
fn _ready(&mut self, #[base] base: &Node, delta: f32) {...}

#[method]
fn _process(&mut self, delta: f32) {...}
}
The old syntax is deprecated and stays valid throughout 0.11, so there is no urge to migrate.
Removals
The constructor Transform2D::from_rotation_translation_scale() was removed, due to its unintuitive semantics.
It has been replaced with from_scale_rotation_origin().
Symbols already deprecated in 0.10 have also been removed, with the exception of #[export]. In particular, the
type aliases RefInstance (now TInstance) and TypedArray (now PoolArray) no longer exist.
Third-party projects
This chapter intends to provide an overview over the godot-rust ecosystem and list projects that use godot-rust across different domains.
godot-rust is a popular choice for game development, but this chapter is not limited to games. We also list other applications, as well as tooling and libraries that extend godot-rust and integrate it with other parts of the ecosystem.
While part of the book, this chapter is not an official list of "featured" entries; project authors themselves are responsible for the up-to-dateness and accuracy of their description.
Unless otherwise noted, projects are powered with Godot 3 and the GDNative-Rust binding.
Projects: Games
Below you see a non-exhaustive list of games that have been developed with godot-rust.
The page focuses on entries which are either in a playable state, or at least have some basic mechanics and graphics to show. For example, such an entry could be an indie game developed over many months, or also a polished game jam submission. The condition is that a notable part of the game is written in godot-rust, however it doesn't need to be the majority. For example, one of the common architectures entails using Rust for selective modules.
Table of contents
The Recall Singularity
by Jump to Warp (Tom Leys)
🕊️ @RecallSingular1

The Recall Singularity is a factory game, set within a player-controlled fleet of space-ships.
Players blast asteroids, collect rocks, grind them up and turn them into ship parts.
The Process
by setzer22
🕊️ @PlayTheProcess

The Process is an upcoming game about factory building, process management, and carrot production, built with godot-rust!
The game offers a similar experience to other titles in the factory building genre (Factorio, Satisfactory), but is more tailored towards a chill, lighthearted atmosphere.
BITGUN
by LogLogGames
🕹️ Steam | 🕊️ @LogLogGames | 🌐 Website
BITGUN is an action roguelike zombie shooter with lots of blood and guns.
BENDYWORM
by Bauxitedev
🕹️ itch.io | 🕊️ @bauxitedev | 📜 GitHub (game is open-source)

BENDYWORM is a platformer with a twist: the entire world bends and twists around you as you progress through the level. Why? Because you're inside of a gigantic worm, and worms are bendy. Navigate the worm's slippery innards, collect the Mega Cannon, and destroy its brain to escape!
Cake Thieves
by GeTech
🕹️ Google Play | 🕊️ @GeTech8
Thieves have found your picnic and want to eat your delicious cake! Protect it by placing cannons on the field to defeat the ants. Improve your cannons to increase their power! How well will you do in this challenge?
Projects: Tools and integrations
This page lists projects, which are intended to be used as an extension to godot-rust.
Examples include:
- CLI or other tools enhancing the development workflow
- Libraries that directly enhance the godot-rust experience
- Libraries that connect godot-rust with other crates in the Rust ecosystem
This page should only provide a high-level description of each project (a couple sentences), plus relevant links and optionally one screenshot. It should not include tutorials or extended code examples, as they tend to become outdated very quickly. Instead, the project's repository or homepage is a much better place for advertising the concrete functionality the tool offers and providing introductory examples.
Table of contents
godot-egui
godot-egui is an egui backend for godot-rust.
This crate enables using the immediate-mode UI library egui within Godot applications and games. Updating UI widgets and properties directly from Rust code becomes straightforward, without going through Godot nodes, signals and the intricacies of GDNative's ownership semantics.
godot-rust-cli
Godot Rust CLI is a simple command-line interface to help you create and update Rust components for your Godot projects.
Example:
# create a Rust library `rust_modules` for the `platformer` Godot project
godot-rust-cli new rust_modules platformer

# create player.rs + player.gdns
godot-rust-cli create Player

# generate dynamic library to be called by Godot, automatically watch changes
godot-rust-cli build --watch
Note that there is also godot-rust-cli-upgrader to upgrade the CLI.
bevy-godot
bevy-godot is an in-development crate for using Bevy with the Godot Engine.
#![allow(unused)]
fn main() {
use bevy_godot::prelude::*;

fn init(_handle: &InitHandle) {}
fn build_app(app: &mut App) {
    app.add_startup_system(spawn_cube).add_system(move_cube);
}

bevy_godot_init!(init, build_app);

#[derive(Component)]
pub struct Cube {
    starting_position: Vector2,
}

fn spawn_cube(mut commands: Commands) {
    let starting_position = Vector2::new(500.0, 300.0);
    commands
        .spawn()
        .insert(GodotScene::from_path("res://simple_scene.tscn"))
        .insert(Cube { starting_position })
        .insert(Transform2D::from(
            GodotTransform2D::from_scale_rotation_origin(Vector2::ONE, 0.0, starting_position),
        ));
}

fn move_cube(mut cube: Query<(&Cube, &mut Transform2D)>, time: Res<Time>) {
    let (cube, mut transform) = cube.single_mut();
    transform.origin =
        Vector2::RIGHT * 300.0 * time.seconds_since_startup().sin() as f32 + cube.starting_position;
}
}
ftw
ftw is a command-line interface to manage your godot-rust project. It enables you to set up projects, add native classes which are automatically wired up, and run build commands.
Example:
# create new project using the default template
ftw new my-awesome-game

# create a class that derives from `Area2D`
ftw class MyHero Area2D

# create a class called `MySingleton` that derives from `Node`
ftw singleton MySingleton

# build the library for the `linux-x86_64` platform using `debug` as default
ftw build linux-x86_64
gdrust
gdrust is a an extension library to godot-rust. It adds ergonomic improvements and is an inspiration for godot-rust itself.
Example:
#[gdrust]
#[signal(signal_name(arg_name: I64, arg2_name: F64 = 10.0))]
struct MyClass {
    #[export_range(1, 10, 2, "or_greater")]
    my_range: i32,
}
Projects: Applications
This page lists non-game applications developed with godot-rust. Libraries should be listed in Tools. Examples here include:
- Tech demos
- User interfaces
- Data visualization