Dev tools and testing
The library comes with a handful of tools and tricks to ease development. This page goes into different aspects of the contributing experience.
Local development
The script check.sh in the project root can be used to mimic a minimal version of CI locally.
It's useful to run this before you commit, push or create a pull request:
./check.sh
At the time of writing, this will run formatting, clippy, unit tests and integration tests. More checks may be added in the future.
Run ./check.sh --help to see all available options.
If you like, you can set this as a pre-commit hook in your local clone of the repository:
ln -sf check.sh .git/hooks/pre-commit
API Docs
Besides published docs, API documentation can also be generated locally using ./check.sh doc.
Use dok instead of doc to open the page in the browser.
Unit tests
Because most of godot-rust interacts with the Godot engine, which is not available from the test executable, unit tests
(using cargo test and the #[test] attribute) are pretty limited in scope. They are primarily used for Rust-only logic.
Unit tests also include doctests, which are Rust code snippets embedded in the documentation.
As additional flags might be needed, the preferred way to run unit tests is through the check.sh script:
./check.sh test
Integration tests
The itest directory contains a suite of integration tests. It is split into two directories:
rust, containing the Rust code for the GDExtension library, and godot with the Godot project and GDScript tests.
Similar to #[test], the function annotated by #[itest] contains one integration test. There are multiple syntax variations:
#![allow(unused)]
fn main() {
// Use a Godot API and verify the results using assertions.
#[itest]
fn variant_nil() {
    let variant = Variant::nil();
    assert!(variant.is_nil());
}

// TestContext parameter gives access to a node in the scene tree.
#[itest]
fn do_sth_with_the_tree(ctx: &TestContext) {
    let tree: Gd<Node> = ctx.scene_tree.share();

    // If you don't need the scene, you can also construct free-standing nodes:
    let node: Gd<Node3D> = Node3D::new_alloc();
    // ...
    node.free(); // don't forget to free everything created by new_alloc().
}

// Skip a test that's not yet ready.
#[itest(skip)]
fn not_executed() {
    // ...
}

// Focus on a one or a few tests.
// As soon as there is at least one #[itest(focus)], only focused tests are run.
#[itest(focus)]
fn i_need_to_debug_this() {
    // ...
}
}
You can run the integration tests like this:
./check.sh itest
Just like when compiling the crate, the GODOT4_BIN environment variable can be used to supply the path and filename of your Godot executable.
Otherwise, a binary named godot4 in your PATH is used.
Formatting
rustfmt is used to format code. check.sh only warns about formatting issues, but does not fix them. To do that, run:
cargo fmt
Clippy
clippy is used for additional lint warnings not implemented in rustc. This, too, is best run through check.sh:
./check.sh clippy
Continuous Integration
If you want to have the full CI experience, you can experiment as much as you like on your own fork of the repository, before submitting a pull request.
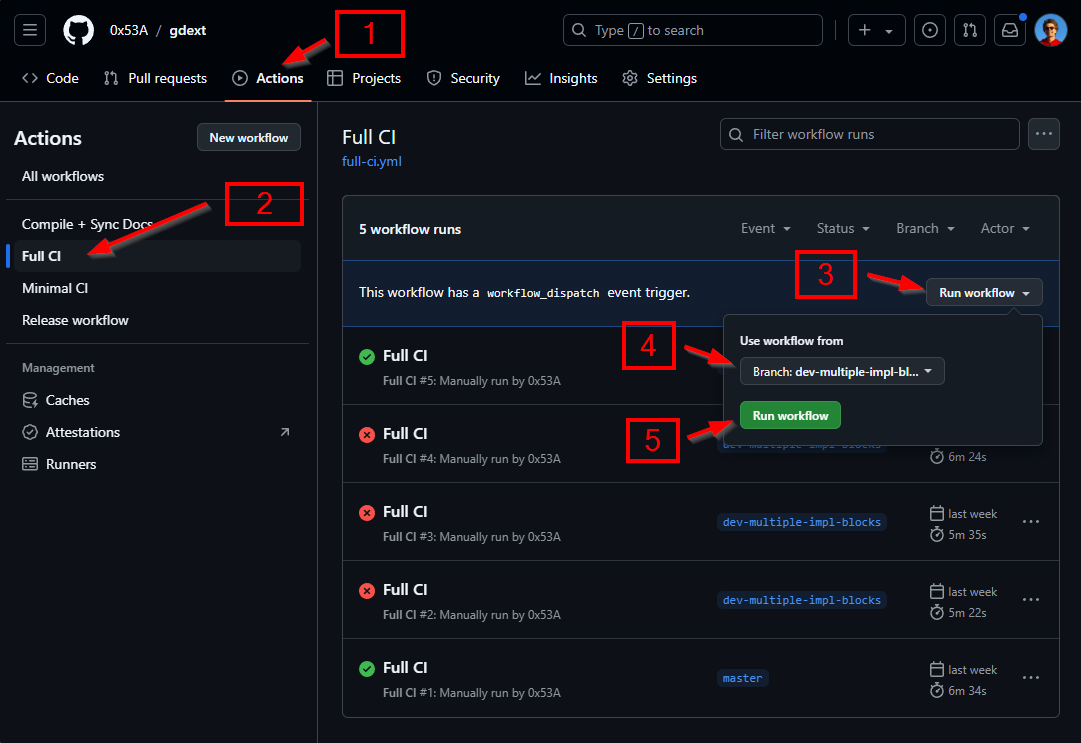
Manually trigger a CI run
For one-off CI runs you can manually trigger it by enabling Actions in the project settings of your fork,
then going to the Actions tab in the project, selecting the Full CI workflow,
clicking on Run Workflow and selecting the branch you're working on:
Trigger CI on push
If you're working on a bigger feature, you might not want to have to trigger CI manually every time.
For this, navigate to the file .github/workflows/full-ci.yml and change the following lines:
on:
  push:
    branches:
      - staging
      - trying
to:
on:
  push:
This runs the entire CI pipeline to run on every push. You can then see the results in the Actions tab in your repository.
Don't forget to undo this before opening a PR! You may want to keep it in a separate commit named "UNDO" or similar.
Build configurations
real type
Certain types in Godot use either a single or double-precision float internally, such as Vector2.
When working with these types, we use the real type instead of choosing either f32 or f64.
As a result, our code is portable between Godot binaries compiled with precision=single and precision=double.
To run the testing suite with double-precision enabled you may add --double to a check.sh invocation:
./check.sh --double