Export to Web
Web builds are a fair bit more difficult to get started with compared to native builds. This will be a complete guide on how to get things compiled. However, setting up a web server to host and share your game is considered out of scope of this guide, and is best explained elsewhere.
Web support in godot-rust is experimental and should be understood as such before proceeding.
Installation
Install a nightly build of rustc, the wasm32-unknown-emscripten target for rustc, and rust-src.
The reason why nightly rustc is required is the unstable flag to build std (-Zbuild-std).
Assuming that Rust was installed with rustup, this is quite simple.
rustup toolchain install nightly
rustup component add rust-src --toolchain nightly
rustup target add wasm32-unknown-emscripten --toolchain nightly
Next, install Emscripten. The simplest way to achieve this is to install emsdk from the git repo.
We recommend version 3.1.74 when targeting Godot 4.3 or later.1
git clone https://github.com/emscripten-core/emsdk.git
cd emsdk
./emsdk install 3.1.74
./emsdk activate 3.1.74

source ./emsdk_env.sh  # on Linux
run ./emsdk_env.bat    # on Windows
It would also be highly recommended to follow the instructions in the terminal to add emcc2 to your PATH.
If not, it is necessary to manually source the emsdk_env.sh file in every new terminal prior to compilation.
This is platform-specific.
Project Configuration
At the moment, you'll need to use api-custom to export to the web. In the future, we will provide a "prebuilt"
target (like Linux, macOS and Windows) directly for Wasm32. For now, see Custom Godot versions.
Enable the experimental-wasm feature on godot-rust in the Cargo.toml file.
It is also recommended to enable the lazy-function-tables feature to avoid long compile times with release builds
(this might be a bug and not necessary in the future). Edit the line to something like the following:
[dependencies.godot]
git = "https://github.com/godot-rust/gdext"
branch = "master"
features = ["api-custom", "experimental-wasm", "lazy-function-tables"]
Next, begin configuring the emcc flags and export targets as below. These initial settings will assume that your extension needs multi-threading
support, but that's usually not the case, so make sure to check the "Thread support" section below if you're
exporting to Godot 4.3 or later.
If you do not already have a .cargo/config.toml file, do the following:
- Create a
.cargodirectory at the same level as yourCargo.toml. - Inside that directory, create a
config.tomlfile.
Start by adding the following contents to that file:
[target.wasm32-unknown-emscripten]
rustflags = [
    "-C", "link-args=-pthread", # /!\ Read 'Thread support' below regarding this flag
    "-C", "target-feature=+atomics", # /!\ Read 'Thread support' below regarding this flag
    "-C", "link-args=-sSIDE_MODULE=2",
    "-C", "llvm-args=-enable-emscripten-cxx-exceptions=0",
    "-Z", "default-visibility=hidden",
    "-Z", "link-native-libraries=no",
    "-Z", "emscripten-wasm-eh=false",
]
A bit of background: The compiled Wasm binary is a side module which is dynamically loaded by Godot's main module at runtime. This is very similar to how dynamic libraries and executables work.
The default-visibility=hidden flag ensures that symbols of each side module are private to that module.
Without it, it's possible that global variables of multiple extensions are merged together, causing very confusing bugs.
This flag is essential when you have multiple Rust extensions loaded in the same Godot game.
If you need to selectively disable this flag (not recommended), you can remove it from the rustflags list in .cargo/config.toml or RUSTFLAGS.
See also this GitHub discussion for more information.
Edit the project's .gdextension file to include support for web exports.
This file will probably be at godot/{YourCrate}.gdextension.
The format will be similar to the following:
[libraries]
...
web.debug.wasm32 = "res://../rust/target/wasm32-unknown-emscripten/debug/{YourCrate}.wasm"
web.release.wasm32 = "res://../rust/target/wasm32-unknown-emscripten/release/{YourCrate}.wasm"
Compile the Project
Verify emcc is in the PATH. This can be as simple as doing the following:
emcc --version
Now, try to compile your code. It is necessary to both use the nightly compiler and specify to build std3, along with specifying the Emscripten target.
cargo +nightly build -Zbuild-std --target wasm32-unknown-emscripten
Note that you may have to use a different build command in order to let the extension work in single-threaded web export in Godot 4.3+ (see the "Thread support" section below for more information).
Thread support (Godot 4.3 or later)
The following section assumes your extension targets Godot 4.3 or later. If your extension will only target Godot 4.2 or 4.1, you may keep the initial configuration from Project Configuration without any changes.
In addition, this section's instructions require godot-rust 0.3 or later.
The above settings assume that multi-threading support is always needed for your extension. However, starting with Godot 4.3, when the end user exports a game to the web, Godot includes an option to disable Thread Support in the web export menu (see the image in the "Godot editor setup" section), with the goal of having the exported game run in more environments, including older browsers, as well as webservers without Cross-Origin Isolation support.
With the proposed initial configuration from "Project configuration", if the end user disabled Thread Support, your extension would break. If you'd like your extension to support builds without multi-threading as well to avoid this problem, you will need to update your build setup in one of the two following ways.
Ensure you're using recommended versions of Emscripten and nightly Rust (at least Rust 1.85 is recommended).
This is because earlier versions of Emscripten expected link-args=-sUSE_PTHREADS=1 instead of link-args=-pthread, but this flag has
been deprecated.
In addition, earlier Rust versions required additional +bulk-memory,+mutable-globals target features, but they appear to not be needed anymore.
Building without multi-threading support
In this scenario, you'd like to build your extension without any multi-threading support, that is, to have your extension only work when Thread Support is disabled.
To do that, you must remove the lines with the -pthread and target-feature=+atomics flags from .cargo/config.toml,
as well as enable the experimental-wasm-nothreads feature in Cargo.toml.
The remaining configuration and build command do not require further changes.
This setup, by itself, isn't very common. We recommend following the instructions below to accept both multi-threaded and single-threaded exports for your extension.
Building both with and without multi-threading support
This is the recommended approach and allows your extension to work in both multi-threaded and single-threaded exports.
For that to happen, your extension will need to have two separate builds, one for each mode (with and without multi-threading).
Afterwards, Godot will automatically pick the correct build depending on whether the user chooses to enable or disable Thread Support when exporting to the web.
Here's how this can be done:
-
Remove
"-C", "link-args=-pthread"and"-C", "target-feature=+atomics"from.cargo/config.tomlso that you may conditionally enable them afterwards, resulting in the following updated.cargo/config.tomlfile:[target.wasm32-unknown-emscripten] rustflags = [ "-C", "link-args=-sSIDE_MODULE=2", "-C", "llvm-args=-enable-emscripten-cxx-exceptions=0", "-Z", "default-visibility=hidden", "-Z", "link-native-libraries=no", "-Z", "emscripten-wasm-eh=false", ] -
Create a feature for your main crate which enables
experimental-wasm-nothreadswhen used. You can do this by creating a[features]section in your crate'sCargo.tomlas follows:[features] nothreads = ["godot/experimental-wasm-nothreads"]This feature should be enabled on any crates depending on the
godotcrate, so if you have more than one crate in your workspace, you should add the same[features]section above to each other crate, and then enable each crate'snothreadsfeature from the main crate (which provides the extension's entrypoint).For example, if you have a workspace with one main crate called
extensionand two other crates calledlib1andlib2, each depending ongodot, then you may add the[features]section above tocrates/lib1/Cargo.tomlandcrates/lib2/Cargo.toml, and then add the following tocrates/extension/Cargo.toml:[features] # Ensure that enabling `nothreads` for the main crate also enables # that feature for other crates. nothreads = [ "lib1/nothreads", "lib2/nothreads", "godot/experimental-wasm-nothreads" ] -
Edit your
.gdextensionfile to list two separate Wasm binary paths - one for the threaded build with the.threads.wasmsuffix and one for thenothreadsbuild without a different suffix, as follows:[libraries] ... web.debug.threads.wasm32 = "res://../rust/target/wasm32-unknown-emscripten/debug/{YourCrate}.threads.wasm" web.release.threads.wasm32 = "res://../rust/target/wasm32-unknown-emscripten/release/{YourCrate}.threads.wasm" web.debug.wasm32 = "res://../rust/target/wasm32-unknown-emscripten/debug/{YourCrate}.wasm" web.release.wasm32 = "res://../rust/target/wasm32-unknown-emscripten/release/{YourCrate}.wasm" -
Have two separate build commands, executed in the following order:
-
Building with multi-threading support: you must add the
-pthreadandtarget-feature=+atomicsflags back manually through theRUSTFLAGSenvironment variable, but NOT enable thenothreadsfeature yet.Specifying `RUSTFLAGS` will cause flags in `.cargo/config.toml` to be ignored, so all flags in it must be specified again.Afterwards, you should rename the generated Wasm binary, such that it can be picked up by the modified
.gdextensionfile as a threaded build:RUSTFLAGS="-C link-args=-pthread \ -C target-feature=+atomics \ -C link-args=-sSIDE_MODULE=2 \ -C llvm-args=-enable-emscripten-cxx-exceptions=0 \ -Z default-visibility=hidden \ -Z link-native-libraries=no \ -Z emscripten-wasm-eh=false" cargo +nightly build -Zbuild-std --target wasm32-unknown-emscripten mv target/wasm32-unknown-emscripten/debug/{YourCrate}.wasm target/wasm32-unknown-emscripten/debug/{YourCrate}.threads.wasm # On Batch (Windows), use instead: REN target\wasm32-unknown-emscripten\debug\{YourCrate}.wasm {YourCrate}.threads.wasmFor a release mode build, you'd replace
debugwithreleasein the last command. -
Building without multi-threading support: build without the
-pthreadortarget-feature=+atomicsflags, but this time enabling yournothreadsfeature created in the second step.No further renaming is needed, but make sure the previous build's resulting binary was renamed to avoid accidentally overwriting it.
The build command for this step will then look as follows:
cargo +nightly build --features nothreads -Zbuild-std --target wasm32-unknown-emscripten
-
-
Optionally, if you'd like to disable certain functionality in your extension for
nothreadsbuilds (e.g. disable a certain multi-threaded function call), you can use#[cfg(feature = "nothreads")]and its variants to conditionally compile certain code under single-threaded builds, thanks to thenothreadsfeature created in step 2. For example:fn maybe_threaded_function() { #[cfg(feature = "nothreads")] { /* single-threaded code */ } #[cfg(not(feature = "nothreads"))] { std::thread::spawn(|| { /* multi-threaded code */ }).join().unwrap(); } }
If your extension is meant to be distributed to other users beside you, the developer, don't forget to ship BOTH binaries (with and without multi-threading support) to your end users.
With those steps, you may successfully compile your extension with and without multi-threading support, and let you and your end users choose either option when exporting games to the web.
To not have to remember the multiple build commands, it is advised to add them to a single shell script file
called build.sh which invokes both builds in order (including the binary file renaming before the second build and any other steps), or store them
in a Justfile (useful if you need to build from Windows), Makefile or similar.
Godot editor setup
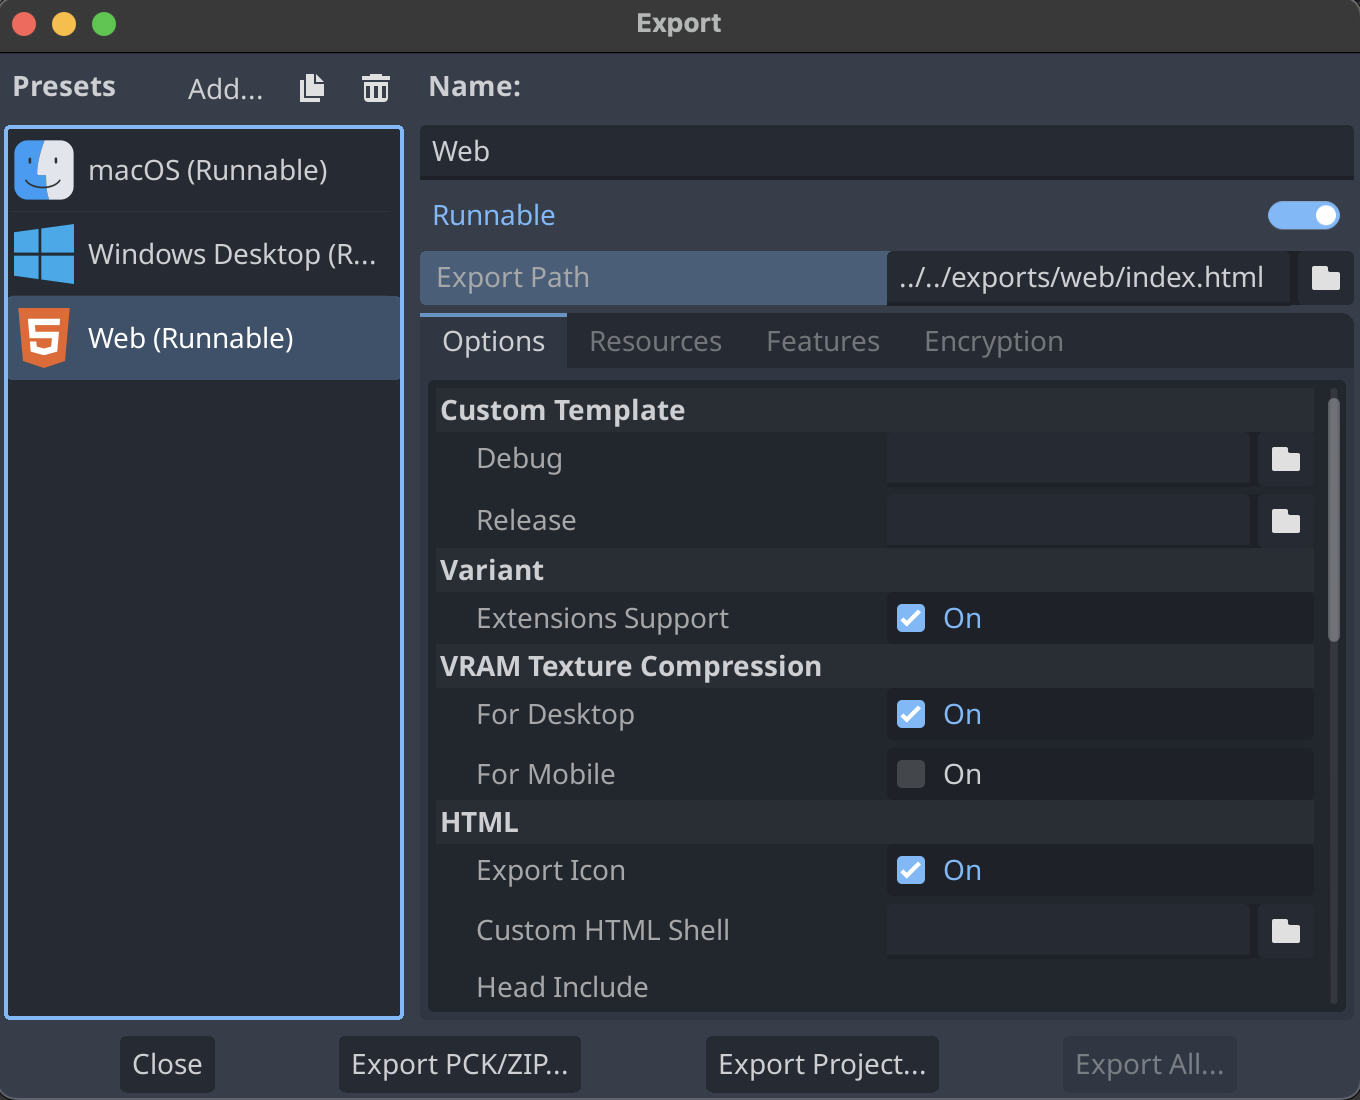
To export your godot-rust game to the web, add a web export in the Godot Editor. It can be configured at Project > Export... in the top menu bar.
Make sure to turn on the Extensions Support checkbox.
In Godot 4.3 or above, you should also make sure to turn on the Thread Support checkbox, unless your extension has a nothreads build,
which can be made by following the steps in the "Thread Support" section.
If the error below appears in red at the bottom of the export popup instead:
No export template found at expected path:
Then click on Manage Export Templates next to the error message, and then on the next screen select Download and Install. See Godot tutorial for further information.
Running the webserver
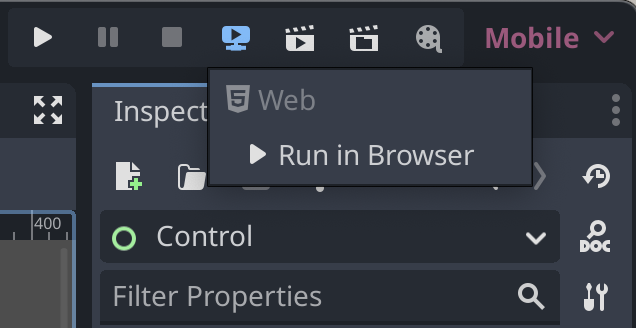
Back at the main editor screen, there is an option to run the web debug build (not a release build) locally without needing to run an export or manually set up a web server.
At the top right, choose Remote Debug > Run in Browser. Afterwards, Godot will automatically open up a web browser running your game.
- Godot 4.1.3+ or 4.2+ is necessary.
- GDExtension support for Firefox requires Godot 4.3+, and can be more limited compared to Chromium-based browsers (such as Google Chrome, Microsoft Edge or Brave).
If you face problems when testing with Firefox, you may need to copy the URL of the server created by the editor, which is usually
http://localhost:8060/tmp_js_export.html, and open it in a Chromium-based browser such as Google Chrome, Microsoft Edge or Brave to verify
whether it's a problem with your game or with Firefox.
Troubleshooting
-
Make sure Extensions Support is turned on when exporting.
-
Make sure you are using the recommended compiler flags.
-
When using Godot 4.3+, Thread Support has to be turned on during export unless your extension supports a
nothreadsbuild, as described in the "Thread Support" section. -
If the game was exported with Thread Support enabled (or targeting Godot 4.1 or 4.2), make sure the webserver you use to host your game supports Cross-Origin Isolation. Web games hosted on itch.io, for example, should already support this out of the box.
To test it locally, you can either use the Godot editor's built-in web game runner (shown in "Running the webserver"), or a third-party HTTP server program. For example, if you have
npmandnpxinstalled, you may usenpx serve --corsto quickly host your web game locally with Cross-Origin Isolation support, enabling multi-threading.- Note that Godot 4.3 games exported to the web without Thread Support are not subject to this restriction, making them compatible with more environments, which is the main advantage of disabling that option. You may even have success in running those games by simply double-clicking the generated HTML file. The main caveat is that they may only run single-threaded.
-
Make sure your Rust library and Godot project are named differently (for example,
cool-game-extensionandcool-game), as otherwise your extension's.wasmfile may be overwritten, leading to confusing runtime errors. -
Try using exactly the recommended
emccversion in the guide.
Understanding common errors
-
RuntimeError: Aborted(undefined). Build with -sASSERTIONS for more info.The game aborted unexpectedly. This likely means some Rust code called
panic!()or unsuccessfulassert!(condition).Unfortunately, godot-rust cannot catch panics in Wasm yet due to limitations in the Rust compiler, so your game will abort.
Please fix any panics indicated in the browser console, perhaps using debugging tools. The suggested
-sASSERTIONSflag will likely not help at all.Some common panic causes include:
- Attempting to call certain multi-threaded code in a
nothreadsbuild, such asstd::thread::spawn(...); - Using panicking variants of methods, such as
Array::atinstead ofArray::get; - Calling
.unwrap()onOption::NoneorResult::Err.
- Attempting to call certain multi-threaded code in a
-
TypeError: resolved is not a functionThis likely indicates you specified the
-sASSERTIONSemscripten flag, which is not entirely supported at the moment. Try removing it. -
Wasm module '{YourCrate}.wasm' not found. Check the console for more information.This indicates the extension's Wasm binary filename is using a name that godot-rust doesn't expect.
By default, on game startup (only on the Wasm target), godot-rust will look for binaries named
{YourCrate}.wasmor{YourCrate}.threads.wasm. If your GDExtension is using a different Wasm filename, please either rename it to one of those names, or tell godot-rust the name of the Wasm binary you are using as below. Don't forget to update the binary name in your.gdextensionfile to match.// lib.rs of your main crate: struct MyExtension; #[gdextension] unsafe impl ExtensionLibrary for MyExtension { fn override_wasm_binary() -> Option<&'static str> { // Explicitly use a custom name for our Wasm binary. Some("some-different-name.wasm") } }In addition, please note that godot-rust 0.3 or later is required to fix this error.
-
LinkError: WebAssembly.instantiate(): Import #6 "env" "__cpp_exception": tag import requires a WebAssembly.TagThis is caused by Rust's WASM exception handling system, used for panics, which was enabled by default for Emscripten targets in
rustcv1.93.0 (see the relevant PR). It unfortunately seems to be incompatible with Godot.To fix, disable the feature by adding
-Z emscripten-wasm-eh=falsetoRUSTFLAGSor to.cargo/config.tomlas suggested in the previous steps (copying the suggested list of flags should be enough). This requires using a nightly compiler.Further discussion can be found at godot-rust issue #1119.
Customizing emcc flags
If you keep running into unknown errors and none of the solutions above worked, first and foremost consider letting us know by opening an issue, especially if you're using a newer Godot version, as it's possible some new information is missing from this documentation.
Make sure to also check or comment on the WebAssembly thread on GitHub, as new information is continually added to that thread over time.
Besides that, it's possible that you may have to enable additional emcc flags during compilation for your extension to work properly,
which are specified at build time as -C link-args=-FLAG_HERE either in the RUSTFLAGS environment variable
or in the .cargo/config.toml file (note that using RUSTFLAGS causes all flags in .cargo/config.toml to be ignored).
If that's the case, you may check out the Emscripten documentation
for a list of some of the accepted flags. For example, -C link-args=-g enables linking back to Rust code while debugging.
This additional list also contains useful emcc flags which may be specified
only with the -s prefix.
If you found a set of flags that worked for your case, please share it in the WebAssembly GitHub thread to help others in a similar situation.
Debugging
Currently, the only option for Wasm debugging is the "C/C++ DevTools Support" extension for Chrome. It adds support for breakpoints and a memory viewer into the F12 menu.
If Rust source code doesn't appear in the browser's debug panel, you should compile your extension in debug mode and add -g to linker flags.
For example, in a multi-threaded build:
RUSTFLAGS="-C link-args=-g \
-C link-args=-pthread \
-C target-feature=+atomics \
-C link-args=-sSIDE_MODULE=2 \
-C llvm-args=-enable-emscripten-cxx-exceptions=0 \
-Z default-visibility=hidden \
-Z link-native-libraries=no \
-Z emscripten-wasm-eh=false" cargo +nightly build -Zbuild-std --target wasm32-unknown-emscripten
Footnotes
Note: Due to a bug with emscripten, web export templates for Godot 4.2 and earlier versions could only be compiled with
emcc versions up to 3.1.39. If you're targeting those older Godot versions, it could be safer to use emcc version 3.1.39
to compile your extension as well, but newer emcc versions might still work regardless
(just make sure to test your extension in all targeted Godot versions).
emcc is the name of Emscripten's compiler.
The primary reason for this is it is necessary to compile with -pthread and -Ctarget-feature=+atomics enabled for multi-threaded builds.
The shipped std does not, and may also build with other flags we don't use, so building std is a requirement.
Related info on about WASM support can be found here.